Canon Canon Reflex Camera Operating Rules
A camera is a rather complicated device that requires certain knowledge of operation. Those who have previously used any camera, it will be much easier to master the new technology. But people who hold the device in their hands for the first time, may face a number of difficulties. Below will be described in detail how to use a Canon reflex camera from the moment it is first turned on and before connecting additional accessories.
Content
Device assembly
Any SLR camera is in original packaging. disassembled. Speaking exactly, the carcass, lens and battery are separate. First of all, remove the protective cover from the lens and the camera itself. After that, the lens is put on the device. To do this, on the lens you need to find a white dot and align it with the white dot on the carcass. After that, the lens rotates clockwise until it clicks.
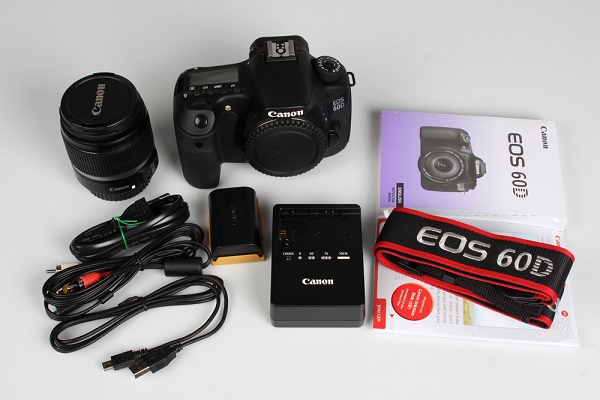
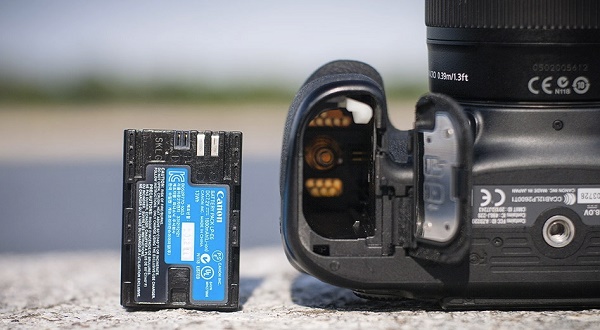
Second phase - battery installation. This is also quite easy to do. The battery compartment is located on the bottom of the camera and opens with a special latch. It is necessary to pull it down, and the cover of the compartment will open. The battery is placed in the camera side with contacts. In general, it is impossible to confuse here, as the other side, it simply does not fit.
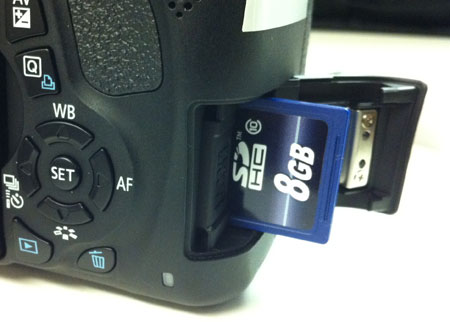
The slot for the memory card is often hidden under the battery compartment cover, but for some models it can be located on the right side. A memory card is inserted with the side of the contacts also forward.
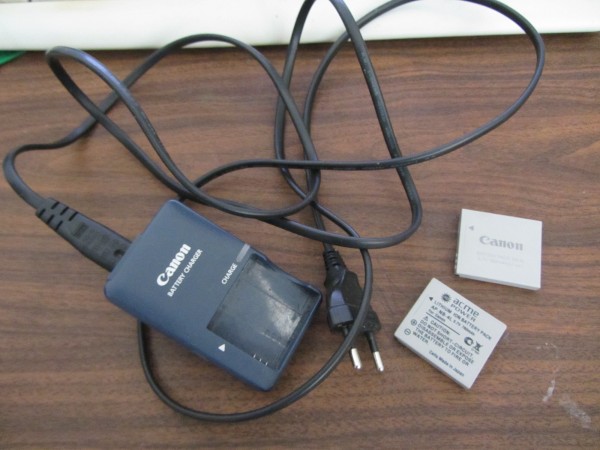
Most often, the camera in the box will be discharged, or the battery will have a small percentage of charge. Before starting operation, it is best to fully charge it so that it does not sit down during the first setting. In most cases, charging is done not by connecting the entire device to the network, but by using a separate battery charger. The battery should be removed and inserted into the charger. In the process, a red light will be on, which will turn green after charging. In rare models available charging function via USB cable. Modern batteries do not require charging and plant them completely. Have them no memory effect, as it was in the old types of batteries, so the battery is not afraid of partial charging and discharging.
First start
After the battery is charged and dressed lens, it's time to turn on the camera. Before you begin using it, you will need an initial setup, during which you set the date, time zone, language, and other system parameters.In fact, the initial setup of the Canon camera does not require special knowledge or additional instructions. The device displays information on the display, and the user simply needs to act according to the proposed actions.
After the first start is complete, the camera will in most cases ask format memory card. If the card is new, then such a need will appear exactly. This can be done in three ways:
- using a laptop or computer;
- with the direct request of the camera;
- through the settings.
The first option is to consider in detail there is no sense, since it is not the best. The fact is that any equipment formats the media for themselves, and sometimes it happens that a memory card formatted in a laptop cannot be read by a camera. For this reason, it is best done using the technique in which the card will be used.
In that case, when the card is new, and the camera does not understand how to work with it, it will simply write on the display that it is necessary to format the carrier, and will offer to do it right now. In this case, the user just needs to agree.
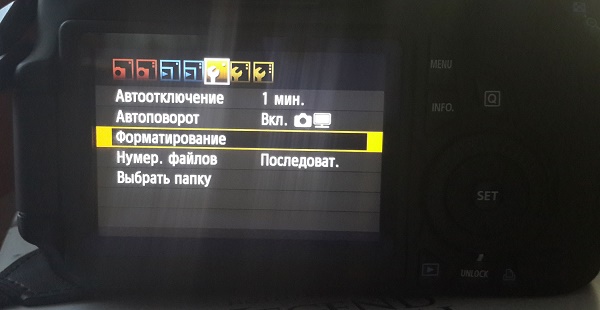
If the card was used previously or it just needs to be cleaned, then formatting can be done using special option in settings. To do this, on the device itself, press the "Menu" button, then select the item with the drawn key. In this menu item, you can change all system settings, for example, set the date again, and also format the memory card.
Camera Modes
Any camera, regardless of class, has different shooting modes. Some of them are automatic, and the second half will require adjusting one or another parameter for specific shooting conditions.

All modes of the Canon camera can be seen on scroll wheel - it is located on top. The choice of modes is carried out by its rotation. The white short line indicates which mode is selected, respectively, to select another, you need to scroll the wheel to the desired option. The number of modes may vary depending on the model.At the same time, they can decrease or increase only due to automatic shooting programs. Semi-automatic modes are unchanged - they are always four.
TO automatic modes include macro (flower on the wheel), sports mode (running man), portrait shooting (man's face), automatic (green empty rectangle) and others. In these modes, the user is only required to point the camera at the object and after focusing, which is also carried out automatically, press the shutter button.
Semi-automatic modes marked with the letters M, Av, Tv, P. When working with them, the photographer will need a certain knowledge and understanding of working with the aperture and shutter speed. However, the pictures here will be more interesting.
P mode
P or program mode does not differ globally from automation, but allows the user to adjust the aperture to a limited extent. Also here it is possible to adjust the white balance.
Most experienced photographers believe that the program mode is completely useless. The manufacturer notes that it will help novice users to move from automation to manual settings.
Av mode
Av - aperture priority. In this case, the user himself sets the aperture size to experiment with the amount of transmitted light and the final image. Based on the size of the aperture, the camera itself selects the exposure time and takes a picture. With this mode you can affect the depth of field.
With this mode, you can adjust the sharpness and make a blurred background. To make the objects in the photo clearer, you need to set a smaller aperture value, if you need to blur the background and focus on the main objects, then a large value is selected for exposure.
It should be understood that the setting of the aperture depends on the lens that is connected to the camera. That is why when changing optics you need to choose not only the lens, but also set new shooting parameters for it. Another nuance - on the same camera the same lens may require new settings.
Tv mode
Tv - shutter priority. In this mode, the user selects the time that the aperture will transmit light, respectively, the size of the aperture is automatically selected. Using this function is indispensable when shooting sporting events or moving objects. Also, a different exposure time can give interesting effects, for example, a photo with a wiring. Mode will appeal to those who like to photograph any movement, regardless of whether it is a person, an animal or a natural phenomenon.
M mode
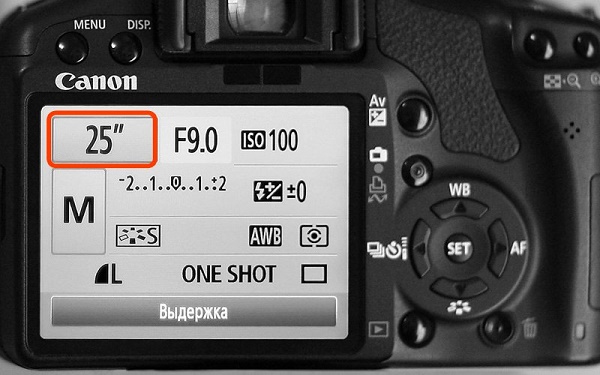
M - manual mode. With it, the user gets access to the simultaneous adjustment of aperture and shutter speed. Suitable for those who know exactly what they are doing and what they want to achieve. The mode is especially good at night when the camera does not understand the aperture and shutter speed due to darkness. The user can choose the parameters that he needs. In this mode, most professionals work. Beginners to the user simply can not figure out how this or that parameter affects the photo.
System settings
Canon cameras have a wide range of settings. This may relate directly to the shooting process, as well as the camera settings, for example, the format in which the picture will be saved, its size, etc. In the system settings, you can set a timer, synchronize the flash or format the memory card.
Photo quality and size
To set specific photo settings, you need to press the “menu” button and select an item with a drawn camera. This is where all the settings associated with the photo are available.
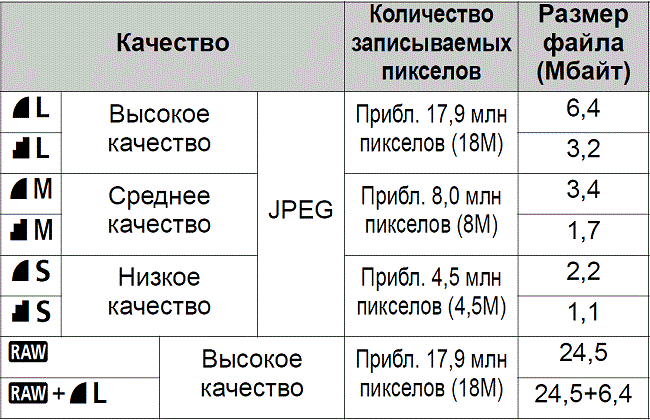
Depending on the model, the point where you can choose the quality of the photo will be called differently. Most often, the name speaks for itself: "quality." In the Canon camera, options are labeled L, M, S1, S2, S3, RAW and RAW + L. All letter options (L, M, S) are saved jpeg and among themselves imply a deterioration in quality from L to S3. Not only the quality of the photo changes, but also its size, as well as how much it occupies on the memory card. It is obvious that in this case it is best to choose option L.
RAW and RAW + L formats - This is the maximum quality of the photo and its size. Pictures are saved in RAW and take up a lot of space. Photos in this format resemble an electronic negative that carries information about the photo, but not the image itself. Pictures in this format require mandatory processing on a PC.
The advantage of the format is that in it you can get more flexible options for processing the image in a professional editor on the computer. Minus - take up a lot of space and do not open without a special program.
Focusing image
Focusing the image in the camera can be manual or automatic. In the first case, the user does everything himself with the power of rotating rings on the lens. In the second case, the automation works. To switch from one object to another, press the switch on the AF-MF lens. AF mode, in turn, is divided into two options.
- AF-S - frame focusing. Its meaning is that the camera focuses on the selected object by lightly pressing the shutter button. It is best suited for shooting fixed objects. To adjust the focus to a new object, you must release the button and re-point the camera to the subject.
- AF-C - continuous focus. Its meaning is that when you press the button, the camera continues to monitor the object, even if it moves. Obviously, it is more convenient to use this type of autofocus when shooting sports events.
An important moment - focus point selection. Modern cameras offer from 9 to 50 points. At the same time there is a main object on which the focus is carried out, the remaining points are focused on other subjects. When the photographer looks in the viewfinder, he sees several points, the active one is highlighted in red.To make the focus point active, which is aligned with the object, you need to use the small wheel on the camera or the navigation buttons. At first glance it may seem that it is much easier to shift the camera and thus align the dots. But there is a nuance: when you change the position of the camera, the exposure changes, that is, the whole idea can be spoiled. Using the navigation keys, the user can take several pictures of one object, but at the same time focus on a new point each time.
Work with shutter speed
Camera shutter speed is a parameter that is measured in seconds, or rather fractions of a second. The physical meaning of the exposure is that it is the time for which the light passes through the aperture and hits the matrix. Obviously, the more time the light hits the matrix, the brighter the picture will be. This is important when shooting in low light conditions, but there is also a downside. A large amount of light can take a picture of the illuminated and give a blur in the frame. To get the blur effect, you should set the shutter speed longer, if sharpness is required, then the time is set to the minimum. You can adjust the shutter speed in manual mode or shutter priority.
What is white balance?
White balance is the correctness of the colors displayed in the image. As you know, the color spectrum may have cooler or warmer values.
An example is a photograph of a person. With a normal white balance, face skin will be natural. If the spectrum rolls to heat, then the skin will turn yellow, if to the cold part, then all the photos will give a blue.
Obviously, depending on the lighting, the spectrum may change, and the photo will have unnatural colors. The sun's rays or incandescent lamp have warm colors, but the fluorescent lamp makes the image "cold." And it is in such situations that white balance adjustment is required.
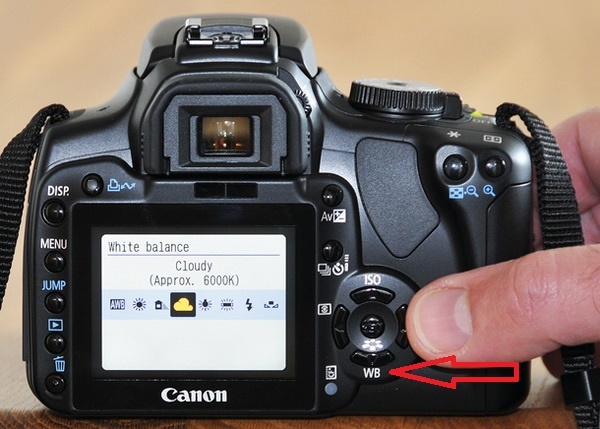
All Canon cameras have special WB buttonwhich opens the white balance setting menu. Here there is an option to choose already preset modes, which are indicated by schematic drawings. For example, the sun means the best setting for outdoor shooting during the daytime. Similarly, auto-tuning is chosen for other situations.
However, the camera makes it possible not only to use the preset options, but also adjust by yourself. This process is similar to the use of filters and will not suit fans. To do this, press the “menu” button, select the item with the drawn camera and find the line “Shift BB” there. Next, the correction screen opens on the display, which is divided into four parts by two straight lines. Each of them is designated by letters:
- A - amber,
- M - purple
- G - green color.
Shifting the cursor (displayed on the screen as a black square) leads to an increase in one of these colors or a combination of them.
How to set the date on the photo
Sometimes there are situations when it is required that the photograph displays the date and time of the image. In modern SLR cameras, such a function no longer exists, since, in general, the date spoils the photo, and if necessary, it can be placed on the photo when printing pictures. The print program extracts the date and time from the photo information and places it in a corner. In more simple devices, for example, compact cameras, this function is. You can set the date in photo settings menu. You should find the item "Display the date and time on the photo." In this case, the user can preset the format of the date and time.
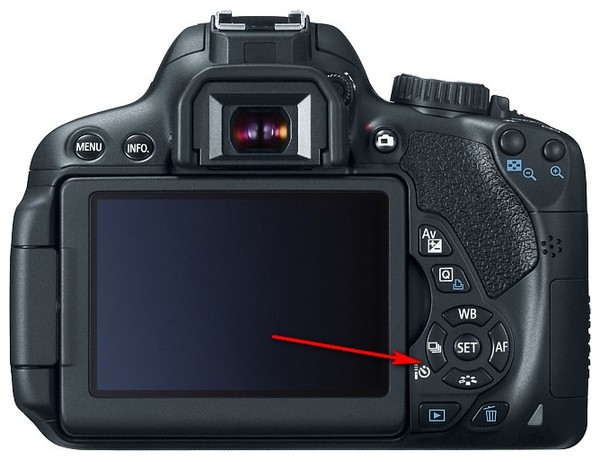
Photos with a timer
Making a selfie on a SLR camera is quite difficult. For this, manufacturers have provided a timer, which is set for a few seconds and takes a picture after this time. To use the camera function, you must first reliably set, ideally on a tripod, select the exposure, check that everything is in the frame, and then select the timer and response time using a special button on the case. Button marked with a clock. Due to the fact that the device beeps after every second, you can know for sure how long the shutter will work and have time to take your place.
Flash use
There are two types of camera flashes - built-in and external. The first is built directly into the carcass of the camera and opens if necessary. In automatic mode, the process is controlled by the camera itself, in manual mode, you can turn on the flash using a special button (lightning), which is usually located next to the flash itself.
How flash works
The main point you should know about how a flash works is its power.. It is obvious that it cannot shine with the same power, since the level of illumination may be different. For this reason, the flash works in three stages:
- determination of the level of illumination;
- frame exposure;
- snapshot.
In other words, the flash fires very quickly three times in a row. In this case, the picture is taken on the third flash, and about 10% of people have a high sensitivity to light and notice the first two flashes. Thus, in the photo such people are obtained with closed or half-closed eyes. The process of defining and exposing is called TTL. Professional photographers know that TTL can be turned off, and then the power must be selected manually. It is quite difficult, but more convenient, and in this case, you can choose the optimal flash power.
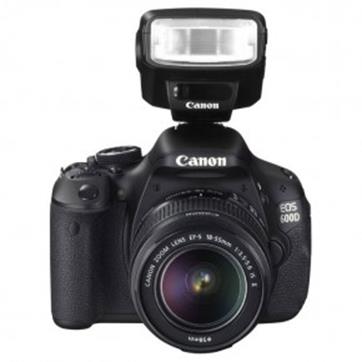
Features external flash
External flash has several advantages before built.
- It is more powerful, it can be angled or at the top, which makes lighting and shadows more natural.
- Another advantage is the range. A standard flash can illuminate an object within 4-5 meters in front of it.
- External flash provides more flexible lighting settings.
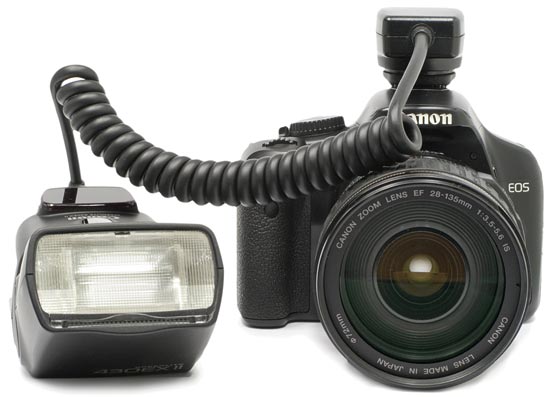
There are two options for external flash - wireless and wired. The second option is connected directly to the camera through a special connector for connection. It looks like a metal socket on the top of the camera. Often it is closed with a plastic cap. You can connect the flash using a special cable that allows you to slightly remove the flash from the camera. The cable length from Canon is 60 cm. The wireless version is the most convenient, since the cords do not interfere with the photographer. In this case, a special transmitter is inserted into the flash slot, which sends a signal to the flash that it needs to be triggered. This transmitter has all the power control buttons.
What is sync?
Currently, flash sync has lost its relevance, since the whole process is automatic. The user’s task is simple make an external flash dependent on the principal. Before you connect an external flash to a Canon camera, the user needs to set the “main” flash in his camera tinctures. To do this, hold the “zoom” button for a few seconds, then use the scroll wheel to select “master” and confirm the selection by pressing the center button. On the flash, you need to similarly select "slave". Now she obeys the main one and reacts to her impulses.
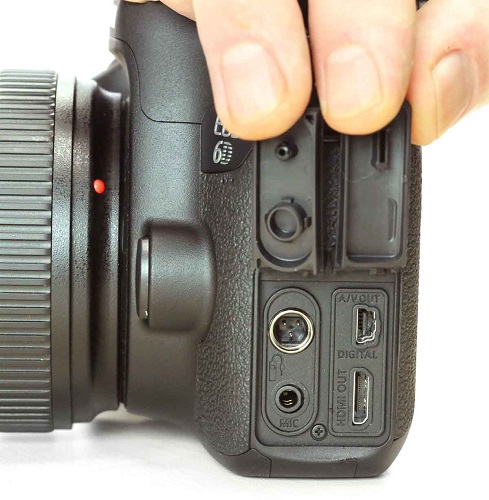
Microphone connection
For professional shooting on a holiday video, an external microphone is required. Most modern SLR cameras have a whole set of necessary connectors. There is an audio-video output, microphone jack, mini-HDM and others. Accordingly, you can connect the microphone to the Canon camera through connector labeled "mic". All settings in the camera are reduced only to choosing which version of the sound to be written in - mono or stereo. This item is located in the settings menu in the video section.
How to check the mileage of the camera
Camera mileage is the number of shutter actuations, which in turn makes it clear the degree of deterioration of the device.
For budget devices, the normal parameter is 15 thousand frames, then at any time you can wait for a breakdown, although this does not mean that it will happen 100% of the time. In models of the expensive and middle segment, this parameter reaches 150 and even 200 thousand.
For a long time, it was only possible to find out the mileage of the Canon parse the carcass. Obviously, the method is not the easiest and most dangerous, because it is easy to disassemble, but to do as it was - not very. Currently, there are more simple ways to see the mileage, namely to use computer programs.
Information about the mileage can be seen either sewn into the photo, or directly in the carcass of the device. It should be noted right away that Canon prefers not to embed such information in photos. There are a limited number of models that sew data into a camera. Thus, only checking the device itself will help. The best options currently are EOSMSG and EOSInfo programs. The programs are distributed free of charge and to use them you just need to install them on your PC. After that, the Canon camera is connected using a USB cable. In some cases, the laptop may not see the camera, then you will need to install drivers or a special program that, in addition to the connection, provides control of the Canon camera from the computer. After connecting the camera to the PC and launching the program, in the opened window, you need to find the ShutterCount (ShutCount) item, which shows the number of shutter releases.
Some cameras do not have the ability to check this option at home. In this case, the best solution would be call service centerso that the diagnostic shows the status of the device. It is worth doing so if you plan to purchase the camera from your hands, but there is no information about its previous operation. The service center will be able to give an answer as to how well the camera is preserved, and how long it will be able to serve.
The main malfunctions and their prevention in Canon cameras
SLR cameras are fragile devices that can fail for a variety of reasons.To avoid breakage, you need to carefully treat the camera and optics, use a protective case, clean the surface of the lens, as well as separate storage of optics and carcass to close the junction points with a special cover.
- Moisture. Moisture is a very dangerous substance for a camera. The device does not need to be exposed to rain or get wet in order to deteriorate. His long stay in a wet room can lead to oxidation of internal parts and breakage. If you fear that something similar has happened, you should put the device in a warm and dry place, and then take it to the workshop.
- Mechanical damage. Shocks and falls do not contribute to the normal operation of the SLR camera. The most fragile elements in it are a mirror that can easily break, as well as a lens in which the focusing system can fail. If the camera cannot focus, a lens breakdown occurred as a result of the impact. In this case, the repair is best to carry the entire device.
- Dust particles. Frequent malfunctions of the Canon camera are associated with sand and dust entering the camera.This can lead to complete breakdown, but much more often to extraneous noise while the lens is working (focusing) or blocking it. In this case, only cleaning the camera will help, and the best solution would be to contact a professional service center.
- Thermal failure. Any camera has a range of operating temperatures. At their non-observance the device can quite fail due to combustion of this or that mechanism. It’s impossible to solve this problem on your own.
- The device gives errors. The inscription “busy” may appear when using a memory card with a low speed, in case the external flash does not have time to charge from the carcass. In general, this inscription can be translated as "busy": the camera hints that some process is not yet complete, and you need to wait a bit. If the camera does not see the memory card or refuses to save data on it, you should format it or see if there is a lock on the card.
Extend the life of the camera is very simple. First of all it is necessary purchase a case which will protect the device from shocks and falls.
If the camera is not used for a long time, then it is better to remove the battery and periodically discharge and recharge it. The camera should be stored in a warm and dry place, and avoid contact with dust or sand. To clean the device, you need to use only special kits that allow you to gently remove dust and debris from the lens and other equipment.

A SLR camera is a serious device that requires the same approach. You can not just buy a camera and start shooting. To understand how to use it, to understand the functions and settings, to extend the life, you do not need to rush to expensive courses. For a start, it’s quite enough to get acquainted with the instruction, where it’s detailed what and how you can do with the camera.
/rating_off.png)


