Common Error Codes on HP Printers
Modern printers and multifunction devices have a system that allows for self-diagnosis of all components of the device. If any hardware problems occur, the microprocessor sends a code signal to the user to detect a malfunction. Fault codes can be displayed on display devices (if it is provided by the design), or by alternating blinking of the LEDs on the control panel of the device. An error message with a code may appear and on PC screen. Despite its high reliability, printers and MFPs from HP (Hewlett-Packard) are also subject to malfunctions. The most common mistakes made by HP, according to users, are the following: printing error and errors with E8, E3 and 79 codes.
Content
HP printing fails
Often when you try to print a document, the user discovers that the process is blocked for an unknown reason. At the same time, all attempts to delete a job in the print queue, or to cancel it, turn out to be unsuccessful.
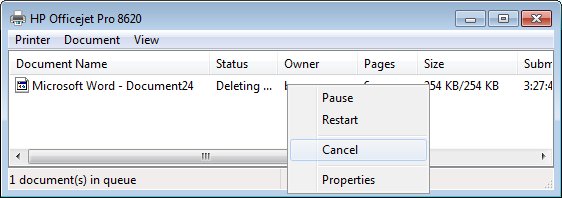
This failure may occur for a number of reasons, for example, from a sudden surge in the power supply network, but, in any case, you will have to fix the problem in the Print Manager program. This fact is explained by the fact that when a document is sent to a printout, a special file is created in the Windows system. For a number of reasons, this file may become damaged and cause a crash in which the printer does not print. Therefore, this file must be deleted as follows.
- Turn off the printer with the button and unplug the power cord from the power outlet.
- Save all work results so that they are not lost.
- Next, open the “windows service” by simultaneously pressing the windows + r keys.
- A window will open with an empty line in which you need to enter “services.msc” (without quotes) and click ok.
- In the window that appears, find the line "print spooler".
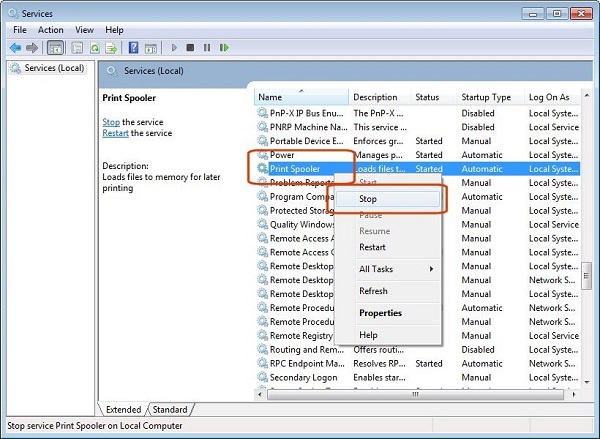
- Click on this line of RMB and select “Stop” in the pop-up menu.
- After stopping the service window can be closed.
- Next, go to: C: \ Windows \ System32 \ Spool \ PRINTERS. You can do this if you paste it into the address bar of Windows Explorer, and then press Enter on the keyboard.
- In the folder that opens, you must delete all the files that are in it.
- Turn off the computer.
- Before connecting the MFP (printer) to the mains, make sure that it has been in the disconnected state for at least 60 seconds.
- Power on the MFP (printer) using the power key.
- Turn on the computer and wait for the operating system to load.
- Send the document to print.
If the printing process went fine, then the setting is considered complete on this. If you still cannot print the document, you can solve the problem using free HP software. The program is called “HP Print and Scan Doctor” and it is used to solve problems arising from printing, as well as to diagnose equipment. Open the program window, select the automatic search for problems and their elimination. After the program finishes, try again to print the document.
In some cases, the following measures help to solve this problem.
- Reinstalling Printer Driver. But first you need to delete it: in the “Control Panel” find “Devices and Printers” and open the window. Right-click on the HP printer icon and select “Delete.” These actions will remove the driver that was installed in the system. After removal, you need to restart the PC. If you for any reason do not have drivers for this model of MFP (printer), then you can download them from the HP website.
- For a while disable firewall and try to print the document.
- Sign in with a different account (relevant in the case when the equipment was configured from another account).
How to fix e8 error
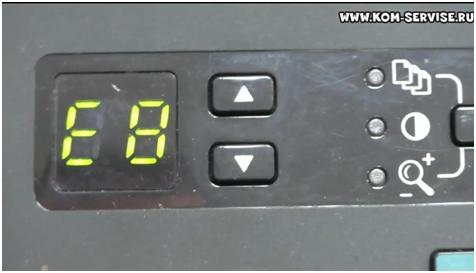
The service message with the code e8 is often found on the laserjet 1132 multifunction printer. It means that it originated problem with the scanner. The instruction to the device indicates that the malfunction with the code e8 is fatal, that is, not removable. But craftsmen have found several ways to eliminate this problem, which, in some cases, can return the scanner to work.
The most common case is when the scanner ruler stops in the extreme right position and does not move.. In this case, the error E8 appears on the display of the MFP.
In this case, the carriage just stuck.To fix this problem, you will have to remove the scanner glass and rearrange the ruler to the center of the device or closer to the left edge. To remove the glass, you need to unscrew the 6 bolts located along the perimeter.
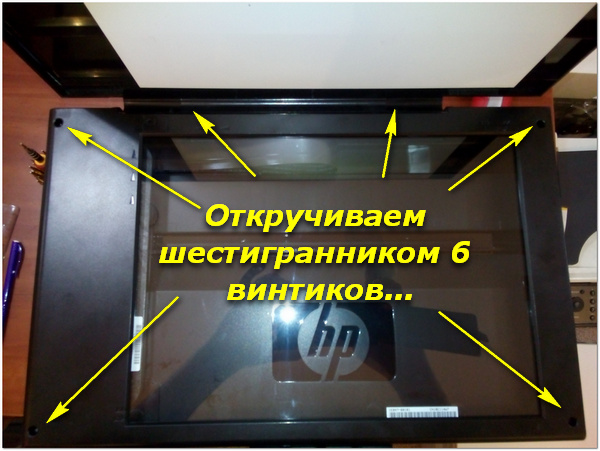
To unscrew the screws you need a hex "star".
After the glass cover is removed, take the carriage, move it closer to the center and return the glass to its place. Turn on the device and wait for the positioning of the ruler (it should go to the extreme left position). If everything happened that way, then you are lucky, because the E8 code may appear for other reasons.
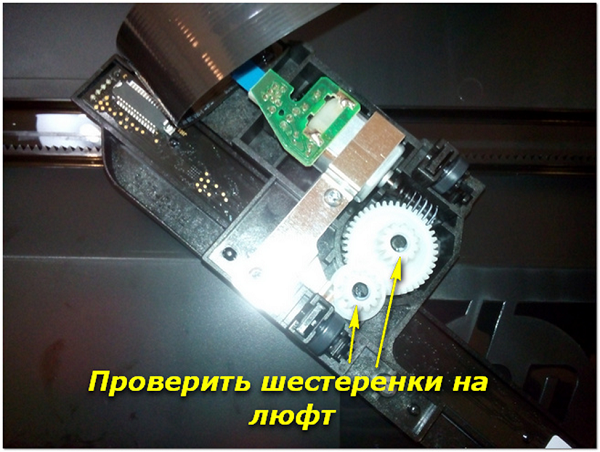
In the case where the scanner carriage after turning on the MFP jerky and stops, while the code E8 appears on the display, you will have to check all the nodes of this unit well. To check the scanner unit, you must remove the glass cover, as mentioned above, after which you need to get the unit itself and turn it over. On the underside of the unit, you will see 2 gears and an electric motor, pressed against the plate. Next, do the following.
- First, it is recommended to unscrew the 2 screws on the plate and check the gears: whether there are any dirt or damage to the teeth, there is a backlash or not, whether the axle has been actuated,which holds the gear, etc.
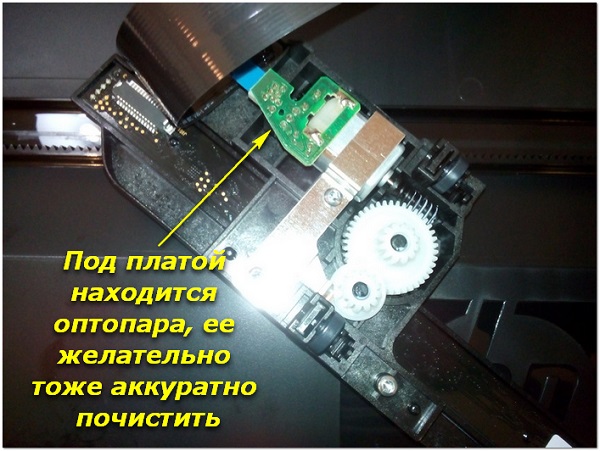
- Remove dirt (if any) from the optocoupler.
- Check the quality of the connection cable.
- After checking and replacing the defective parts, apply a little lubricant (you can use lubricant for the thermal film) on the gear hubs and on the guides along which the scanner unit moves.
The above steps usually fix the scanner problem in the hp m1132 MFP. But in some cases this problem can cause too tight pressure gears or optocoupler. Sometimes the problem is eliminated, if you loosen the clamping gears or even remove the small gear. After that, turn on the device (with the scanner unit removed and turned upside down) and watch the gear rotation. If it continues to move in spurts, then the problem may be hiding in the optocoupler.
If you look closely at the optocoupler, you will see that there is a notched disk between the two sensors. This disk should be located in the center of the optocoupler. Sometimes it is shifted in one direction, which causes the appearance of the code E8. Try to install the engine so that the disk is in the center, between the sensors.
If after all the above manipulations the code E8 appears again, then the malfunction may be found in the engine itself or the control board. If you can replace the motor yourself, then you will have to contact the service center about the control board.
Troubleshooting the E3 code
Often, users of HP MFPs see on the display of the device the appearance of the E3 code. If you look at the instructions for the device, then this code is decoded as “The cartridge is missing or installed incorrectly”. Undoubtedly, the cartridge may be installed incorrectly, foreign objects may fall under it, or it may happen that it is simply broken. But sometimes there is a situation when the device does not see the cartridge due to the fact that the lever, which has a valve, simply does not reach the optocoupler. To get to it, you must remove the back (metal) cover MFP. How to unlock the lever, after which the error E3 will be reset, clearly shown in this video from a foreign resource (knowledge of the language is optional).
Troubleshooting 79
Error 79 in HP printers usually means something has happened software failure apparatus. To eliminate it, fly the following:
- turn off the power of the device using the off key;
- pause not less than 30 seconds;
- restart the unit and wait until it is initialized;
- in the case when the device was connected through a power filter, try to turn it on this time directly, to an outlet;
- if the code message continues to appear, it sometimes helps to get rid of the problem of cleaning the print queue or reinstalling the driver.
Reset errors on HP printers
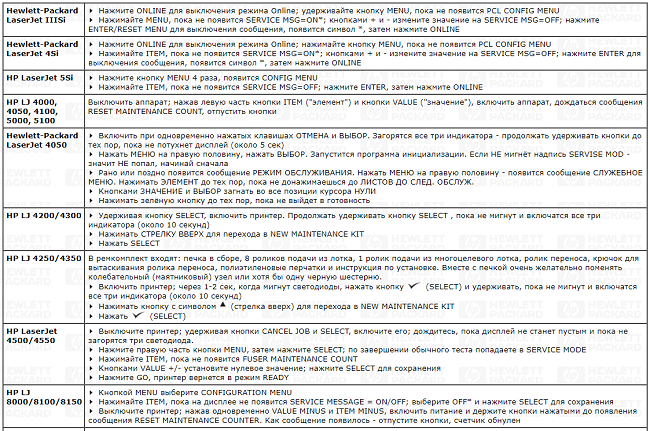
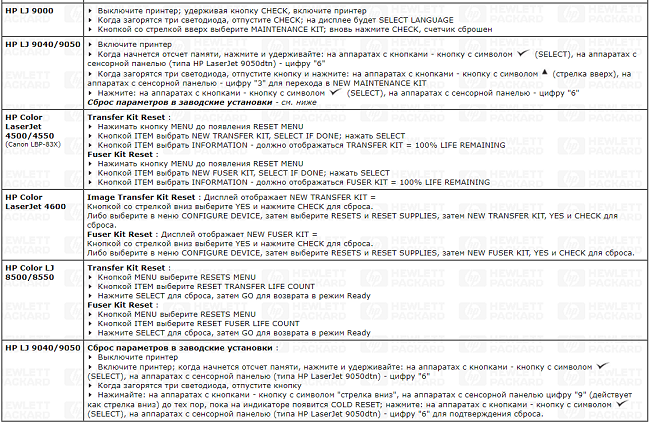
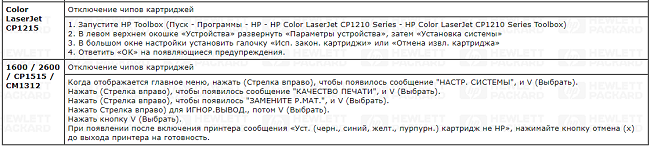
To reset an error or a so-called maintenance message on HP printers, there are many ways that are suitable only for specific models. Since there are a large number of models of printing equipment from this manufacturer, then, to reset service reports about the problem, you can use the tables below.
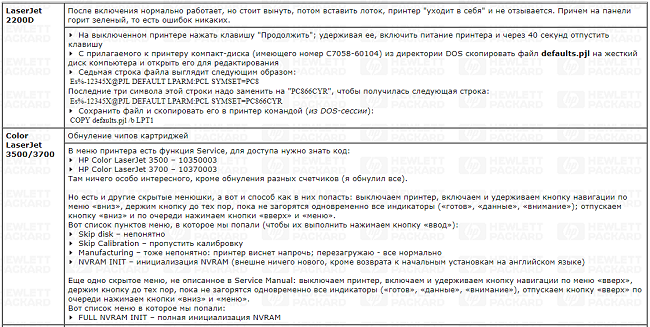
In cases where there is a refill cartridges (LaserJet 1300, 1320, 4250/4350) containing the chip, then it must be sealed before installing them in the machine. The device, of course, will display a message that a “left” cartridge is inserted, but it will work. Also for zeroing chips You can use the recommendations from the following table.
Almost any service codesmeaning errors for HP Photosmart printers are reset by the following method.
- Hold the left arrow and, without releasing it, press the “Setup” key, then remove your fingers from the keys. As a result of this action, the “Enter Special Key Combo” menu will appear. Hold down the “Print Photos” and “Red Eye Removal” keys simultaneously, and release them. Next, press one key and release: “Photo correction (Red Eye Removal)”, “Print Photos”, “Photo correction (Red Eye Removal)”.
- Click the arrow to the right and go to the line "System Configuration". Click OK.
- Press the right arrow again to get to the line “Hardware failure status: Clear. Press OK to clear ”(if the device’s operation was without failures, then you will not find this line). Remember, you cannot start printing at this time.
- Turn off the device, then turn it on.
Thus, the error code was reset, and the device can be used as usual.
/rating_off.png)


