What to do if the printer stops printing after refueling
Since the price of a new cartridge remains high and almost equal to the cost of the printer itself, many users, in order to save money, resort to self-refilling of the ink tank. But, despite the fact that the cartridge is full, in some cases, the printer refuses to print.
Content
The main causes of the problem
Before you search for malfunctions with the cartridge, you must check cord USB. Oddly enough, sometimes this cable is the cause of the problem. If you do not have a spare cord, try moving all the connectors or plug the cable into another USB port on your PC. If these actions have not improved the situation, then you need to look for other reasons why the printer does not print.
Ink dried in nozzles
Have inkjet printers There is one big disadvantage: after a short period of time, the ink in the nozzles of the print head dries out. To prevent this from happening, you need to print something all the time, or turn on the printer 1 time in several days (from 3 to 7) so that it “blows” the nozzles.
Air got in when refueling
Air in a cartridge filled with ink will not do much harm. Is that the paint will begin to flow out of it, because inside the tank will not have the necessary vacuum that keeps the ink from leaking.
Another thing is when the ink has run out and air gets into the nozzles of the print head. In this case, it is possible drying of paint in the capillaries of the head. Also, air can enter and dry the head if it has been parked incorrectly after the printer has finished working. It is important to check that the carriage always reaches the parking space.Only in this case, nozzles will be protected from drying out.
Still, air can damage the print head, especially in Epson printers, since it is not removable. The problem is that when changing ink tanks, if it is done slowly, or when installing a CISS, when the head is outside the parking unit, the nozzles have time to dry out.
Ink selected incorrectly
Some users think that the ink for all printer models is the same. But in fact, even for devices of the same brand, the ink may differ. The cartridge may not print due to refilling of incompatible ink into it, which entails a complete flushing of the print head.
It is very important when choosing a paint to read the instructions for it, where the devices for which it can be used are indicated.
You should also pay attention to ink expiration date.
Cartridge installed incorrectly
Sometimes there is a situation when the printer does not see the cartridge. This is explained by the fact that there are electrical contacts on it, which during installation must ideally coincide with the contacts inside the carriage.If for any reason there is a contact breakdown (dust, dried paint), then the device will not work normally. Also need to unstick protective film from contactsif the inkwell is new.
Some devices, especially the MFP, will not work until lid open. The reason for the failure of the equipment lies in a special sensor cover. Therefore, if you have installed a CISS, and the cable prevents the lid from closing tightly, then this sensor should be blocked, for example, with a piece of foam (for different models of printers the methods of blocking may differ).
Problems with the chip or pampers counter
Inkjet printers use two types of cartridges: disposable and refillable. In the disposable manufacturer installs a special chip that blocks the operation of the device after the ink in the tank. Even if you pour paint into the tank, the chip will still signal that the tank is empty. Also, the printer refuses to print if the diaper counter indicates that it is full.
Pampers is a place in the apparatus, filled with foam, where the excess ink from the print head merges.
Brother Printer Troubleshooter Issues
To eliminate problems with dried printhead, diapers, chip, etc. There is no universal method, because the design of the devices is different. Different models of printers have their own troubleshooting methods. Brother MFPs most often refuse to print after refilling the cartridge due to dried nozzles or diapers overflow.
Printhead recovery
Brother machines use cartridges with both water-based and pigmented inks. Usually pigment ink has a “black” cartridge - they become the culprits of print head clogging, if the device has not been used for 3-4 weeks.
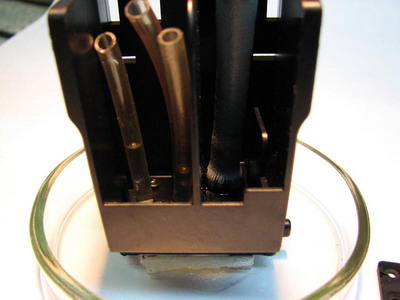
Brother MFPs, unlike other models from different manufacturers, are designed so that the ink tanks are located to the side and are connected to the print head by means of silicone tubes (loops), similar to the loops in the CISS.
The paint, as usual, dries not in a loop or cartridge, but in the nozzles of the print head (PG). Therefore, you first need to get to the head. In standby mode, this node is in the parking lot in a locked state. If you open the lid, the node is visible, but you cannot move it.
To move the head off the lock, do the following:
- turn on the device and wait until it is fully self-tuning;
- run the nozzle check with the scanner unit closed;
- as soon as you hear the movement of the printing mechanism, you should unplug the power cord from the outlet to stop the movement of the carriage.
Now you can manually move the carriage in any direction. To restore the nozzles, it is necessary that the flushing fluid on them hit in some way. The easiest method is to use for this purpose. parking space:
- you need to take a napkin and roll it 3-4 times;
- place the napkin over the entire surface of the tray;
- heat the washing liquid to 40 degrees and soak the napkin on the drip well with it;
- applying maximum care, move the carriage with the print head to the parking space so that the napkin does not move and the nozzles are in close contact with the flushing;
- leave the carriage in this position for a while from 5 to 10 hours (it is better to do the procedure in the evening and leave “soaking” until the morning);
- if “soaking” did not produce the expected result, then it can be repeated by replacing the napkin with a new one.
This method is quite effective if the case is not running. Otherwise, you will need to contact the service center.
Reset diapers
Brother printers do not have sensors that monitor the overflow of diapers with waste ink, and therefore control over the adsorber is maintained at the program level. The calculation is made on the basis of the number of prints that came out of the apparatus, as well as on the number of head cleaning (forced and regular). After some time of operation of the unit, the program counter determines that it is time for the diapers to overflow and locks the printer, while the message “Cleaning” or “Error 46” is displayed on the machine display. To reset the counter, no additional software is required. The device is provided reset function through the service menu. To get into it, do the following.
- Unplug the power cord of the machine from the outlet.
- By pressing and holding the “MENU” key, connect the power cable to the electrical network.
- Wait until the message “Maintenance” appears on the screen for a couple of seconds. At this point, you need to have time to remove your finger from the “MENU” key. If it does not work, then unplug the outlet and do it all over again.
- Pressing “+”, wait until the figure 8 appears, then press “OK”.
- Using the “+” key, select the number 2, and after “OK”. After these steps, you should see the message “MACHINE ERROR” or “MACHINE ERROR 00”. If such a message does not appear, but some other one is displayed, then you cannot reset the diaper counter.
Next, you need to go to the procedure of the software reset:
- follow the steps above to point 3 (inclusive);
- Next, use the “+” button to select the number 0 and then press the “OK” key, the image “00:00 XX: XX” will appear, where XX: XX is the time;
- now you need to press the “BLACK AND WHITE” key (its, as well as the “COLOR” key, you can find it next to the “START” button) until the inscription “PURGE: xxxxxx” appears (instead of xxxxxx there can be any numbers).
At the next stage, the special code “2783” must be entered for the inscription “PURGE”:
- press “+” key to find number 2 on the display and press on “OK”;
- further, “+” → “7” → “OK”;
- “+” → “8” → “OK”;
- “+” → “3” → “OK”.
- after that you should see the message “PURGE: 00000”;
- press the “BLACK AND WHITE” key, select “FLUSH: xxxxxx”;
- repeat all the actions that were made after selecting the inscription “PURGE”;
- after selecting the number 3 and pressing “OK”, you will see the message “FLUSH: 00000”, then turn off the printer,unplug it and turn it on again.
After resetting the counter, the printer will continue its operation. It is also recommended to remove the diaper itself, rinse it and dry it, but this will require disassembling the apparatus. To understand how to do this, you will need a separate article.
Canon Printer Solution
The manufacturer of printing equipment, Canon, uses 2 types of printheads in its devices: fixed and removable, located directly on the cartridge.
Flushing fixed printheads
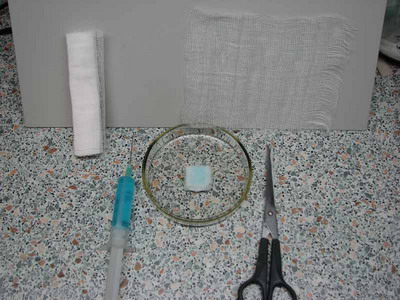
Before you start washing this part, you will need to prepare a small container in which the washing process will take place. It can be a saucer, a plastic box with small sides, a photo of a bath, etc. You will also need: gauze or bandage, a pair of syringes (10 ml), plastic and rubber tubes, which are in medical droppers. Elastic bands will be needed if a strong blockage is found which cannot be removed by soaking.
For flushing, it is recommended to use flushing liquid sold in ink shops. But, since the price of liquids is quite high, you can use household chemicals, namely “Mister Muscle”(MM) for washing glasses with content of ammonia.
Note that the color of the chemical is either green or blue. Other fluid colors will not be suitable for flushing.
Next, you need to remove the printhead itself. Since there are a great many devices of this type, each case has its own nuances. Video of the process of removing the head for any printer can be found on the Internet.
So, when everything is cooked, do the following.
- Type in a syringe MM.
- Cut 2 small pieces of gauze. First fold so that it is the size of the lower platform PG, then put it in a saucer and soak the MM. Crumple the second piece and soak a little with liquid for glasses.
- Turn the PG with the nozzles upwards and with a crumpled (moistened) piece of gauze remove all dirt from it. You may have to change a few gauze tampons.

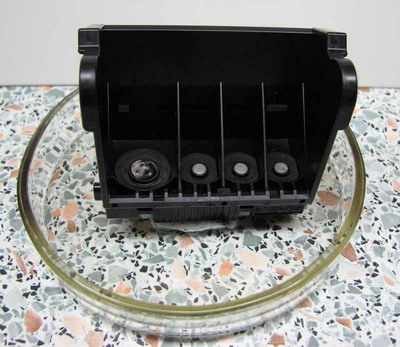
- Place the PG on the prepared area of the gauze in the saucer. Use a gauze pad moistened with MM to remove contaminants from the intake grates (be careful not to break them).
- After removing the gum from the ink tanks, rinse them under water to remove dried paint, and wipe them with gauze where they were.
- Further, it is necessary to drop one drop of MM onto the grilles of the intakes using a syringe.
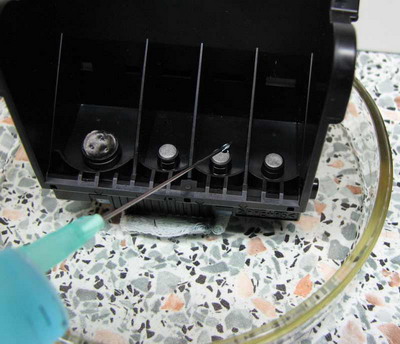
- As soon as the MM is absorbed, put another 1 drop on the grids. So you need to repeat many times, and change the piece of gauze under the head as it gets dirty. When the moment comes that the liquid flowing through the nozzles will not paint gauze - it means that the washing can be completed.
- To check the quality of washing, roll a small piece of gauze in half, moisten it well with MM, and place PG on it for about 1 hour. If after a time the gauze remains clean or with a weak ink divorce, but without areas with intense pollution, the PG can be inserted into the machine.
- After installing the head into the printer, it is necessary to start the PG cleaning 2-3 times to remove residual MM.
In the case when a drop of liquid is not absorbed into the grid, leave it for a while to soak. From time to time clean it with a napkin and apply again. When the napkin stops dyeing, but the liquid still does not pass, you will have to use the following washing method, which is used with strong blockages.
- Pick up tubes that are suitable for the diameter so that they can be put on the pipes,through which the ink enters the head. The tubes should be about 5 cm long and fit tightly.
- After installing the tubes, place the head on a gauze in a saucer and pour MM in them. It is necessary from time to time to add liquid to the pipes, which will gradually go through the nozzles. Also do not forget to change the gauze in the saucer, as soon as a puddle appears near it.
- If in one or several MM tubes it goes down very slowly or stands still, then it is recommended to leave the head in this position for several hours, and better at night.
In the case when soaking for the night did not give results, and the liquid in the tube does not fall, then you can proceed to the next method. But it should be noted that you will apply it at one's own risk, since it is possible to completely damage the PG, or rather, the nozzles. This is done as follows.
- Leave the tube on only the color that you want to wash.
- Pick up the necessary adapter to connect the syringe to the tube.
- Connect the syringe (piston in the lower position).
- Change the gauze under the head and soak it well MM. You can even pour it a little in a saucer, about 2-3 mm.
- Lightly pressing PG to gauze to eliminate air leaks, begin to pull the piston so that the liquid begins to pull through the nozzles into the syringe. This should be done very smoothly.
- The liquid collected in the syringe cannot be reused and must be emptied. Add some MM in the saucer and repeat the procedure 2-3 times.
- After that, leave the head to soak for 1 hour.
- Repeat pulling the liquid through the nozzles. In normal condition, the liquid should be drawn in without much effort. When you do the last broach, be careful not to accidentally draw in air. If this happens, an airlock is formed that will interfere with the passage of MM.
- Put all the pipes back on and pour liquid in them. It is necessary to check how evenly its level falls on different colors (except black). If the level difference varies between 5-8 mm, then this is considered normal. If on any pipe there is a noticeable difference from the norm, then draw a fluid through it, as mentioned above.
Important! If it is impossible to extend the liquid through the nozzles at all, then you should not try to push the liquid in the opposite direction (through the nozzles).This will lead to rupture of the capillaries, and the head can be discarded.
It is possible to push the MM through the nozzles only in a situation when at least a little, but the liquid passes through the nozzles during the suction. But even in such a situation it is necessary to have experience in order to feel the allowable force that is applied to the syringe piston. The degree of sensitivity of the capillaries to pressure in different heads may differ, and to reduce the chances of damaging them, it is recommended to use larger volume syringes (10-20 ml), in which air will serve as a shock absorber.
If apply fluid pulling method in two directions, you should consider the following nuances:
- if you use a 10 ml syringe, then the air gap between the piston and the liquid should be about three divisions;
- at first, lower the plunger of the syringe is allowed only in 3 divisions, not more;
- as the liquid decreases, one division can be added;
- The pressure on the piston should be smooth, without jerks.
You should be aware that full GHG cleaning with an average degree of clogging takes from one to three days. In case of severe blockage, the procedure may be delayed for a week.It is necessary to have patience, since the desire to do everything quickly can finally “kill” the head.
There is another, extreme method of nozzle washing, which is called “shower”.
- Type in the syringe MM, but without the air gap.
- Connect it to the nozzle using a tube (from the system) about 20 cm long. This is done so that the pressure is compensated by the length of the tube. In extreme cases, when you exceed the pressure, it will jump off the pipe, splashing everything around with liquid.
- Lift the GHG over the saucer and begin to put pressure on the piston with little effort.
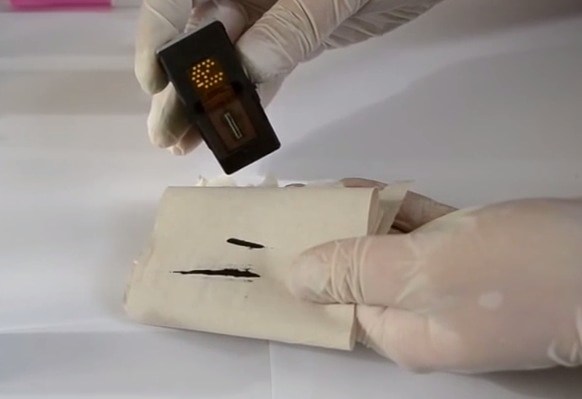
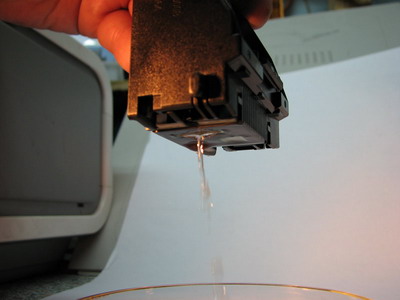
The result can be evaluated by the way the fluid flows out of the nozzles. If they are not completely washed, the jet looks like in the figure below. By the way, this type of jet can be observed with the destruction of the nozzles, which can also be determined visually.
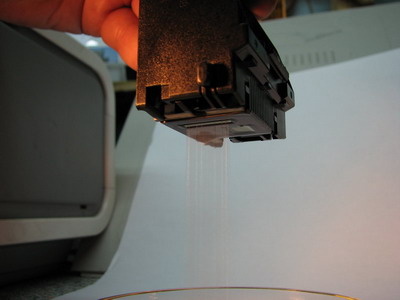
The following figure shows that the liquid comes out in even, thin jets, resembling a shower. This means that nozzles are well washed.
After this method of washing the head is recommended blow drybut do not overheat it. The temperature of the PG after drying should be such that it can be held in the hands. It needs to be dried several times, at intervals of 20 minutes.
Before installing the head into the printer, it is necessary to “dip” the head so that it is not dry. To do this, drip a few drops of washing liquid into the ink channel grids.
Do not forget to start the hardware cleaning of the print head so that it fills with ink.
Flushing the print head on the cartridge
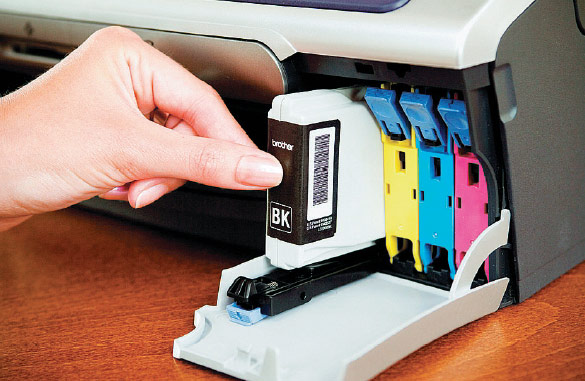
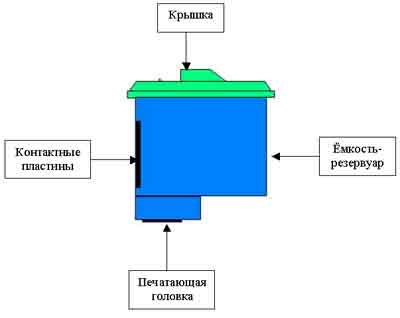
This recovery method is suitable for both Canon printer cartridges and HP ink tanks that have a built-in head and look like the following figure.
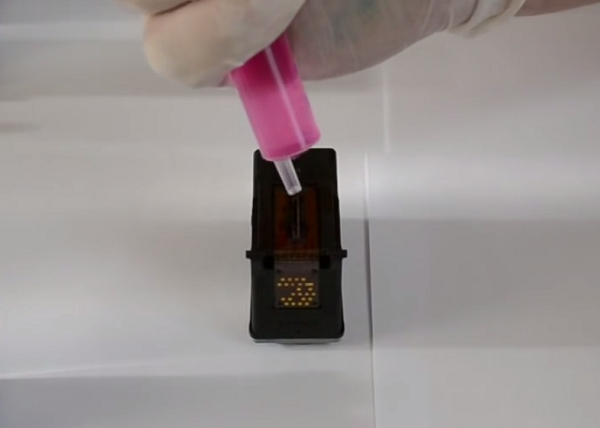
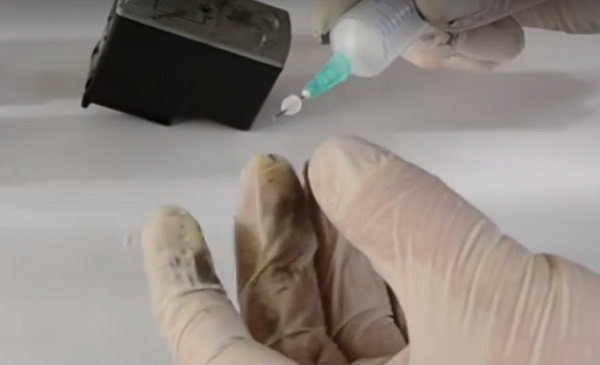
To begin with, it is necessary to determine whether the cartridge really dried out if the printer does not print. To do this, take the toilet paper and press it to the bottom of the inkwell, where the nozzles are located. If the ink imprint on the paper is clear, then the head is not dried. If there is no print or it is weak, then it is necessary to soak the nozzles. The easiest and fastest method of soaking is to apply a few drops of MM to the nozzles. To do this, turn the part upside down with nozzles, as shown in the figure.
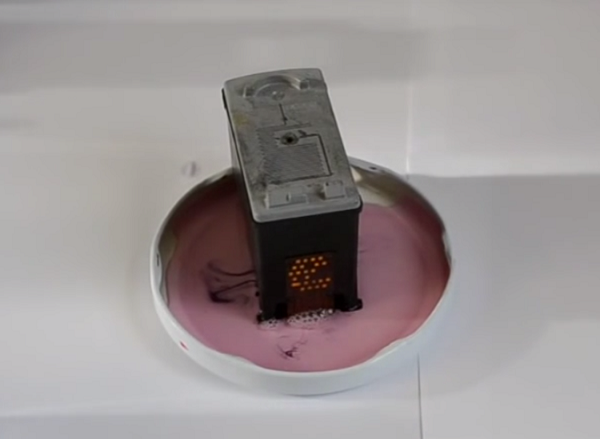
After 10 minutes, remove the liquid from the nozzle with a napkin and check whether the paint runs on the paper. If this method does not help, then you can put the item soaked for a longer time (2-3 hours) in the tank with MM.
For better penetration of liquid to the nozzles, you can put a piece of toothpick under the ink bottle, for example, so that the nozzles do not touch the bottom of the container, but are immersed in the solution.
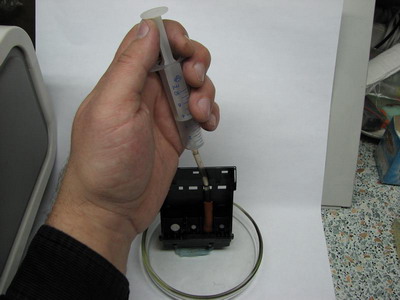
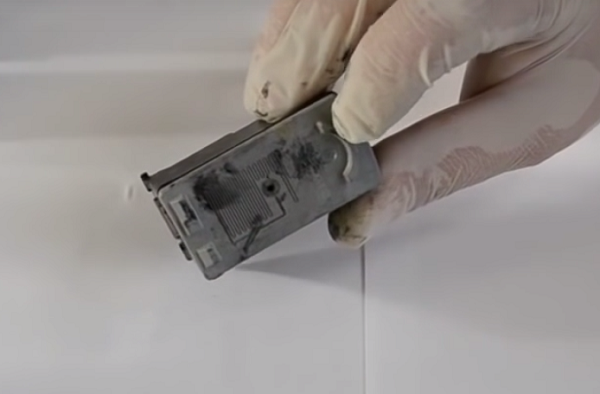
After soaking, wipe the part with a napkin dry, especially the contact group, insert it into the printer and run a deep cleaning. Then run the nozzle check test. If the result does not suit you, you can try blow the nozzles through the air inlet in the cartridge.
To do this, do the following:
- cut the medical needle in half and put it on the syringe;
- in order to ensure a tight fit of the syringe to the body of the inkwell, any soft elastic band should be put on the needle;
- insert the syringe with air into the hole in the cartridge and press it firmly so that the gum provides a tight fit;
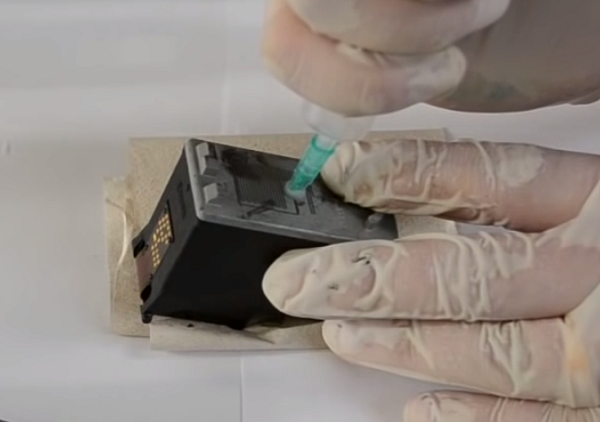
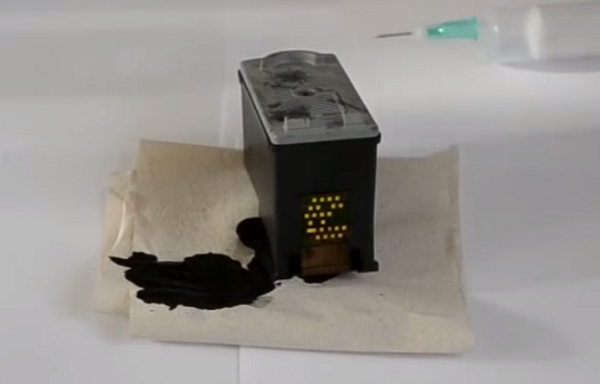
- start gently pushing the air into the inkpot, having previously placed a piece of toilet paper or napkins under it;
- as a result, ink must run out of the nozzles;
In this way, “colored” cartridges with 3 holes on top are blown through.
Ink control reset
A Canon chip is installed on the ink tanks, which counts the amount of ink remaining in them.When, in the “opinion” of the chip, the paint ends, an error message or an empty cartridge appears. Therefore need disable the counter.
If Canon PG510 / 440/426 ink tanks are installed, then click “OK” in all messages appearing on the device display. Click “OK” until you see a message about the need to press a button that turns on the paper feed. Hold it for a few seconds and the ink count will be reset. For the remaining cartridges, the reset occurs after pressing the button with the image of a triangle in a circle for 5-10 seconds. or in the printer settings on the PC.
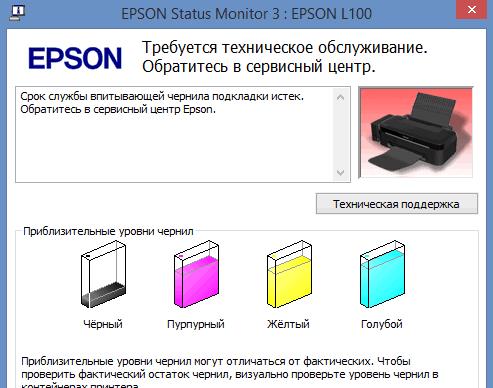
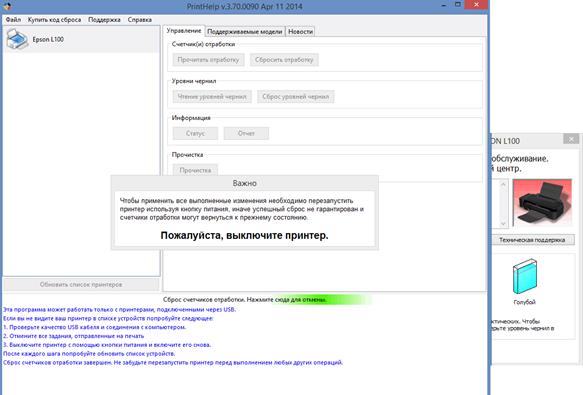
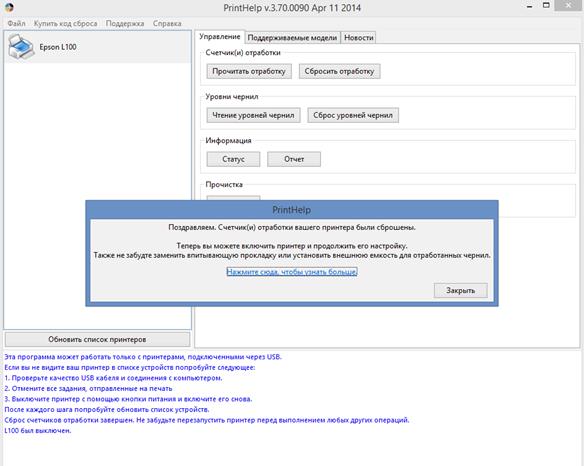
We reanimate Epson printers
Accounting for ink in Epson printers is their own software (firmware). Therefore, no matter how much ink you add, the program will assume that the capacity is empty and will block printing.
To return the machine to work, it is customary to use PrintHelpwhich is freely available on the Internet and is free. In addition, it can be used for most Epson printing equipment.
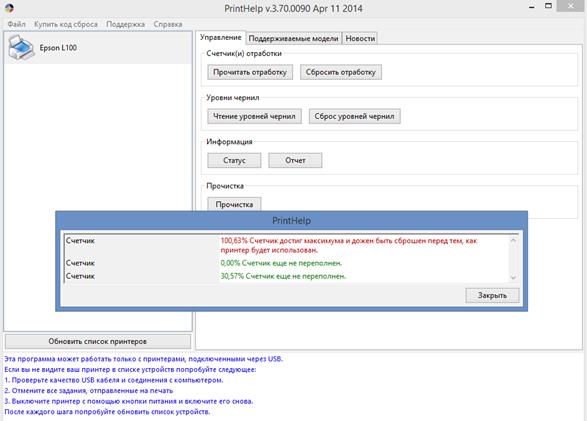
With this program you can do not only reset the ink, but also to monitor their number. The program is also able to detect overflow of diapers and, if necessary, reset it.
Printhead recovery
To flush the printhead in Epson printers, you need a special flushing fluid or “Mr. Muscle” for glasses. In most cases, GHG carriage does not need to be removedand washing is carried out as follows.
- Turn on the device with the lid open, and at the moment when the carriage is in the middle - pull the cord out of the socket.
- Remove the ink tanks from the carriage. If you have installed a CISS, then read the instructions for it, where it is written what to do to remove the cartridges.
- Manually move the carriage slightly to the right, place a clean napkin on the bottom of the machine, and move the head so that it is over the planted napkin.
- Cut a 5-10 cm long tube from a medical dropper.
- Put the tube on the syringe and type MM in it.
- Insert the tube into the hole through which ink is drawn from the ink tank to the head (the hole leading to the clogged nozzles).
- Fill it with a couple of cubes of liquid and wait until it leaks onto the napkin. It is also recommended that the remaining nozzles do not dry out, while you rinse any one area, pour liquid into other openings.
- Repeat this procedure several times, changing the cloth.
At the end of flushing, do the following: remove the napkin, remove any possible liquid drops from their apparatus, insert the ink tanks into the carriage and, having turned on the apparatus, start the enhanced SG cleaning.
In a situation where this method of restoration of the head did not help, you will have to remove it from the printer and use the restoration methods that were previously described for the Canon head removed.
Recover HP Printers
For cleaning the printhead in HP printers placed on a cartridge or detached, the method described for Canon printers is suitable.
Ink counter reset
It is no secret that the ink tanks HP 121, 27, 28, 56, 57, 21 and 22 have the ability to refuel. In this case, you need to be careful and do not allow the complete exhaustion of ink, filling them in time. When the chip determines that the ink is running out (but there is still paint), a message is displayed about it: an exclamation mark appears opposite the problem inkwell. In this case, you must click on “Continue”, thereby disabling paint tracking. The disadvantage of this method is that you cannot see the ink level.
If after that the ink is not refilled and continue to print, then after they are exhausted, the sensor will work, which determines the actual amount of ink, and will block the operation of the printer and the chip itself. A cross in front of the cartridge will appear. If this happens, you will have to replace the chip or the ink tank. Although there are several ways reset chipso that the paint level is displayed.
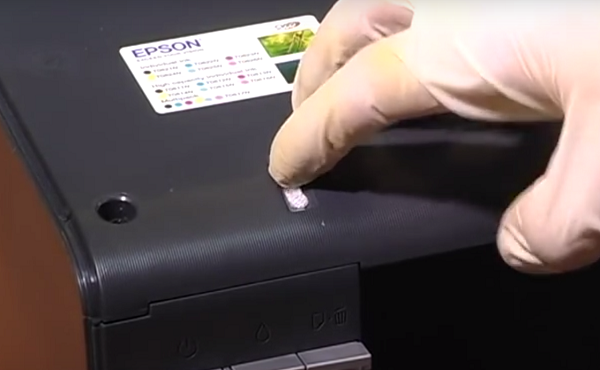
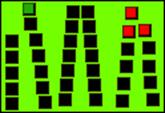
Put the ink bottle on the table with the contacts up and do the following.
- It will be necessary to glue with the help of adhesive tape 1 contact highlighted in green in the figure. It is important that only 1 contact be sealed.
- After that, you need to insert the ink tank into the machine, click “OK”, which will appear in the message window, and print the internal test of the unit.
- Remove the ink bottle from the printer again.
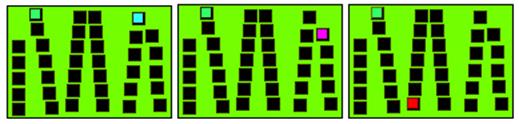
- Next, you need to close another contact. You can choose any (blue, purple, red) without removing the sticker from the contact that was closed before.
- Insert the part into the printer again, click “OK” and print a test page.
- Remove the ink from the machine again.
- Remove the sticker from the first contact, then return the part to the machine. Wait for the machine to “see” the ink tank, then remove it.
- You will need to remove the sticker from the second contact, wipe all the contacts with alcohol, and install the ink bottle back into the printer.
The meaning of these manipulations is as follows: four different cartridges are replaced, after which the identifier information of the refilled ink tank is erased from the device’s memory, and it, inserted in the fifth, is counted as new. After that, the printer will assume that there is paint, and display its level in the tanks.
The second method is suitable if the first was ineffective:
- cover the first contact, insert the ink tank into the machine, and print the test, as in the first method;
- without removing the sticker from the first contact, it is necessary to glue the rhinestone three contacts, as shown in the figure;
- insert the part into the machine and print the test;
- remove all the stickers and put the ink bottle back in place, not forgetting to clean the contacts with alcohol.
/rating_on.png)
/rating_off.png)


