Making a robot vacuum cleaner at home with your own hands
To create robot vacuum cleaner do it yourself, it is enough to acquire the necessary minimum of theoretical knowledge and a set of easily accessible components. Such an assistant will keep the floors of the premises clean, saving time on cleaning. Due to the presence of special sensors, the mechanism independently not only moves around the room, but also guides it. The manufacturing process at home will take time and patience, but the creation scheme is quite simple and accessible even to amateurs, and the money spent on this is much lower than the price of market apparatuses.
Content
Theoretical aspects of the problem
Domestic craftsmen have deduced in a practical way the requirements for robotic vacuum cleaners, which should be followed when creating them.The result of compliance will be a mechanism suitable for further operation. The list of basic rules is as follows:
- it is recommended to make a robot in the shape of a small cylinder;
- in order for the machine to make turns on the spot - the wheels should be placed along the diameter;
- no additional steering wheel required;
- the mechanism must collect garbage in an easily removable garbage bin;
- the robot must be equipped contact bumperoccupying at least half of its circumference;
- Charging the device should be carried out from the charger, without disassembling it;
- the best location for the center of gravity of the robot are the wheels, it is also allowed to have it near them;
- optimal speed of movement - from 25 to 35 cm / s;
- Engines work in conjunction with gearboxes equipped with springs.
There are models with stepper motors, which allows you to programmatically manage them without the use of gearboxes.
Ways to ensure the movement, cleaning and power of the robot vacuum cleaner
The movement of a robotic device is generally carried out in two ways: in a spiral (from the center to the outside) and in zigzags.In the microcontrollers can also be recorded and the schemes of rooms separately.
Spatial orientation, detour obstacles along the way the vacuum cleaner provides thanks to the built-in contact and infrared sensors - they form a feedback system. Infrared regulate movement, determining the distance to the walls, objects, elevation changes. Contact sensors work in bumpers when hitting an obstacle (for more details on how the device works, see the articleprinciples of operation of robot vacuum cleaners).
An automated vacuum cleaner with an autonomous power source, of course, does not develop such suction poweras a manual option. Practical tests have shown the great efficiency of using a small brush together with a suction turbine. For cleaning in the corners The front part of the vacuum cleaner is equipped with 2 brushes that, when used, scoop up debris to the main one.
The power supply of the robotic system can be carried out from several batteries, the voltage at the terminals of which is 12 V (18 V), and its capacity is 7 Ah. Charging is carried out by direct contact or wirelessly. The use of the latter increases the cost of components.
Independent return of the robot to the place of charging is a difficult task that can be solved by installing a transmitting beacon.
Any automated model is going controller based (brain system). Therefore, it is necessary to study its programming language for entering the command algorithm. It should also take into account the intuitive orientation of the command interface, which greatly simplifies the process. Both the microcontroller and the sensors used often have standardized connectors for connections, so soldering is rarely required.

Preparation for the practical implementation of the project
Consider the application of the above principles based on the Arduino Mega 2560 platform. The creation process will consist of several stages:
- preparation of tools and materials;
- the manufacture of housing with wheels and a department for garbage, dust collectors and turbines;
- installation of sensors and microcontroller, motors with gearboxes, battery, brushes;
- making electrical connections;
- the introduction of the program in the Arduino, determining the consistency of sensors;
- functional test of the robot vacuum cleaner and its ability to charge independently.
The idea is implemented using the following materials and tools:
- Arduino controller - 1 pc, with drivers;
- a sheet of plywood (or thick cardboard) - 1 sq.m;
- wheels - 3 pieces;
- a wire with a cross section of not more than 0.75 mm.kv (twisted pair will do) - about 2 m;
- power supply - 4 batteries of 18 V each, charge indicator for them, charger;
- infrared sensors - 4 pieces, contact - 2 pieces;
- electric motors: for a turbine - 1 pc, rotating a brush - 1 pc, 2 motors with a reducer provide movement;
- polyvinyl chloride case - 1 pc;
- glue - 1 pack, self-tapping screws - 10 pcs, scotch tape - 1 pc, set of magnets;
- a set of screwdrivers and drills, pliers, stationery knife, pencil, ruler, screwdriver, jigsaw.
Assembly of the robot vacuum cleaner
Preparing everything you need, you can begin to assemble. It is the passage of the above steps.
- We create a cylindrical body made of cardboard or polyvinyl chloride: diameter - 30 cm, height - 9 cm, wall thickness - 0.6 cm. It is better to cut the bottom out of plywood.
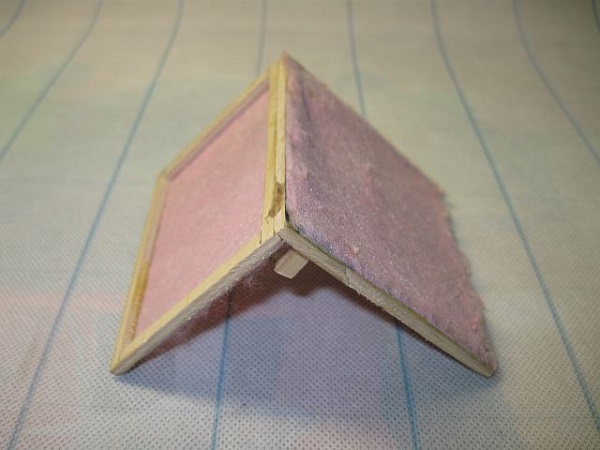
- We fix on the case polyvinyl chloride bumper with the help of adhesive tape, pre-installing in it the infrared sensors and responding to impact.

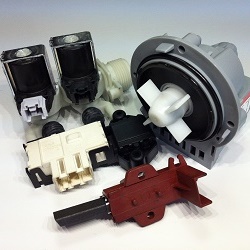
Collision sensor
Attached bumper
- We make a compartment for garbage from a cardboard or polyvinyl chloride with a lid, fixed by magnets.

- We make a filter from cloth napkins.
- We make a turbine of polyvinyl chloride and computer disks, install.
- We connect the sensors to the controller: the normal operating mode corresponds to a logical one, and the response to zero.
- The front brush motor is connected to the arduino mega 2560 through a mosfet transistor, which ensures its fast rotation at the corners and rather slow along the main area of the room.
- Install 4 batteries (connect them in pairs, each pair - in series) and the charger, connect them.
- We mount brushes made independently of fishing line and wheels (purchased or removed from a suitable toy) on the bottom.
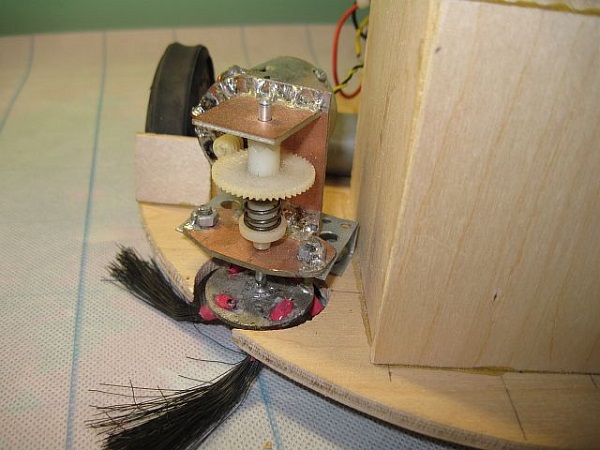
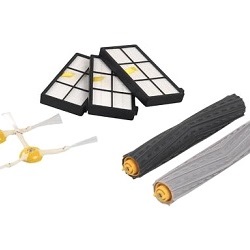
Radial brush
- We install the necessary programs on arduino using a computer that can be found on the Internet.
- We check the fixing of all components to the bottom and walls of the case.
- Cut a cardboard or polyvinyl chloride cover, fasten it with screws.
The important point of the work is the return of the bumper to its original position after hitting an obstacle, that is, its sufficient elasticity.
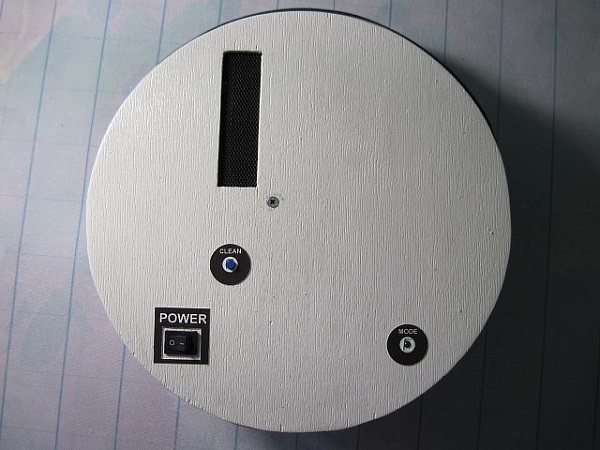
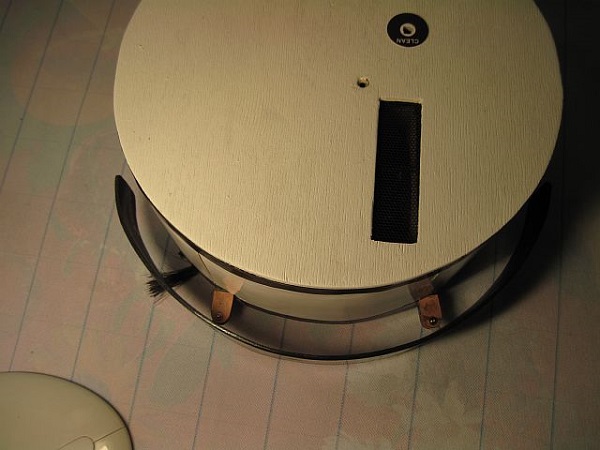
All parts are fastened to the connectors that are available for this purpose with screws or glue or tape. The result is shown in the photo:
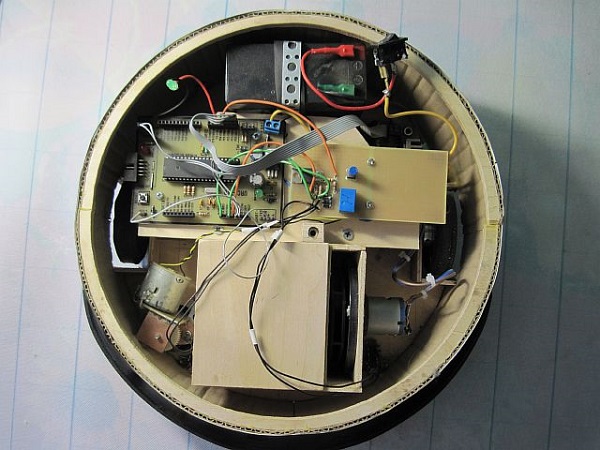
/rating_off.png)