Ways of sealing the cuff hatch in the washing machine
The modern mistress cannot imagine her life without a washing machine, so breaking the assistant requires immediate repair actions. Often there are situations when a manhole cuff comes into disrepair, the replacement of which is not always possible in the shortest possible time. On the operation of the washing machine, in general, such a failure will not greatly affect, but the owners can easily spoil the comfort, because water will constantly leak around the hatch of the machine. Therefore, many owners are wondering how to seal cuff hatch washing machine and whether it can be done independently. Of course, you can seal the cuff, but most likely it will not last too long. Such repairs should be carried out as a temporary measure until complete replacement of the part has been carried out.
Why is this happening
Understand the reason for rupture of the cuff should be at the very beginning.It will become clear whether it makes sense to carry out such repairs at home, as well as how to avoid this situation in the future. There may be several reasons for the break.
- Crackswhich result from the strong vibration of the drum of the machine. Repair can be done, but the issue of vibration should be resolved, and it is much more difficult.
- Sometimes arises wiping cuffIf something in the mechanism is broken and the cuff rubs against some part. Lead to such a breakdown may offset the drum. Before repairing, remove the cause of the damage.
- Breakthrough or cut, which can cause forgotten in the pockets of little things.
- "Incurable" damage, repair of which does not make sense.
The latter can occur for several reasons, for example, the poor quality of the cuff initially or cracks from old age, which will appear again and again. Such damage can not be glued together, and there is no point.
Preliminary inspection and preparation
If you decide to do your own repair of the cuff (for example, there is no money to buy a new one or there is no suitable option in the store, but you need to wash it), you should make a list of preparatory activities,which will help avoid unpleasant surprises in the aftermath.
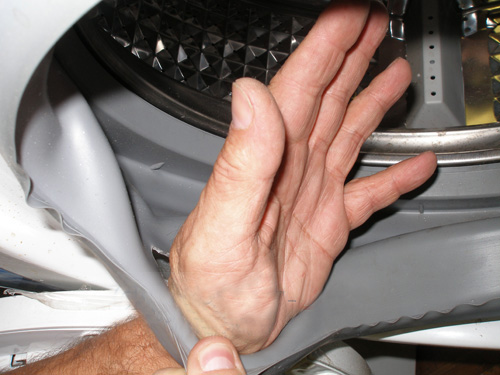
The first step is a thorough inspection of the cuff and set the expediency of its bonding, as well as the extent and cause of damage. To do this, remove the spring clip that holds the cuff itself. In some models of washing machines will need to remove the entire front cover, and sometimes even remove the drum.
Then analysis is performed on the need to dismantle the cuff. If damage is available and is located on top, then you can glue the cuff, and not removing. In some models, in order to remove the cuff, you also need to dismantle the drum, so you need to soberly assess your strength about reassembly. It may be better to contact a specialist or a more experienced person.
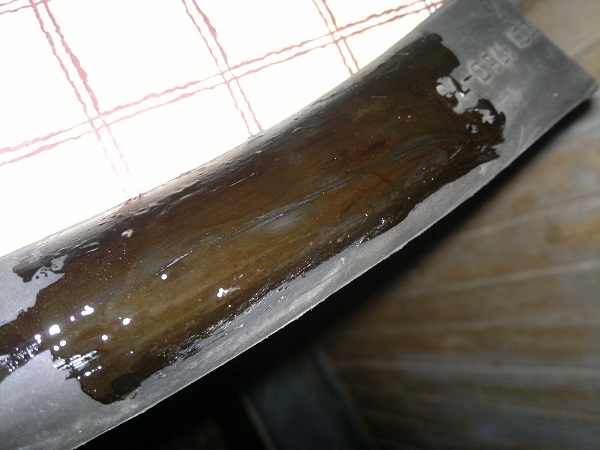
Finally, patch and glue. If you do not have thin rubber on your hands, you can use a condom or medical glove, which should be folded several times. The adhesive must have good adhesion and elasticity.
Many are pleased with the results of using instant rubber and shoe adhesives.
Repair process
In order to quickly and efficiently carry out the process of sealing the cuff of the hatch should be prepared all that may be required at such a moment:
- a small piece of thin rubber;
- scissors;
- gasoline or alcohol to degrease;
- glue for rubber, for example, "Moment";
- cotton wool or soft cloth.
For the repair to be as long as possible, and the patch on the cuff held tight, you need to adhere to the following algorithm.
- At the first stage, the patch itself is prepared. If it is rubber, then it should be carefully trimmed to the size of the damage. If a condom or rubber gloves are used as a patch, then each layer should be glued and then the part should be cut to the required size. The patch should be more than 1.5-2 cm hole on each side.
- Care should be taken at the site of damage. degreasing with gasoline or alcohol. The sealed cuff should be in straightened form until completely dry.
- Then a thin layer of glue is applied to the surfaces to be glued. Subsequent actions must be carried out in accordance with the instructions attached to the adhesive.There may be two options. Sometimes you want to connect the details at once, and sometimes wait for some time, and then glue.
- The glued surface should provide the most natural position, and then fix until the glue dries.
- The part is left at least for a day to fit well.
Well, that's all, repair the cuff hatch produced. But do not hope that there will be no more trouble with him. Such a measure is only a temporary solution, so as far as possible it is necessary in the shortest possible time to purchase a new part and perform a replacement. After all, from the constant movement of the drum patch can fly off in speed.
After the glue is completely dry, you can do the assembly. After installation, the parts should be held test wash to verify the effectiveness of the repair. With proper adherence to instructions for the use of glue, problems should not arise and for some time the machine will work without leakage.
/rating_off.png)