How to change the bearings on the washing machine Samsung
If during washing in a Samsung washing machine you heard outsider rumble - This is the first sign that something is happening with the drum shaft bearing. Do not wait for the moment when it collapses and the shaft development begins - repairs may cost you dearly, and you may have to buy a new assistant. Timely replacement of bearings will save you from trouble.
Content
Why do I need to change bearings
The bearings of the washing machine perform a very important task - they contribute to the correct and uniform rotation of the drum.Due to the fact that the latter makes a large number of revolutions, they quickly fail and must be replaced in a timely manner.
Wear of bearings can cause a failure in the process of washing and spinning clothes, as well as strong noise when the machine is running. If you do not replace the parts in time, the drum may fail, the repair of which will cost you dearly.
Preparation for work
First of all, when you need to change bearings that have failed, you need to pick up an identical set so that there are no problems during installation.
Choosing a repair kit
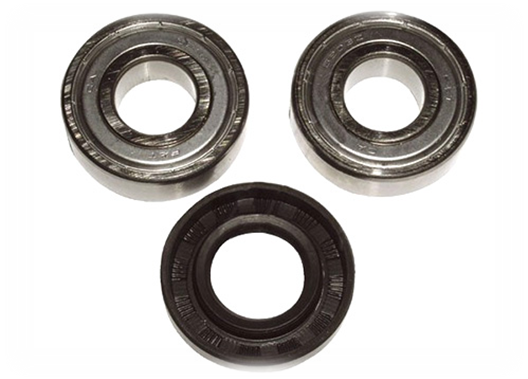
Bearings in the car of this brand are subject to replacement: they not repaired. Before starting washing machine disassembly, you need to purchase new parts, where in one package you will be offered:
- bearing set;
- oil seals for sealing;
- grease special composition.
Repair kits are available strictly for each Samsung model, so before going to the store, write down the model number of the washing machine.
We select the tool
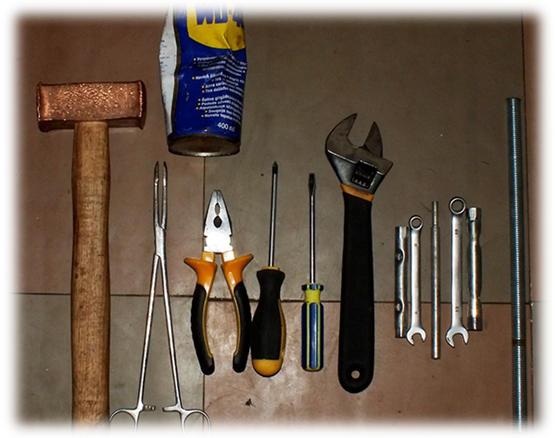
In addition to new bearings, you need to stock up on necessary disassembly tool mounting pipe, the tank itself, disconnecting the wires:
- Conventional hammer or made of copper, so as not to cause mechanical damage.
- Standard set of open-end wrenches and heads.
- Passatizhi.
- Steel stud.
- Marker.
- Screwdrivers (for slots and cross) and indicator.
- Small adjustable wrench.
- Silicone sealant.
- Mobile phone with a camera.
The camera is necessary for photographing all nodes before dismantling, especially the initial connection of wires.
Step by step machine disassembly algorithm
First dismantle top cover on the washing machine, unscrewing the two mounting screws (or screws) from the back side, which are located at the corners, then move the cover, lift it.

Then remove detergent dispenser, do it simply without special knowledge and skills:
- open until it stops;
- use your thumb to easily press the tongue in the central section, at the same time slightly lift the device and pull it towards you;
- if everything is done correctly, the dispenser will leave the place of attachment.

Now let's dismantle hoses, supplying water to the sections of the dispenser and the nozzle, through which water with the dissolved powder enters the tank. It requires maximum careso as not to damage the fastening of the clamps: with the help of pliers, unclip the fastener, tighten the hoses from the place of their connection.
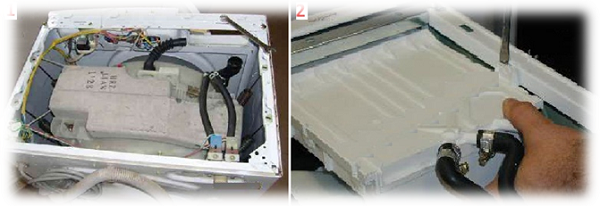
Take off counterweight - disconnection is carried out very carefully, holding its case with your free hand. Turn off the two bolts with the appropriate head and remove it to the side.
When unscrewing the last fixing bolt, hold the counterweight, because it is heavy, and sliding downwards accidentally can damage important parts of the machine.
Dismantling the hatch cuff
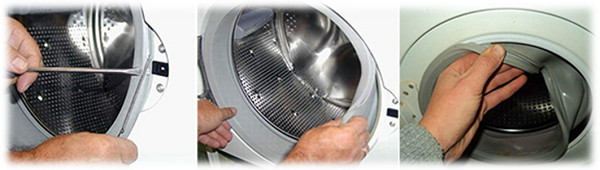
The cuff interferes with the removal of the front panel, so first of all we remove it. It is mounted on the panel with hose clampand the other side is dressed on the drum. We find the spring connecting the ends of the holder, hook it and remove it together with the clamp. Now you can remove the edge of the cuff and fill it in the tank so as not to interfere.
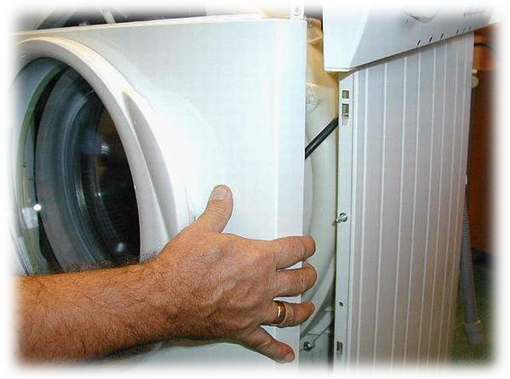
Removing the front panel
Close the hatch, find the screws on the top and bottom and unscrew them. Now the panel is held only on a small hook. Carefully remove it, so as not to damage the wire connecting manhole lock with the rest of the wiring machine. Disconnect the wire by removing connecting piece. The panel is set aside so that it does not interfere with us.
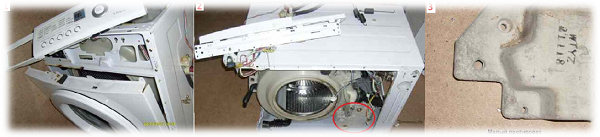
Remove the bottom panel
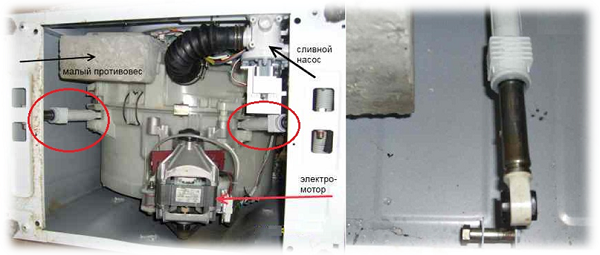
To do this, carefully put the machine on its side, unscrew the four mounting bolts, remove the bottom to the side. Now we can clearly see the electric motor and the drain pump. First you need to disconnect all wiresby taking a picture so that you do not get confused in their connection.
Pay special attention! The contacts of the connections are quite delicate, so we take maximum care, if we noticed burning, replace the terminal.
Dismantle rack mounting tank on the bottom of the washing machine, disconnecting the fasteners on the tank itself and the bottom of the case. Nothing more than an engine, there is no need to unscrew: the drain pump does not interfere, only it is necessary to disconnect the inlet pipes.
Inlet valve
The machine is also on the side, and we turn again to the upper part and dismantle sensors and nozzles filling valve. First, disconnect the wire, then fixing bolts, remove the valve body and set it aside.
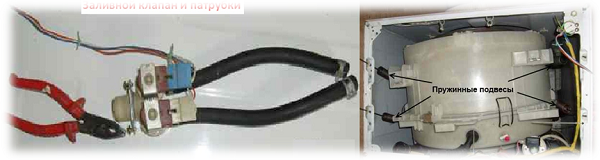
Now you can disconnect counterweights in the form of four springs, on which the tank is suspended in a suspended state with a drum inside. All that prevented the free removal of the tank through the top, we dismantled, it remains to remove the control panel.Remove it carefully so as not to damage the wires and connection terminals. We removed the front wall in advance, we still need to remove the small counterweight at the bottom of the machine.
Removing the tank
We carry out this operation with maximum attention so as not to damage any contact, or additional repairs may be necessary, which is not our intention.
Let's reverse the tank so that there is free access to the belt transmission: we remove belt, dismantle with hex key pulley body.
Tip! The bolt of the pulley can stick to the thread. To avoid disrupting the thread during dismantling, treat it with WD-40 grease - after some time it will unscrew quite easily.
The tank is dismantled and is located outside the body of the machine, all the necessary photos have been taken, therefore we proceed to disassembling tankto get to the drum and replace the bearings.
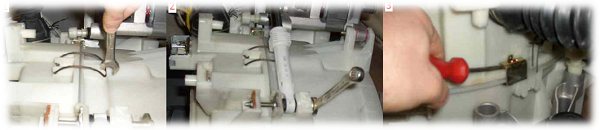
Spin the tank
The racks have already been dismantled, so the two halves of the tank are kept only on brackets and special clamps, when removing which there are no problems - it is enough to pull them off with the help of spanner and screwdrivers.
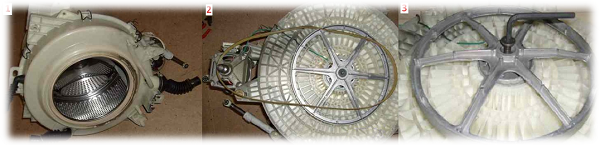
As a result of the disassembly, we received three fairly large elements:
- the upper part with a hole in the middle of the hatch;
- lower body of the tank with a heating element;
- the drum itself with the shaft.
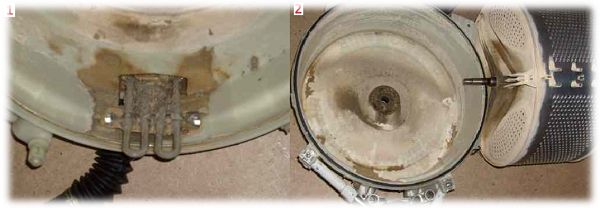
Reaching the bearing installation unit, carefully examine other elements. When a breakdown or scaling is found, defects should be fixed: clean the tank and Teng from scum, ring the item for failure, replace if necessary.
Bearing replacement
In the sleeve of the tank housing there are two bearings: large and small. We knock out the first one from the outside inwards with a steel stud, the second one - on the contrary.We knock out the bearing housing, alternately striking diametrically opposed light blows at hairpin, attached to its edge, shifting in a circle until the body is completely out.
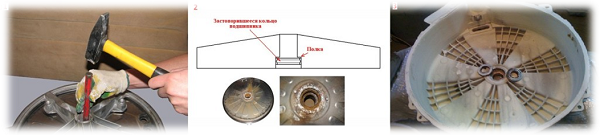
Remember! So that the bearing does not jam, it is necessary to beat at different points. Otherwise, create problems for yourself that cannot be solved without a special tool.
After removing the old bearings, remove oil sealswipe with a clean cloth inside the sleeve. We get new gaskets from the repair kit, lubricate, insert them in place. Set new bearings should be careful:
- Put in the sleeve with your hands, as far as possible.
- We place a small wooden bar on top of the bearing housing.
- Light blows of the hammer on the tree set the bearing in its place.
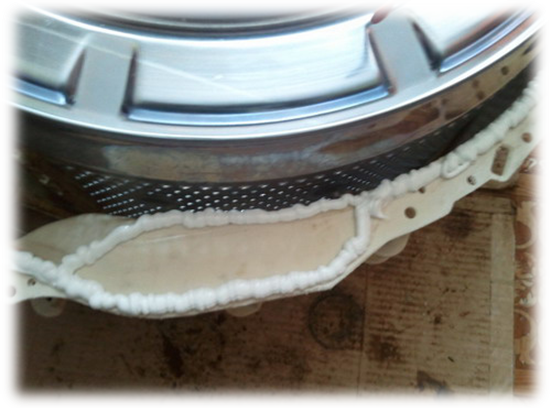
That's all the technology replacement bearing in the washing machine Samsung, it remains only to assemble the car in the reverse order. We grease both halves of the tank with a thin layer of sealant, the leakage path will be blocked very reliably. The repair algorithm for other brands of washing machines has certain nuances. On our website you can also find articles on the replacement of bearings on washing machines. Ariston, LG and Indesit.
Common mistakes when replacing
When self-replacing these parts, users often make a number of errors that can only complicate the problem:
- hatch cuff damage;
- breaking the wire from the sensor that blocks the hatch;
- damage to the pulley shaft while removing it from the axis;
- wire breakage from the thermal sensor and the heating element;
- damage to the mounting bolts;
- disruption of pipes due to the fact that they forgot to loosen the clamp;
- damage to the sleeve in the process of beating bearings from the drum, resulting in the latter will require replacement.
These errors will only add problems, so it is better not to take up work if repairing a washing machine is not within your reach.
If you are far from technology, then ask for help from a professional.For those with household appliances "on you" - a video to help.
/rating_off.png)