Self repair electric drill
Drill is considered one of the most popular tools of home craftsmen and is used in many types of work. Due to intensive use, parts of the tool can break, which disables the device. Do not rush to the service center: it is quite possible to repair the drill with your own hands and save a lot of money.
Content
Part location
If you know the device of the drill and the principle of operation of the tool, then independent repair of the product will not make it difficult for you.
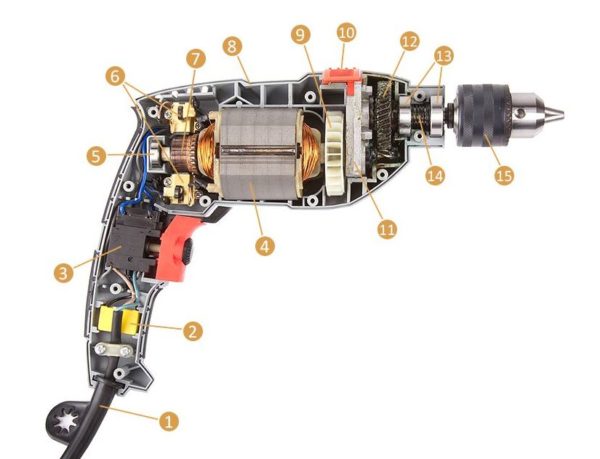
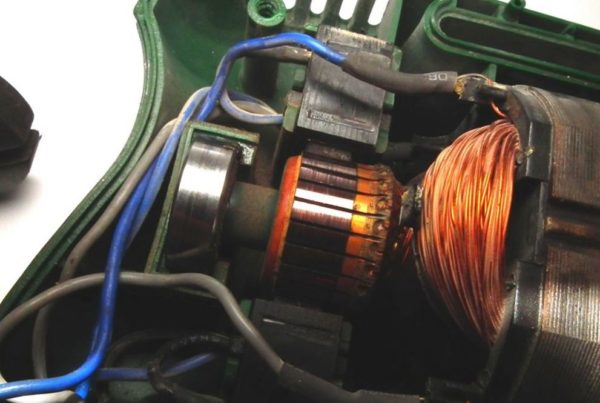
Regardless of the model or manufacturer, all of these electrical tools consist of a typical set of basic components.
- Network cable. Many of the users do not pay due attention to the cord connecting the tool to the network, and in fact, according to statistics, 50% of faults in electrical products occur because of it.The cord breaks easily during operation, its frequent break points are the entrance to the device handle and the place of soldering of the contacts on the start button. The defect often happens due to the mobility of the entire block of the button.
- Capacitor. This small rectangular shape is located in the handle of the drill and is designed to suppress arcing interference.
- Start Button. One of the weakest points - in case of problems in the electrical part of the product is tested immediately after the cable.
- Electric motor stator. In case of a short circuit, a winding breakdown may occur in it - a very unpleasant case, it is necessary to rewind the entire winding. Inside is a rotor or anchor.
- Thrust bearing.
- Location Nodes motor brushes. Brushes are made of durable graphite and are erased from long life, they can be guilty of a malfunction of the electrical part of the product - when working in normal mode, each of them sparkles. Frequent malfunctions - a wad of dust between the body of the brush and the rotor.
- Collector. If its contacts are clean, then the rotor rotation is smooth.
- Product body.
- Fan. It is designed for continuous cooling of the electric motor of the drill.
- Mode switch.
- Gearbox. Always present in any model, since the cartridge does not directly fit on the rotor axis.
- The largest gear gear. Frequent malfunctions: ingress of dust and foreign particles into the lubricant, because of this, it loses its properties, and the gearbox wears out quickly and requires its replacement.
- Two chuck bearings. It is on them that the biggest load falls, therefore they need periodic inspection and maintenance - removal, flushing, replacement of lubricant.
- Axis on which the cartridge is mounted. In models of drill-perforator, it has a return spring.
- Product cartridge. Its collet mechanism for clamping a drill or various nozzles can be of a fast-tightening type or clamped with a special key.
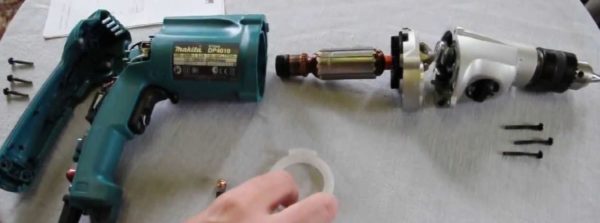
Any repair of the drill with your own hands must begin with a visual inspection of all parts. The principle here is simple - from simple to complex, that is, first we check the cord, wiring, contacts, various fasteners, then we start testing the blocks and the engine. A complete disassembly of the product does not always reach, but in practice one has to be prepared for such a development of events.How to disassemble a particular model, will help the instruction manual.
Frequent breakdowns
Regardless of the build quality and manufacturer, the following malfunctions often occur:
- the electric motor fails due to the failure of the armature or stator;
- maximum wear of brushes;
- bearing problems;
- The revs adjustment button does not work;
- at the start button, the contacts are oxidized or burned;
- breakage of the chuck clamping the drill bit due to wear of the jaws.
If you decide to repair the electric drill yourself, then you must first make a diagnosis and find the fault. It’s rarely possible to fix a failed part on its own, as a rule, it is simply replaced with a new one.
Electrical problems
Before disassembling the drill, make sure that it is unplugged. Any disassembly begins with the removal of fasteners. Then we unscrew the screws and screws, remove the upper part of the product - all components remain in the lower part. Electric circuit drill quite simple - there is no need to separately describe all the elements, everything is so intuitively clear.
Naturally, it is much more difficult for models with electronic adjustments, but repairing a drill with such knots on your own is unlikely, it is better to entrust it to specialists from the service center.
Connection cord
When power is lost, it is only necessary to change the position of the product - the reason lies in the cable, most likely broke one of the wires. It is necessary to disconnect the drill from the network and check with a cable multimeter. You can use the simplest option - a light bulb and a battery in the same circuit.
Attention! Pulling the cord when the drill is plugged in is strictly forbidden, in order to avoid short circuits - it is necessary to rewind the motor winding.
After checking, you can bend it as you please, to find a cliff, then part of the cable is cut off, stripping wires and creating new contacts for connection are performed. When the break occurred in the middle of the cable, it must be completely changed to a new one. True, economical users prefer to connect dangling wires by soldering, followed by reliable insulation of the repair site, but there is no complete confidence in such a wire.
Power button
This part has a very simple design, but in the event of problems it will prevent the inclusion of the drill. Its operation is simple: the key slides in a special block, and the finger-pusher closes the contacts. From long operation inside the unit dust is stuffed, which prevents the button from moving and locks it, preventing the contact circuit from closing. The defect is eliminated simply - to open and remove dust with a brush.
Important! Never try to lubricate the sliding surfaces of the button - dust mixes with grease and production occurs, as a result, the entire unit must be replaced.
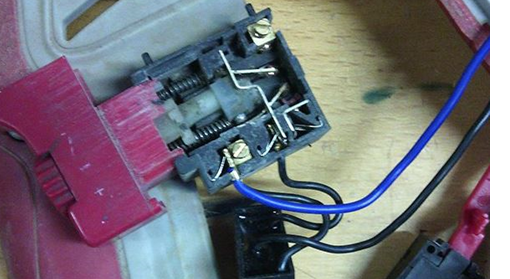
To repair the drill button, you must remove the side wall, check the integrity of the contacts. When nagar was formed - clean the contact with fine emery paper. In case of contact burning, we change the entire unit.
Rotor brushes
Not all users know that mains power is transmitted to the rotor using brushes made of graphite — during normal operation, a constant spark arises between them and the rotor. There are cases when between the anchor and the brush there is a wad of dust, and since the dust is a dielectric, the drill will not work,until we remove the dust and restore contact.
During the work of a brush gradually decrease because their lower part is erased. Periodically, they need to be inspected and changed - this is easy to do, just need to have in stock a new set.
When you notice strong sparking in the area of the brushes, and have changed them recently, this can happen because rotor problems or its collector.
Check the rotor
For thorough inspection, carefully remove the rotor from the stator. Contacts can be charred or have scale - it is necessary to clean them with sandpaper strictly in the direction of rotation. The reason scale appearance there may be a long work at the maximum speed. How to check the rotor for serviceability? Ring the multimeter neighboring lamella - their resistance must be identical.
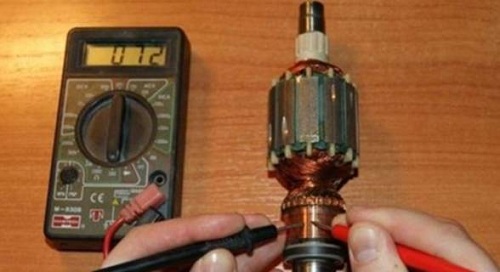
Do not forget check winding - whether there was a closure with the body of the magnetic circuit. In the event of a breakdown, the faulty winding is rewound on its own or referred to a service center.
Drill stator
A visual inspection must be done periodically: when overheating, when the product was working with maximum loads, a protective varnish could melt and occur interturn closure. The winding in this case will blow, and the electric motor is unsuitable for further operation. The check is done in the same way as in the case of the rotor - we check it with a winding multimeter. When a breakdown is detected, the stator winding is rewound.
Leading manufacturers of impact drills pay special attention to the protection of the winding wires, because their products operate in a special mode.

Mechanical damage
Why the device still does not function if you checked everything and eliminated breakages in the electric circuit of the drill? The answer can be only one - the inoperative state of the product arose due to the presence of mechanical faults.
- Bearings not working. Dust gets into the grease due to the breaking of the gland, so they wear out quickly and can jam at some point. It is easy to eliminate: we wash the bearing in kerosene, change the glands, fill in a new lubricant, better than a special compound for products with high revolutions.
- Gearbox broken - very serious damage, need spare gears, or have to replace the entire module. You need to install only the same model. If the drill is a common modification, then in the stores to buy spare parts for it is not a problem.
- Experts consider another one of the most difficult faults breakage of parts of the cartridge.
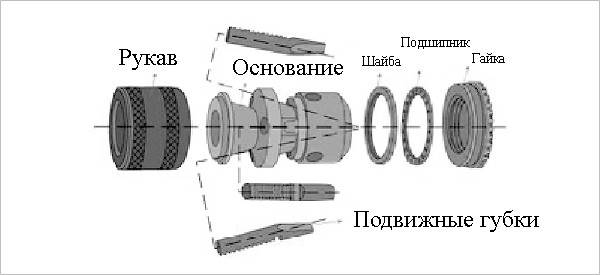
When working often in the inner part of the cartridge fall drilling waste, they are mixed with grease that wedges the inner sponge. The cartridge must be disassembled, all parts are washed and lubricated before assembly. If the limit wear is found, then the part should be replaced; if the base or sleeve is strongly worn, the entire unit should be replaced.
We tried to tell about all the failures encountered during the operation of electric drills. Remember that self-repair is always much cheaper than buying a new product.
/rating_off.png)


