Types of diagrams for connecting the drill button
The electric drill is an indispensable tool in all types of home repairs: it can be used to perform a number of tasks from mixing paints, wallpaper glue to the main purpose - drilling various holes. The button of inclusion of the product is exposed to rapid wear, which often has to be repaired or replaced with a new one. To carry out this rather simple operation, the user needs a connection pattern for the drill button and knowledge of the most common problems with this important detail.
Content
Breakdown diagnostics
This seemingly simple device during use sends signals to the user that he will soon need repairs, but not all understand them. If the drill starts to work with temporary interruptions or the button requires a stronger pressing than before, then these are the first symptoms of incorrect operation of this part.
When you use a cordless drill, the first thing to do is to measure the battery voltage with a tester - if it is less than the nominal, then it should be charged.
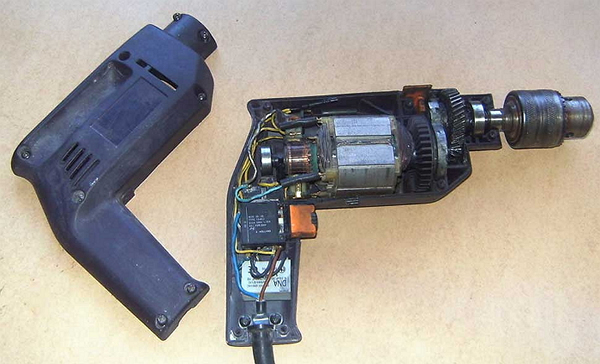
In this case, we are particularly interested in the state and functionality of the on / off button of the product. It is quite simple to check the serviceability of its work: it is necessary to unscrew the fasteners of the main body, remove the top cover and check the voltage of the wires going to the device by plugging in the power cord. When the device shows the voltage, and when you press the button, the product does not work, it means that it is broken or happened burning of contacts inside the device.
Normal on / off button
Repairing or replacing a drill button is considered a simple process, but you need to have certain skills — if you carelessly open the side wall, many parts can fly apart or fall out of the case.
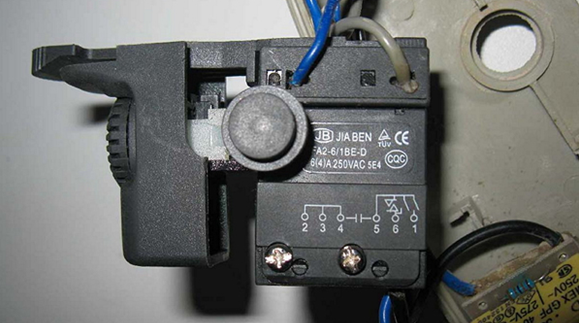
As described above, the button may not function due to oxidation or burning of the contacts. To fix this, you need take it apartby following the following procedure.
- Carefully pick up the clips of the protective cover and open it.
- Remove nagar on the contacts with alcohol, or clean them with emery paper.
- Then assemble and check.
If everything is working fine, it means that the reason was in contacts, otherwise it is required button replacement.
You should know that a special layer is often erased, which is applied under the rheostat slider during manufacture - in this case, the button must also be replaced.
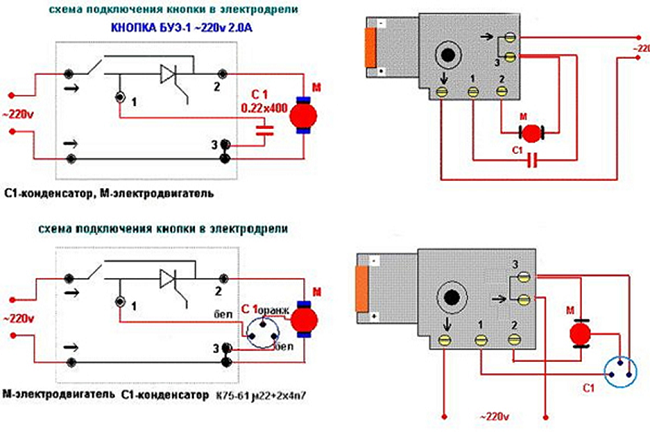
Quite often, the connection diagram of the drill button is used to check the functional capabilities of the whole structure: only if it is available, can a partial repair be made or the button can be properly connected in case of its replacement. The scheme should go along with product instruction manual, if for some reason it is not there, you can search on the Internet.
The power button with reverse / speed control
The button for the drill presented in the photo, besides reverse, has a built-in regulator of revolutions of the electric motor. This design is characterized by increased complexity, so it is not possible to disassemble it without any special skills: as soon as you open the case, all the parts will “scatter” in different directions, because the springs support them. Without knowing their correct location, it will be impossible to assemble the entire structure back - it is easier to buy a new one, and make the connection, referring to a special scheme that can be found on the Internet.

Modern drills come with a reverse, so the button performs several functions at once:
- the main inclusion of the product in the work;
- adjustment of rotations of rotation of the electric motor;
- turning on the reverse - changing the direction of rotation of the motor rotor.
Attention! Reverse control and speed control are in different cases - they should be checked separately.
It must be remembered that in modern products speed controller located on a special substrate, and in the manufacture of it is filled with compound - an insulating composition, which after curing protects all parts from mechanical, thermal and chemical effects. Therefore, it is beyond repair.
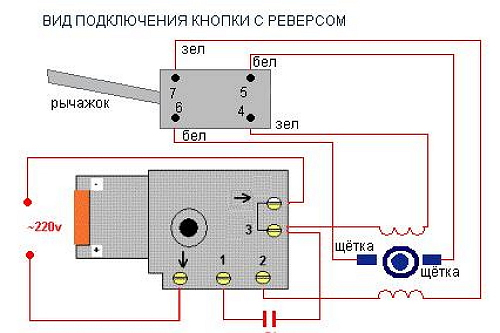
As can be seen from the wiring diagram, when there is a drill button with a reverse in it, the rotation is switched using special toggle switch. At the same time, plus or minus is applied to different brushes, so the engine armature rotates in a different direction.
You should not independently disassemble the start button of the drill in case of its complicated construction - disconnect the wires and take them to the service center, where professional specialists will carry out a full diagnosis and repair.
Our assistant can drill different materials, so often there is a lot of dust and waste. After each use should clean the drill, then the next time you use the device, it will work like a Swiss watch: without glitches and annoying stops.
/rating_on.png)
/rating_off.png)


