Choosing, tensioning and sharpening a saw chain
The saw chain at an electric saw is an important functional detail which sooner or later will have to be sharpened, repaired or completely replaced with a new one. To do this correctly, you need to consider the design and other features of this tooling.
Content
How to choose a chain for electric saws
Please be aware that there is no difference between the chains for benzo and electric saws.. For both types of tools, chains are made of the same materials, and mounted on tires that are the same for both electric and gasoline units.To select a chain for an electric saw, several parameters should be considered. Some of them must comply with the specifications of the installed tire.
Chain size
This parameter always matches tire change your unit. If you get a saw chain smaller than a tire, you cannot wear it. Also, equipment that exceeds the size of the tire does not pull on it properly. In both cases, it will not be possible to use a power saw. The dimensions of the sawing tool can be specified in inches and they can have the following values: 10 ″, 12 ″, 13 ″, 14 ″, 15 ″, 16 ″, 18 ″ and above.
Chain pitch
Determined by any three rivets of the chain. In the picture below, the letter “a” shows exactly this distance, which is measured in inches.
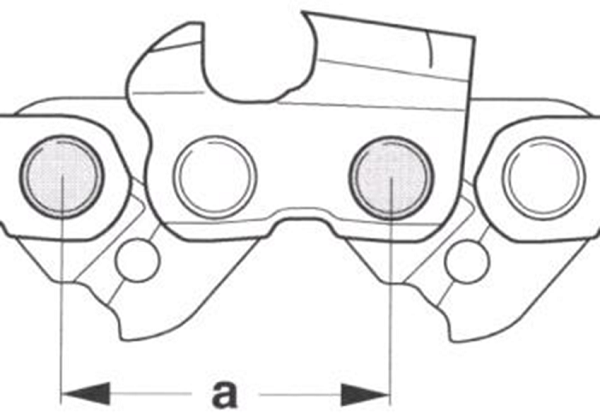
The chain pitch can have the following values: 0.325 ″, 0.375 ″ and 0.404 ″.
A step with a size of 0.375 ″ is often written as a fraction, as 3/8 ”(3: 8 = 0.375), so as not to be confused with the number 0.325.
You should know: the more step at the saw chain, the more power the unit's engine should have. On amateur and semi-professional units with a capacity of 1.84 kW, chains with a step of 0.325 ″ are installed. Such equipment can be cut thin branches, cut knots, and also use it during construction work, for example, cut boards.Sawing with a step of 3/8 (engine power about 2.94 kW is required) it is already possible to cut thin trees and cut boards of average thickness. Equipment with a pitch of 0.404 ″ (engine power from 4.41 kW and above) is used only on professional equipment and is designed to perform work of any complexity.
Lead Link Thickness
The thickness of the shank (also called the leading link) - this is a very important parameter when choosing a tool for electric saws.

In order to choose the right sawing equipment for the unit, it is necessary that the thickness of the shank matches the width of the groove of the tire. Thickness may have the following meanings.
- 1.1 mm (0.043 ”), 1.3 mm (0.05”). A snap carry out work with minor loads and apply it on small electric saws. The rig has a pitch of 0.325 ″.
- 1.5 mm (0.058 ”). Chains with this shank thickness have a pitch of 3/8 ”. They are able to withstand heavy loads and are installed on semi-professional and home appliances.
- 1.6 mm (0.063 ”), 2 mm (0.08”). Tires and saw accessories with these values are used to perform complex work with large loads only on professional equipment.
Number of links
By the number of links (shanks) is determined tooling length. Choosing a snap, you can rely either on the length values or on the number of links. Since different manufacturers in the description of the product can only indicate the number of cutting elements, it does not hurt to know both that and other information.
Type of cutting links
According to the configuration, the cutting elements of the tooling are divided into 2 types: chipper and chisel.

Chipping type cutting tooth - it is a sickle-shaped cutter with a large area of contact with the material. Crescent teeth increase the load on the engine of the unit and do not have good cutting characteristics. But, thanks to this form, the teeth easily cope with pollution, and their editing does not require special precision.
Chisel tooth profile reminds the number “7” and is popularly called the “seven”. The equipment with such a tooth profile is distinguished by the speed of sawing, the quality of cutting and is used mainly on professional devices. Sharpening a tooling with chizel teeth in everyday life is quite difficult, since even the slightest non-observance of the sharpening angles negates all the advantages of the chisel profile of the cutter.
Cutting teeth material
When choosing a tool for the electric saw, ask what material its cutters are made of. For sawing soft wood, chains with cutters from chrome-nickel, alloy steel. For sawing frozen, contaminated and hard wood tooling with cutting elements made of alloy steel will not work. For these purposes, use cutters, reinforced carbide tippedcharacterized by increased wear resistance.
Profile height
The height of the profile of the tool depends cutting depth and tool productivity. The higher the profile of the cutting tooth, the stronger it will go into the material. Teeth that have a small profile height will remove thinner chips during sawing. The depth of the incision of the tool into the material is adjusted by grinding off the stopper that each cutting element has.
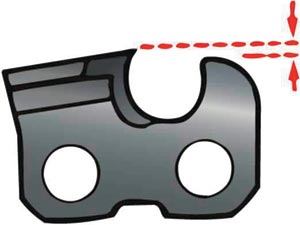
There are 2 types of chains in profile height:
- height 0,025 "(0,635 mm) refers to low-profile tooling;
- 0.03 "(0.762 mm) profile height - to high profile.
This information can also be found. in the instructions for the unit (indicate the types of tooling applicable to this saw model).It will be useful if you sharpen the teeth yourself. On professional units, both high-profile and low-profile equipment are used, but on household units, only low-profile equipment is used. High profile chains are a highly productive tooling. But using it increases the vibration and aggressiveness of the instrument.
To reduce the aggressiveness of the chain, the developers resort to a little trick: with a large pitch of the chain, a low cutter profile is made and, conversely, as the pitch is reduced, the profile also rises. This technique allows the unit to process the material at the same time efficiently and with less aggressiveness.
Type of cut
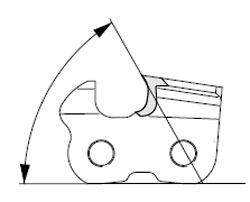
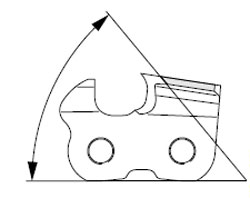
It is no secret that wood has a structure consisting of longitudinally arranged fibers. Therefore, for cutting this material along or across the fibers, different sharpening of the chain saw teeth is required.
- For cross cutting Timber tool teeth sharpened at an angle of 25-30 degrees.
- For effective sawing along the fibers Requires sharpening incisors at an angle of 5 to 15 degrees. But these chains are used very rarely, since it is better to produce longitudinal sawing of wood with a band saw or circular saw.
The number of cutting elements
The standard saw chain has two shanks on each cutting link. However, to reduce the cost of their products, some manufacturers produce a snap with a smaller number of cutting elements, which is called: “with a pass” and “semi-pass”.
![]()
In a snap-in with a half-pass, an additional link is inserted between every second pair of cutters. And in the chains with a pass, an intermediate link is inserted after each cutting element. The result is:
- in a standard chain with 64 shanks, there should be 32 cutting elements, i.e. 50%, of all links;
- in a tool with a semi-pass, the number of cutting elements will be 40%;
- chains with a pass have the smallest number of incisors - 37.5%.
Equipment with gaps increases the aggressiveness of the tool, reduces its performance, contributes to the rapid wear of the tire, as well as the drive sprocket.
For this reason, you should not buy cheap equipment. In the future, such savings will not be able to justify the funds spent on the repair or replacement of all parts of the saw headset.
When you need to change the chain
The need to replace the circuit mainly arises when wear and excessive stretching. If you are unable to stretch the snap using the adjusting screw, then it should be replaced. But installing a new part on an old, worn out sprocket and the same tire is not recommended, since this will lead to its rapid wear.
Many owners of electric saws know that the wear of the chain occurs 2-3 times faster than the development of the life of the tire and sprocket, and resort to a little trickery.
- Having a new electric saw, you should buy 3 saw chains at once.
- Having worked with one chain for several hours, it should be replaced with a new one. Further, the second chain varies according to the same principle.
- After each replacement of equipment it is necessary to overturn the tire for uniform wear.
Performing these simple manipulations leads to uniform wear of all parts and extends their service life.
Replacing the chain on electric saws
If you want to change the equipment on the saw, then it is done in the following way. For example, shows how to put the chain on Makit's electric saw.
- On the casing, closing the drive sprocket unit, you can see a small cover with a printed pattern. If you lift it, you get a handle with which you can unscrew the screw.
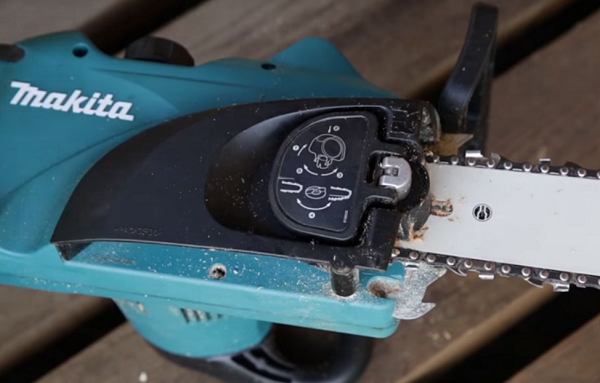
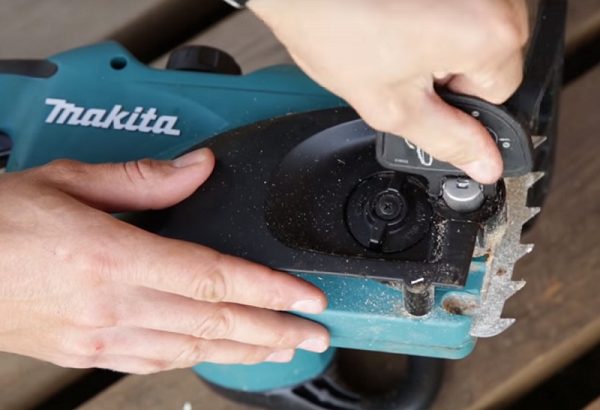
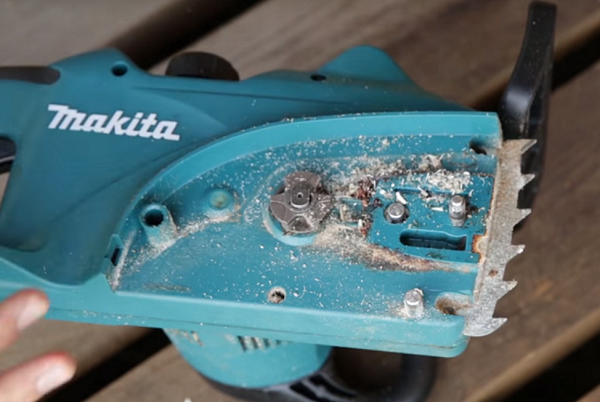
- To remove the chain from the power saw, first unscrew clamping screw and remove the cover. You will see a leading sprocket and 2 pins on which the tire is put on.
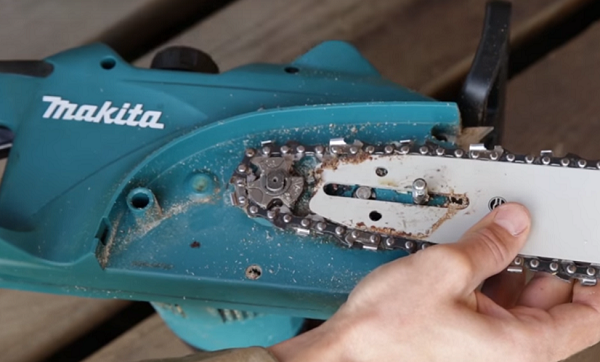
- Disconnect the tire with the chain from the unit.
- Next, you should carefully put the chain on the tire, observing right direction cutting teeth, install the chain on an electric saw (with the tire), putting it on an asterisk.
- Hold the tire, put the casing on.
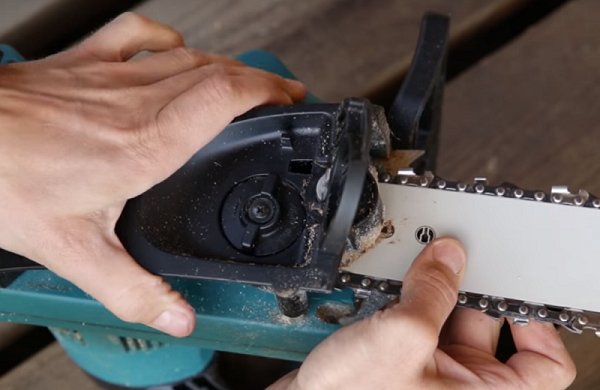
- Turning in different directions tension adjuster knob, get it into engagement with the adjusting screw.
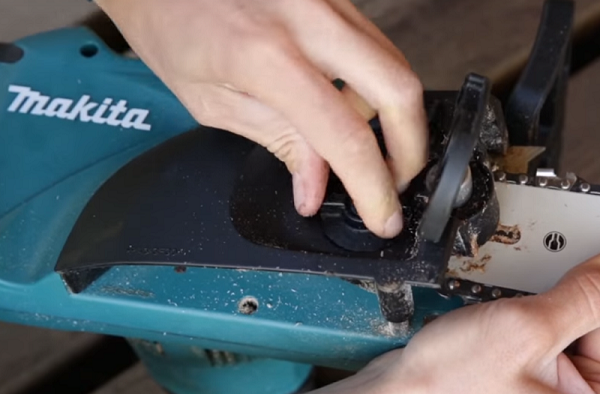
- Tightening the clamping screw slightly, check the tension of the cutting element of the unit.

- If necessary, tighten the chain to the desired level with the adjusting thumb and finally tighten the clamping screw. Proper installation of the chain checked by drawing (manually) it over the tire. Snap-in should move freely without any difficulty. On this replacement circuit is considered over.
How to adjust the tension of the chain
Tighten the chain on the saw is required in the following cases:
- after replacing the equipment with a new one;
- at wear of equipment which over time stretches.
During operation of the saws should not allow the chain to sag.Also, it can not be too tight. Loose fittings can come off the tire and damage it. Strongly tightened equipment can break off or lead to a rapid failure of the sprocket and tire grinding.
To tighten the chain on the unit, do the following.
- Loosen the tire fixing screw or nut (depending on the machine model).
- Via adjusting bolt increase the tension of the snap. The correctness of the tooling tension is checked in a simple way: pull the chain along the center of the tire and look at the drive link. Normally, 1/3 of the shank (its tip) should not extend from the tire groove.
- Having achieved the correct tension, tighten the clamping screw (nut).
Sharpening the chain at home
To understand that sharpening of a chain of a saw is required, it is possible by several signs:
- during operation, the tire “leads” to the side;
- sawing speed decreased significantly;
- The chips have the shape of needles, and there is a lot of dust in them (sharply ground teeth produce square chips of uniform shape).
Sharpening rules
Getting to sharpening the cutters of the chain saw, you need to have an idea about their design, consisting of:
- base link;
- blade blades;
- cut depth limiter;
- vertical blades;
- upper blade located horizontally.
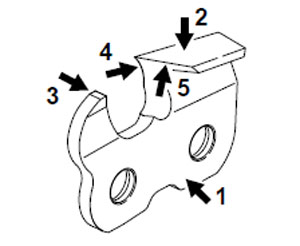
To give the chain maximum cutting properties, its blades are ground at certain angles. The cutting ability of tooling mainly depends on the rake angle, the angle of the upper blade and the angle of sharpening.
The blade must be tilted back and shaped. back angle. It is needed to deepen the upper blade into the material.
To form rear corner of the end blade Grind off the back of the scapula. This angle is responsible for cutting chips (lateral).
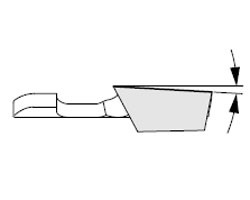
For the formation rake angle (from 60 ° to 85 °) meets the end edge. It is measured relative to the bottom of the link.
For giving the angle of the back of the upper blade grind down his back. The angle can range from 50 ° to 60 °.
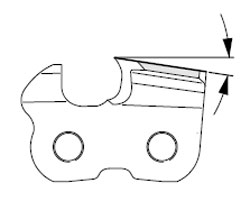
Sharpening angle measured at right angles to the tire.
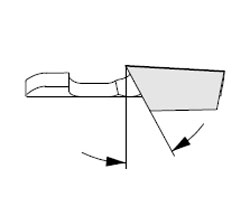
The greater the value of the sharpening angle, the more productive the tool becomes. If this angle is reduced, then the vibration will noticeably decrease, and the cutting process will occur more smoothly.
The sharpening angle should be no more than 35 ° and not less than 25 ° if the tooling is intended for cutting across the fibers. But this rule does not apply to longitudinal chains. They have a sharpening angle of 10 °.
Each cutter has a stop that limits the depth of penetration of the blade into the wood.
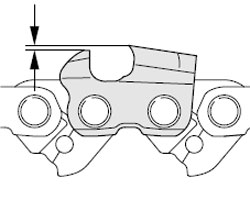
Normally, the distance between the top of the blade and the stop should be between 0.5 and 0.8 mm.
Chain teeth sharpening algorithm
Chains for electric and chainsaws, especially with carbide taps, are usually sharpened on a machine specially designed for this purpose. The latter has a disk for sharpening and a swivel table on which the rigging is mounted.

Sharpening your own chains requires availability of special adaptwhich helps to withstand the required sharpening angles in this operation. You will also need to prepare two files: one with a flat profile, and the second with a round one.
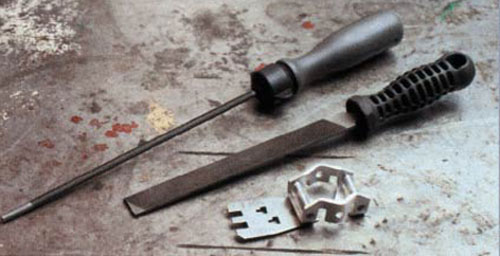
To sharpen the saw, follow these steps.
- Clamp the tire assembly in a vice.
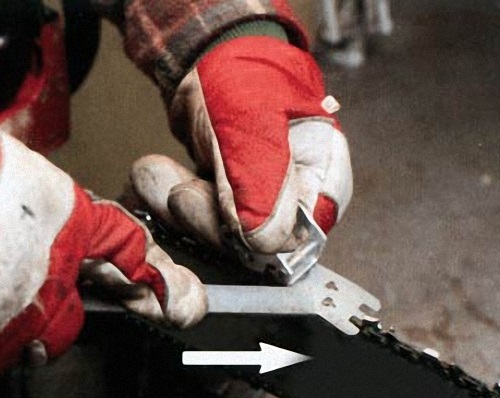
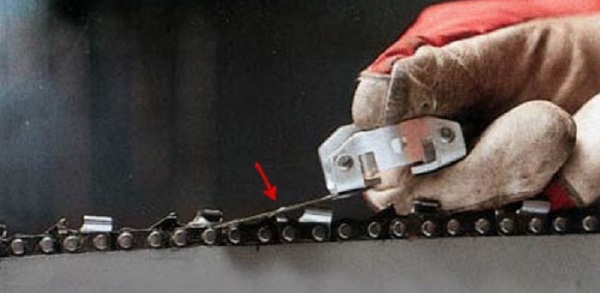
- First, the cutting edge of the teeth is straightened. Place the fit on the snap as shown in the photo below.
- Taking round filestart moving it forward with light and smooth movements.Their number should be the same for all incisors. Thus sharpen all the teeth of the tooling (through one), then rotate the template and perform the same operation for every second non-hardened tool.
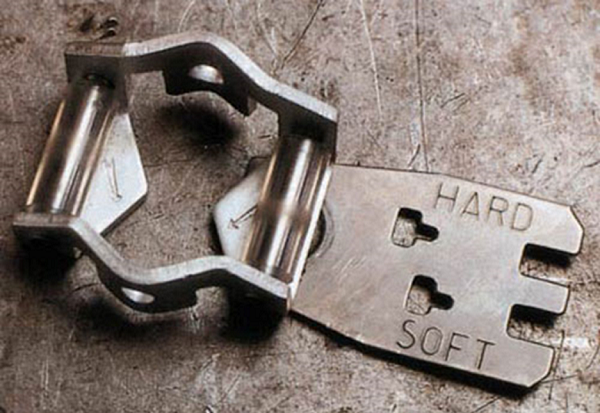
- After editing the cutting edges of the incisors, a little grind off the depth limiter. Install the template as shown in the following photos.
- The template has two holes, next to which are the inscriptions “HARD” (hard) and “SOFT” (soft). Install the template on the fence with the “HARD” hole, if you want to cut hard wood. For cutting soft materials, the stop is grinded through the “SOFT” hole.
- For grinding the stop is used flat file.
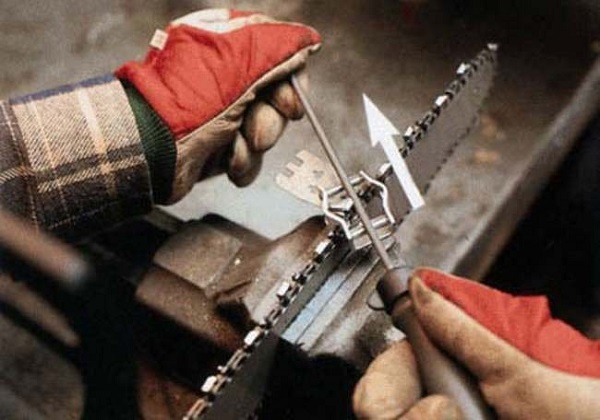
Important! The depth of cutter must not be ground without a template. In excess of the normal, the stop will cause the saw teeth to deepen too deeply into the material, which will increase the load on the engine of the unit, increase vibration, reduce the accuracy of sawing and increase the risk of kickback.
/rating_off.png)


