Homemade machines from electrical cutting
At home, you can independently make an electrical surface gage or a jointer. They will facilitate and speed up the work with wooden blanks. With the help of self-made machines it will be possible to cut and adjust the thickness of the lumber, as well as to carry out surface finishing and some other operations. The simplest option is to use an electric planer, which can be fastened to the machine bed upside down. In such models, the conversion to the thicknessing planer or jointing machine is provided for by their design. In other cases, you will need to make special fasteners for reliable fixation of the tool in the working position.
Content
Electric Planer
Thicknessing machine is a woodworking equipment, with which they cut flat planes of lumber to achieve the desired thickness of the workpieces. In this process, only pre-prepared (otugugovannye) boards or bars are processed.
Preparation of materials and working tools
There are quite a lot of various options for creating structures that allow you to convert electric planes into reysmusovy equipment. To make a relatively simple homemade machine at home will require the following tools and materials:
- screwdriver with a set of bits;
- square or corner joiner;
- roulette or simple ruler;
- screwdrivers with different tips;
- spanners;
- electric plane;
- jigsaw or hand saw on wood;
- plywood with a sheet thickness of 1.5 cm;
- long screws with coarse thread (4 pieces);
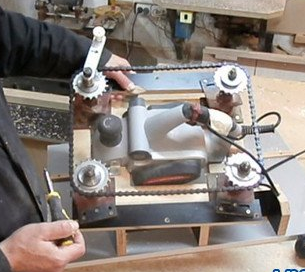
- a bicycle chain and four drive stars for it;
- wooden bars (2.5 x 2.5 cm) and slats (1.5 × 1.5 cm);
- nuts with thread M14;
- washers of suitable sizes;
- screws 25 per 100 mm.
The electrical plane will serve as the main mechanism of the created machine. Screws can be replaced by screws of similar size with wood screws.
Manufacturing algorithm
Simplify the process of creating a gauge tool from electroplaning will help drawings and diagrams, but it is easier to make from photographs. Make the equipment in such a sequence.
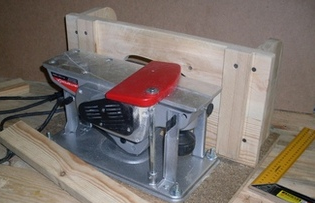
- A rectangular fragment having a length of 50 cm and a width of 40 cm is cut out of a sheet of plywood.
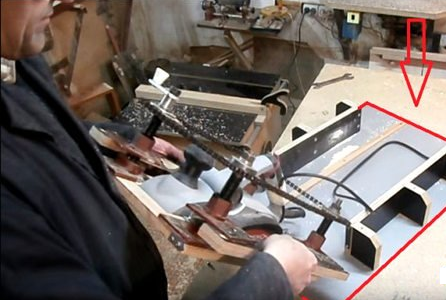
- It collects a stand for an electric planer, mounted on a working platform, from pieces of plywood, which are fastened to each other with self-tapping screws or screws.
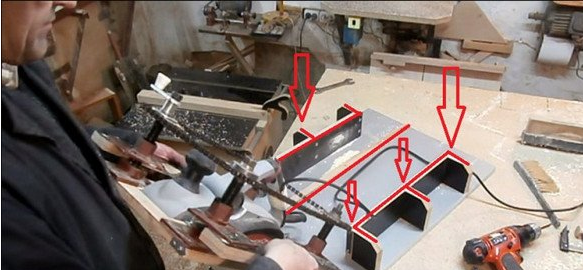
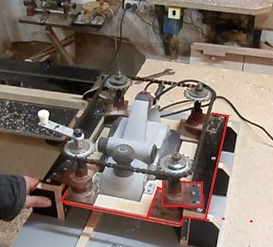
- Create working platform for installation on it electroplane. For this electric jigsaw cut out in the prepared rectangular piece of plywood aperture in the shape of the power tool used (as shown in the photo below).
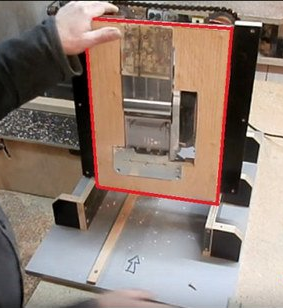
- Using special clips, which often come bundled with an electric planer, as well as screws, fix this tool to the working platform.
- On the basis of using screws mounted drive mechanismwhich will ensure its lifting and lowering.At the corners of the platform set the screw screws with asterisks.
- Using screws, install the base platform on the stand made for it.
- In a convenient place, a handle for controlling the positioning of the surface gauge with nuts and washers is attached to a long screw.
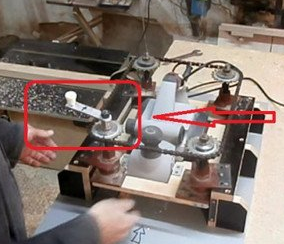
- Install measuring bar (line segment) and index arrow.
- Make setting and testing created devices.
Created design set on a flat surface. For fixing to the workbench or table, you need to use suitable fasteners.
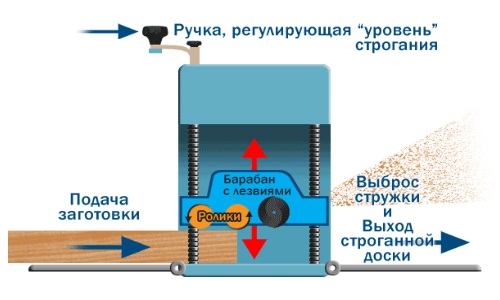
The presence of the drive mechanism provides the ability to set the desired thickness of the workpiece.
When assembling the machine with your own hands, you should fix the power supply cable so that it does not interfere with the work, and the wire was not accidentally damaged. In order to secure the electrical planer itself at the working site, it is recommended to use bolts with nuts.
The measuring ruler is an obligatory constructive element of the created self-made surface gauge. With its help establish the thickness of the lumber, which is planned to be processed.A piece of plastic, wooden or metal ruler 8 cm long can be used as a bar. You can also make an arrow pointer from similar materials.
Assembling a jointing machine based on a jigsaw
The planer is designed to remove any irregularities from the surface of the wood. The workflow is thus one-side planing of sawn timber. You can also shoot at different chamfer angles. Due to the processing on this equipment, the bars or boards become smooth.
The construction of the planer is simpler than that of the surface gauge counterpart. This allows you to self-assemble the installation using the available materials.
Manufacturing plan jointer
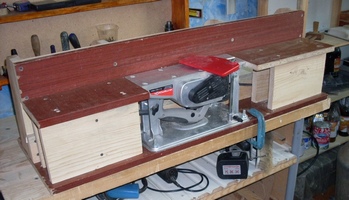
To make a planer for processing small workpieces, you need an electric planer that can be fixed in a stationary position. The basis of the created unit can serve fragment of plywood, MDF or chipboard. A piece of 50 by 35 cm is enough. The thickness of the sheet material used should be more than 2 cm.
Gather a tool for joking, performing actions in the following sequence:
- cut out from the available sheet material the base for the machine;
- to him with screws or screws attach the support for the workpiece at an angle of strictly ninety degrees (for his exposure using a square);
- set the ribs that will ensure the rigidity of the stop;
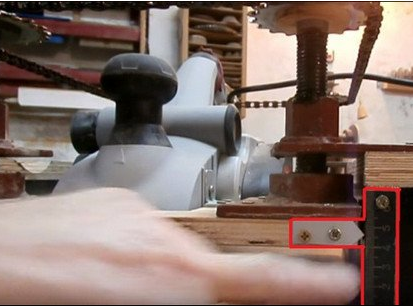
- An electric planer is attached to the base with M8 bolts and nuts.
Before fixing the stop, cut a hole in it under the nozzle and for cooling the tool motor.
If you need to plane large workpiecesit is enough to increase the size of the generated unit. At the same time you get a design, as in the photos below.
In addition to the considered variant of the electroplane, fugovalnuyu equipment can be assembled in another version. The practical implementation of such structures depends on the materials and creative abilities available to the master at home. How to make self-made fugovalny units of other designs, shown in the following videos:
Making stand for electroplane
Working with an electric planer constantly, it is recommended to have a special stand that is suitable for storing it and installing the tool on it immediately after turning it off.
The use of such a device is especially important when working with powerful, heavy electric planers.
The need for a special stand is due to the fact that the metal drum with blades, after disconnecting the supply voltage from the tool's electric motor, does not stop immediately, but after some time (about 6 seconds). All this period he is still moving by inertia. The inertial duration of rotation depends on the massiveness of the drum and the power of the equipment used. At the same time, the power tool cannot be put on the table with a sole or workbench, because it is possible not only to damage their surfaces, but also to get injured.

To keep the instrument in your hands all the time the drum stops, you need to use a stand of special design. The main element is a groove about 8 cm wide, and 0.6 cm deep. It is necessary for the drum to rotate freely to its full stop. The accuracy of the positioning of the electric planer placed on the stand (when the blades are above the cut out groove) is ensured by the presence of a front stop from the bar.
The width of the groove and the distance from its front edge to the stop are determined by the dimensions of the used model of the power tool.
Necessary tools and materials
To make the stand yourself, you need the following tools:
- electric jigsaw, equipped with a file for cutting figures;
- screwdriver with a set of bits;
- drill with metal drills 3 and 4 mm in diameter;
- awl;
- hand saw on wood with fine teeth;
- ruler or tape measure;
- gon;
- pencil or marker;
- milling cutter in spherical shape;
- emery paper;
- chisel (enough with a 3-4 centimeter wide tip).
To create the construction will require the following materials:
- a piece of board up to 1 m long, 20 mm thick, and 140 mm wide;
- wood screws - 2 pieces 4 by 45 mm;
- a plank made of wood 30 mm wide, 20 mm thick, and 140 mm long;
- 4 screws with large caps 4 to 15 mm.
All tools and materials recommended cook in advance before making a stand, so as not to be distracted by trifles in the process.

Creation sequence
In the manufacture of stands for electric planer operate according to the following algorithm:
- Cut off from the board with a saw or jigsaw a fragment of 50 cm in length.
- According to the scheme above, mark the bar with the board.
- They drill holes for the screws (at the marks marked at the right points) for fixing the stop.
- Try on the used model of the electric planer to the prepared workpiece of the base of the stand, marking the future placement of the groove by the location of the tool drum.
- By marking cut out a groove with a sawing file, making it approximately 4 cm morethan this parameter at the slot under the drum. Nadpil produce at the edges and in the center.
- Chisel removes wood from the groove and smooths it out.
- Saw jigsaw excess from the workpiece.
- With the help of screws fix the front stop. Along the edges twist 4 screws, which will serve as the "legs" stand.
- Emery paper sanding made stand to remove roughness.
The position of the stand is adjustable with screws.
When finished, you should make sure that the groove is made of the desired width and depth: to do this, simply put the power tool on top of the stand and look at the location of the drum from the side. If necessary, you need to deepen or expand the groove.
After turning off (when the drum still continues to rotate), the instrument is placed in the following way:
- at first they rest the front edge of the planer base;
- only then lower the power tool on the stand.
Making the stand does not require much time, labor and money. But such a device facilitates the work.
Self-made gauges and jointer planners are much cheaper than their factory counterparts, but their functionality is inferior to proprietary equipment. However, they are quite enough to perform the basic operations for which these devices are intended. Practical use of self-made machines significantly speeds up the processing of wood, improves its accuracy and quality compared with the manual use of an electric planer.
/rating_off.png)


