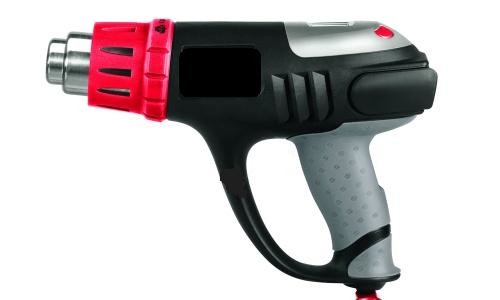
Homemade building hair dryer
Not all users understand the intricacies and purpose of the installation hair dryer when carrying out repairs in the apartment on their own. However, some work without his participation is practically impossible. In order to save the budget, you can assemble such a device at home from improvised means. We will tell you in detail how to make a building hair dryer with your own hands, and what is needed for this.
Content
Possibilities of the construction hair dryer
Before discussing the independent production of such a very dangerous household appliance during operation, let us consider all the possibilities of an industrial dryer so that skeptical ordinary people change their attitude towards this product in the household. Let's start with practical application and list the main points in which its use would be appropriate:
- remove unwanted stickers on any basis, as well as price tags and information signs for the goods that are outdated;
- remove the vinyl coating from any carrier without the use of chemicals and mechanical impact;
- melt the resin, bitumen or wax to cover the surface;
- to make an original form a set of candles for a gift;
- bend plastic pipe of any diameter in the right place;
- remove the old paint from any coating without the use of piercing-cutting tools - only a spatula;

- unscrew stuck nuts and screws;
- remove the thrombus in the water supply system by the method of defrosting;
- warm up the frozen lock on the car door;
- solder thin-walled copper tubes;
- bend thin wooden parts;
- connect a torn garden hose for watering;
- dry building materials soaked in the rain;
- dry the wall after wetting due to careless neighbors;
- solder delicate thin-walled copper pipes;
- form and solder plastic pipes;
- form and bend any wooden part;
- to connect among themselves garden watering hoses;
- dry building materials, paints, varnishes;
- Kindle brazier in any weather.
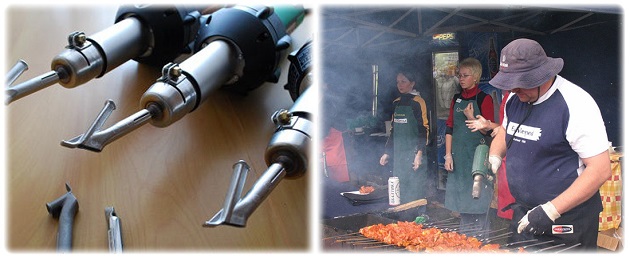
As you can see, the range of application is quite impressive. Especially homemade hair dryer will help when repairing a carHowever, experts say that there is no alternative to it in almost any operation - whether it is body decor or soldering of a plastic bumper.
Preparation process
To assemble a high-power dryer, you must first prepare a set of tools for plumbing, be patient and perseverance in order to fulfill your plans.
If you do not have the knowledge and experience with electrical products of varying complexity, the ability to understand the nuances of the electrical circuit, then do not even begin the preparatory work - this is beyond your power.
For those who are in the know and know how to work with metal and various tools, we continue our story. From the parts we need:
- metal or durable thick plastic for the base, a plastic case from a hair dryer is not suitable for drying hair, because at a strong temperature it will lead;
- metal or dural sheet - from it we will make propeller blades for the fan;
- nichrome wire a certain section for the manufacture of a powerful spiral of the heating element - the base canborrow from an old fen if it is ceramic;
- high power cablefrom which the power cord is made;
- piece of rubber pipe use the required diameter as an insulator;
- metal nozzlewhich will form and direct the hot flow to the right place;
- thick mounting gloves, goggles and other personal protective equipment.
When designing a building hair dryer, it is necessary to take into account the high temperature that will be created in the zone of operation of the heating element. Therefore, as far as possible, it should be taken out of the main body or applied additional means of isolation.
Hair dryer installation
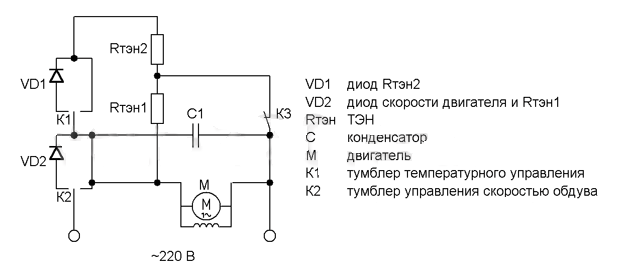
Having prepared everything you need, you should not forget about electrical circuit - without it you can not properly assemble a homemade hair dryer with your own hands. We are starting to modernize the old, long spent hair dryer. First of all, we remove all plastic parts and replace them with similar ones, but from ebonite or textolite.
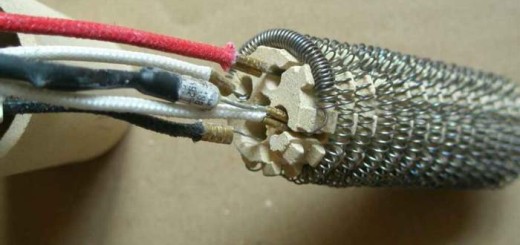
Heater coil We produce as follows: we wind a nichrome thread onto a rod of the desired cross section, resulting in the required twisted structure.Its main feature - the more turns, the higher the temperature will be. At the same time, we make sure that the neighboring turns do not touch at all - this is fraught with a short circuit. Nichrome cannot be soldered, so we fasten the ends of the helix to the power cord and isolate or use special pads, where we insert the ends from the wire and connectors of the network cable.
As an additional insulator on the handle building hair dryer, made their own hands, wear a rubber tube. The best option is the old corrugated hose from a vacuum cleaner, it is quite rubberized inside and perfectly protects your hands from excessive temperature.
If the heating part is made far beyond the main body, then the handle can not be isolated, however, while the self-made design looks like a long-nosed alien from a nearby galaxy, but fulfills its purpose properly.

At the final stage, it must be remembered that the fan is first turned on, which begins to draw air into the device, only then can the heating element be turned on. At the end of the work, everything happens exactly the opposite: first, turn off the heating circuit, and then the air supply system.
For uninterrupted supply of air flow into the product, some craftsmen use a compressor for an aquarium, only select its capacity and performance, respectively.
After making the hair dryer check its functional abilities, for this it is better to use some low-value surface, because the temperature still needs to be adjusted in the process of finishing the product.
Normal operation of the hair dryer looks like this:
- the fan or air supply compressor is turned on first;
- then voltage is applied to the spiral, it is heated;
- the air, passing through the zone, is heated to the optimum temperature and goes outside;
- a nozzle mounted on a hair dryer directs it to the right place.
Security
When working with such handicrafts, you should not forget about safety measures.
- You can not use a hairdryer near the gas equipment - first of all it concerns the room for the kitchen.
- Removing paints indoors should be done only with exhaust ventilation, becausewith active heating, their components volatilize and can mix with the air you breathe, which does not add to health.
- In any type of work involving a construction dryer, one should attend to the presence of fire extinguishing agents, in the form of a bucket of water.
- The product should not be placed on unprotected surfaces - during operation, the nozzle gets very hot and can spoil the decor of the coating, it is better to prepare a piece of board or plywood.
- When removing the old paint from the window opening, it is necessary to use a special device that can be made independently by copying it from the standard for the factory equivalent. It is impossible to work without it - the glass can break apart into small pieces due to the high temperature and injure you.
- Before removing the paintwork, it is necessary to find out its exact origin so that there is no toxic constituents.
- It is unlikely that someone will think to dry the hair with this hairdryer, but to warn that it is dangerous, we must.
To help home masters who decided to make a building hairdryer themselves, there is a video where the author went on his own and designed a unique sample of a building hairdryer, where all the details were made by hand.
/rating_off.png)


