Restoration, alteration and repair of the screwdriver battery
It is no secret that the cost of a new battery for a screwdriver equals 70% of the total cost of the device. During operation, any rechargeable battery (battery) begins to lose its capacity and as a result completely or partially fails. But do not throw out the battery that has served its time, because it can be reanimated at home.
Content
How to diagnose battery failure
The main problems with the screwdriver battery include the following:
- battery not charging;
- The battery charges quickly and discharges just as quickly;
- The battery does not hold charging for a long time.
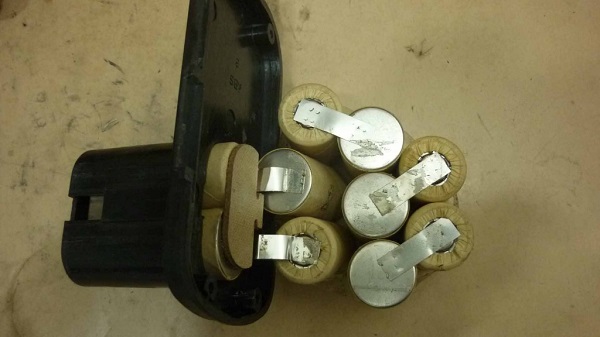
A malfunction of the battery of the screwdriver can be caused by the failure of one or several storage elements. Malfunction of all cans in the battery pack is very rare, so it is quite possible to restore the battery. Since all the banks are connected in series, you will need to disassemble the unit and find the faulty ones.
Full battery check is carried out in several stages, with a fully charged battery.
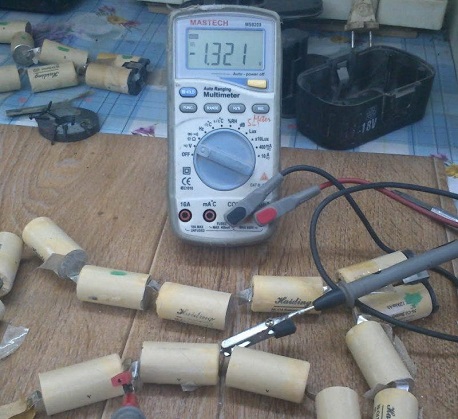
Test with a multimeter
Since all components of the battery pack must have the same voltage level, it will not be difficult to find the faulty cell. For these purposes, usually use a multimeter, switching it to the voltage measurement mode. When measuring, consider Rated voltage for different types of batteries:
- Li-Ion (lithium-ion) battery has a rated voltage of 3.6-3.8 V;
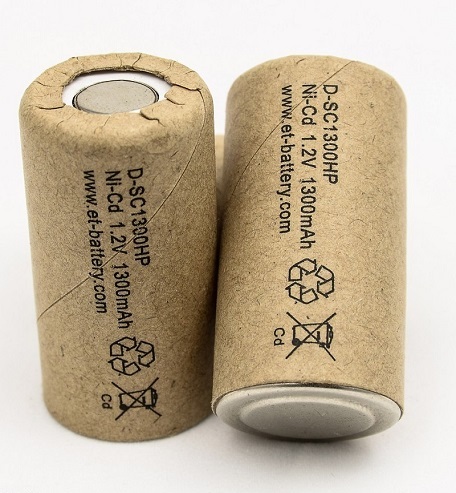
- Ni-Cd (nickel-cadmium) and Ni-MH (nickel-metal-hydride) batteries have a voltage rating of 1.2-1.4 V.
The search for a faulty battery is as follows.
- Connect the battery to the charger and wait for it to fully charge.
- Disassemble the battery case, remove all the cans from it and measure the voltage on each of them.
- Banks with a nominal voltage below the norm must be marked.
- Assemble the unit by installing all the extracted elements into it, and connect it to the screwdriver.
- In the next step, you need to turn on the tool and perform several operations with it in order to achieve a noticeable drop in power.
- After discharging, you should again disassemble the battery pack and measure the voltage on all batteries in the circuit. Pay special attention to labeled cans.
- If you notice a voltage drop of 0.5-0.7 V on any battery, then such a battery can be considered unsuitable and you will have to replace it.
Load test
To find out after what time the battery fully sits down, you need to check the battery under load. The latter is selected in accordance with the power of the battery.
As a rule, it is customary to select the load to check the battery in the range of 35-40 watts. To do this, you can use a 12 V light bulb with a power of 40 watts.
Connect the battery through the ammeter to the light bulb for 2-3 minutes. All measurements should be carried out with a voltmeter.The voltage at the battery outlets should be slightly more than 12.4 V. If during this time the readings have fallen and are in the range of 12–12.4 V, this indicates that there are damaged banks in the circuit. Also the fact that the block contains faulty elements can signal drop in brightness of the connected lamp.
Ways to restore the battery at home
It should be noted that recovery is possible only for Ni-Cd batteries with a pronounced memory effect, due to which the battery capacity is lost. As a result, the battery quickly sits down, and after a break, it starts working again. This problem is quite easy to fix.
- Fully charge the battery in the usual way, ideally, charging should be carried out with a small current.
- Next, you should completely discharge the battery by connecting the load to it. As the latter, you can use a conventional light bulb at 12 V and power up to 40 watts. Thus, there will be a mild discharge, as a result of which not only the outer layer of the battery will be discharged, but also its internal plates.
- You can spend from 3 to 5 cycles of charge-discharge. After that, the memory effect of your battery will be erased, and the battery capacity will increase markedly.
In some cases, when it is not possible to purchase new banks for the battery pack, they can be revived by topping up distilled water, because over time the electrolyte in the banks boils away, and they fail. You can restore the battery as follows.
- Identify the faulty batteries using the method described above.
- Fully discharge the battery by connecting a 12 V (40 W) light bulb to the terminals.
- Disconnect the unsuitable items (marked) from the rest.
- Remove a small piece of paper insulation from the top of the jar to open a small area with a groove. If you remove all the paper, you will have to wrap the battery with tape.
- Using a thin drill with a diameter of 1 mm, make a hole in the battery case, namely, in the groove, as shown in the photo below.
- Next, you need to dial into the syringe distilled water and slowly pour it into the jar. In order to restore the battery, the capacity must be completely full.
- Wait a little for the water to absorb well, then seal the holes with epoxy or tape.
- Now you can solder the restored banks, placing them in the same places.
- Assemble the unit and do 3-5 cycles, including a full charge and a full discharge of the battery. Only after carrying out these procedures will it be possible to use the tool.
How to replace defective batteries
In addition to the restoration of unsuitable elements of the screwdriver battery, the most effective screwdriver battery repair is the replacement of the batteries in its composition with new ones. Before repair is necessary buy suitable batteries in the Internet. Their technical characteristics should be identical to those indicated on the can body in the battery pack of the screwdriver.
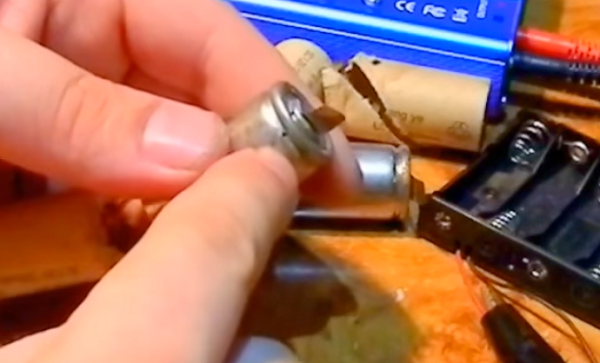
To change the batteries in the unit with your own hands, you will need a soldering iron and materials for soldering: tin and alcohol flux (for rosin).
Replacing batteries requires certain rules.
- To connect the cans you need to use the plates, previously sealed from the batteries. They have the correct cross-section and the desired indicator of resistance.
- To do not overheat banks during soldering, it should be carried out quickly. Excessive heating of the batteries may render them unusable.
- Batteries connected in series: the minus of each can connects with the plus of the next one.
- After collecting the battery pack, spend at least 3 cycles of full discharge and battery charge.
Screwdriver conversion to lithium
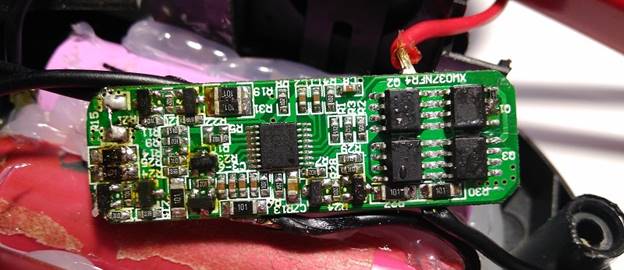
Owners of screwdrivers with nickel-cadmium batteries often change them to lithium-ion, when the “native” batteries are completely out of order. Alteration of the screwdriver for lithium batteries 18650 is not a big deal. It is only necessary to acquire the necessary parts: finger-type batteries in the required quantity and the BMS charge card (Battery Management System). All parts can be purchased on the websites of China.
BMS is designed to control the process of charge / discharge of all elements separately, the level of current consumption and temperature. Also BMS is capable of balancing batteries. This controller is selected depending on the number of cans that need to be charged.
For example, the designation BMS 5S means that the controller is designed for 5 elements.
Abbreviation “18650” indicates the size of the battery, that is, a diameter of 18 mm and a length of 65 mm. These sizes of batteries are enough to accommodate them in the power supply unit of the screwdriver.
For example, the transfer of a Ni-Cd battery screwdriver to 4 lithium batteries will be considered. Accordingly, BMS will be calculated on 4 elements. Below is a diagram of the connection of BMS to batteries.
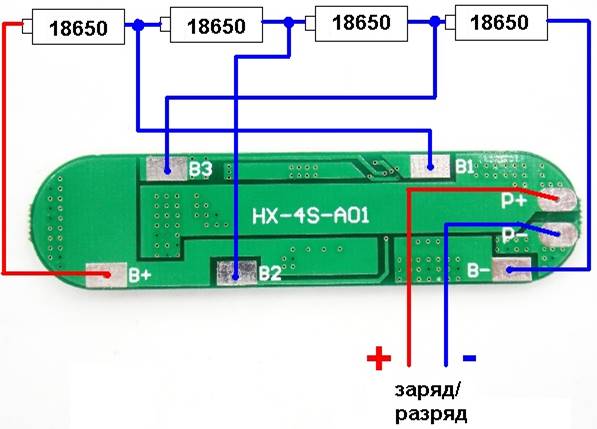
Next, you need to connect the batteries, soldering them together sequentially, as shown in the diagram, and then connect them to the controller board.
All components are placed in the body of the battery pack. At this stage, alteration of the battery screwdriver completed.

During the operation of the screwdriver, the controller monitors the voltage level at each bank. If the voltage drops below 3 V on one of them, the discharge is switched off. The same thing happens with charge. If the voltage rises to 4.2 V, charging stops.
Thus, the controller does not allow the battery to fully discharge and overcharge, which is very important for lithium-ion batteries.
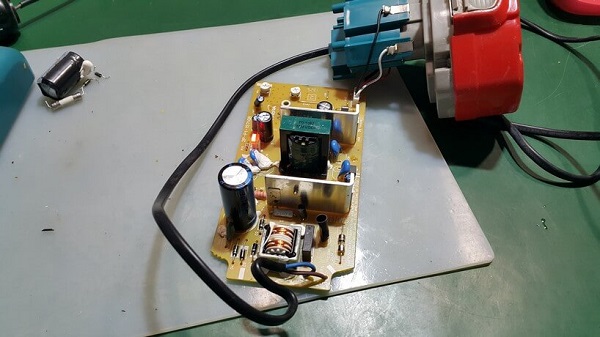
Faults and repair of the battery charger
In order to repair the charging, it is necessary to have at least minimal knowledge in the radio industry, as well as a device for “dialing” of the device’s radio components - a tester. All chargers for screwdrivers are similar to each other and have the following nodes:
- low-voltage part, which includes a converter rectifier, as well as a circuit that provides power for charging the battery;
- step-down inverter;
- network rectifier.
Network Rectifiers can be called the most durable elements of the chargers, if properly exploited. But if the charging is designed to work from the 120-130 V mains, and when it is connected through the converter, a fuse blows, then in order to repair it, the fault should be sought in the rectifier. Chargers operating from 220 V, often burn inverter high voltage transistors. At the same time, the rest of the charging electronics and the inverter rectifier fail very rarely. Also the reason that the charger does not work can be considered punched or swollen capacitors.
Before troubleshooting, you will need to disassemble the charger case. This should be done carefully, since most cases are assembled on 1 screw and on latches that break easily.
All components of the electronic charging circuit is necessary check with a tester. Most often, it turns out to be a faulty rectifier capacitor.Even if during visual inspection you see swollen electrolytes, they need to be re-soldered, replacing them with working analogs. Then, having installed the fuse with the required rating, you can check the operation of the board in battery charging mode. If no problems are detected, the current and voltage indicators are within the normal range, then the board can be mounted into the case.
If the charger board still refuses to work, and the battery does not charge, then you need to look for the problem further. The operability of the fuse, as well as the presence of voltage on the capacitor indicates that the fault is in the inverter. Inverter Diagnostics is a complex task and requires a certain experience, as well as special equipment - an oscilloscope. If there is no experience and equipment, then charging can be repaired by alternately checking all radio components, changing transistors and converter chips, and each time checking the board for operability.
Also during visual inspection you can see punched diodes. They will differ in their yellowness due to overheating. If at least one diode (diode bridge) breaks through, it will short the transformer.What happened causes overheating of the remaining diodes, resulting in overheating of the transformer windings and their interturn short circuit. Therefore, it is necessary to check with the tester all suspicious diodes and both windings of the transformer. The check most often shows a break on the primary winding.
It is worth knowing that in almost all transformers of this type there is thermal protection, which operates at a temperature of 130 ° C. Usually this sensor is located under the upper layers of transformer insulation. If there is nothing to replace the sensor, then at your own risk and risk you can simply solder the sensor legs, eliminating a break. Next, you should return the insulation removed from the windings to the place and check the operation of the charger. In most cases, this transformer malfunction is resolved in a rather simple way.
/rating_off.png)


