How to make an induction furnace and heating boiler from an inverter
The use of induction coils instead of traditional heating elements in heating equipment has significantly increased the efficiency of the units with less electricity consumption. Induction heaters went on sale relatively recently, besides at relatively high prices. Therefore, craftsmen have not left without attention to this topic and figured out how to make an induction heater from a welding inverter.
Content
Advantages of induction heater
Every day induction heaters are gaining popularity among consumers due to the following advantages:
- high efficiency;
- the unit runs almost silently;
- induction boilers and heaters are considered to be quite safe in comparison with gas equipment;
- the heater is fully automatic;
- the equipment does not require constant maintenance;
- due to the tightness of the device, leakage is excluded;
- due to vibrations of the electromagnetic field, the formation of scale becomes impossible.
Also the advantages of this type of heater include the simplicity of its design and the availability of materials for the assembly of the apparatus with their own hands.
The operation of the induction heater
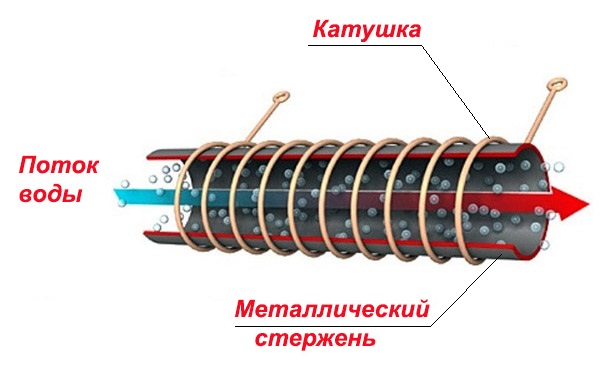
The inductor type heater contains the following elements.
- Current generator. Thanks to this module, the alternating current of the household power grid is converted to high frequency.
- Inductor. It is made of copper wire, twisted in the form of a coil, to form a magnetic field.
- A heating element. It is a metal pipe placed inside the inductor.
All of these elements, interacting with each other, work on the following principle. The high-frequency current developed by the generator is fed to an inductor coil made of copper conductor.The high frequency current is converted by the inductor into an electromagnetic field. Further, the metal pipe inside the inductor is heated due to the effect of vortex flows on it in the coil. Heat carrier (water) passing through the heater takes heat energy and transfers it to the heating system. Also, the coolant acts as a cooler of the heating element, which prolongs the “life” of the heating boiler.
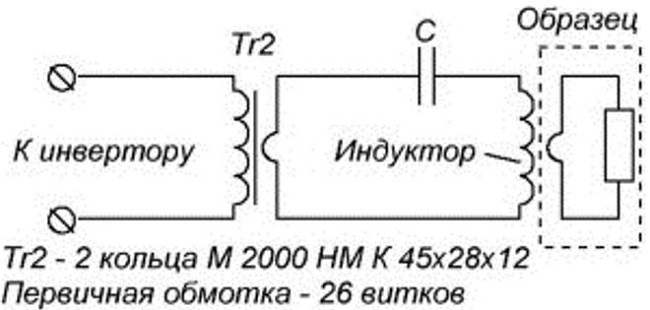
Below is the electrical circuit of the induction heater.
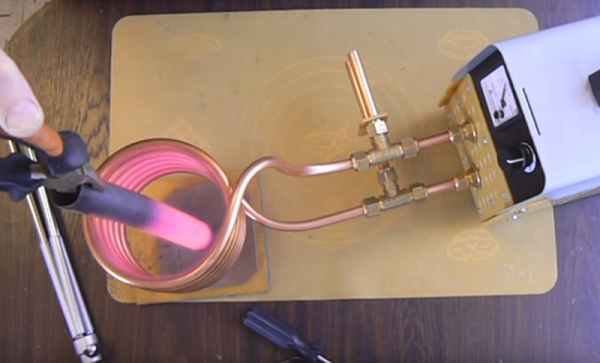
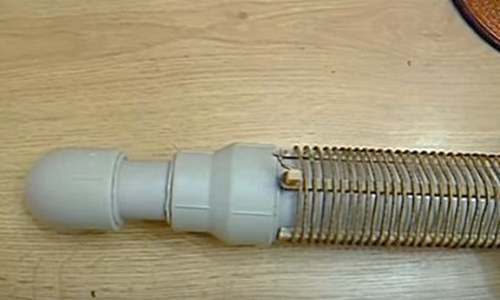
The following photo shows how an induction metal heater works.
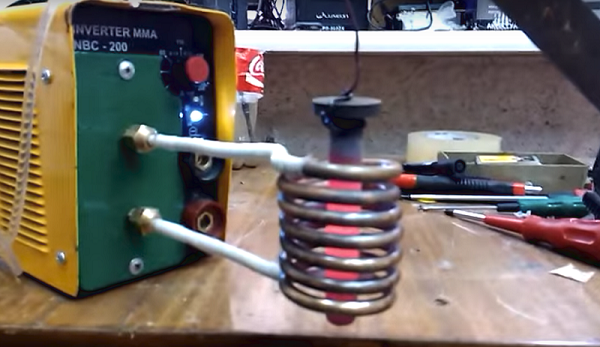
Important! If you touch the heated part to two turns of the inductor, then there will be an inter-turn short circuit, from which transistors will instantly burn out.
Assembly and installation of the system
It is not possible to connect the inductor to the terminals of the welding machine intended for connecting the welding cables. If this is done, the unit will simply fail. To adapt the inverter to work with an induction heater, it will require a rather complicated reworking of the apparatus, requiring, first of all, knowledge in radio electronics.
In a nutshell, this alteration looks like this: a coil, namely its primary winding, is required to be connected after the high frequency converter of the inverter instead of the built-in induction coil of the latter. In addition, you will need to remove the diode bridge and solder the capacitor unit.
How does the welding inverter convert into an induction heater? video.
Induction furnace for metal
To make an induction heater from a welding inverter, the following materials are required.
- Invertor welding machine. Well, if the unit will be implemented smoothly adjustable current.
- Copper tube about 8 mm in diameter and long enough to make 7 turns around the billet 4-5 cm in diameter. In addition, after the coils, the free ends of the tube should be about 25 cm long.
To assemble the furnace, follow these steps.
- Pick up any part with a diameter of 4-5 cm, which will serve as a template for winding a coil from a copper tube. It can be a wooden round piece, metal or plastic pipe.
- Take the copper tube and rivet one end of it with a hammer.
- Fill the tube tightly dry sand and rivet the second end of it. Sand will not allow the tube to break when twisting.
- Make 7 turns of the tube around the template, then cut off its ends and pour out the sand.
- Connect the resulting coil to a converted inverter.
Induction Water Heater
The following structural elements will be required to assemble the boiler.
- Inverter. The device is chosen such power, what is needed for the heating boiler.
- Thick wall tube (plastic), you can brand PN. Its length should be 40-50 cm. Coolant (water) will pass through it. The inner diameter of the pipe must be at least 5 cm. In this case, the outer diameter will be 7.5 cm. If the inner diameter is smaller, then the boiler capacity will be low.
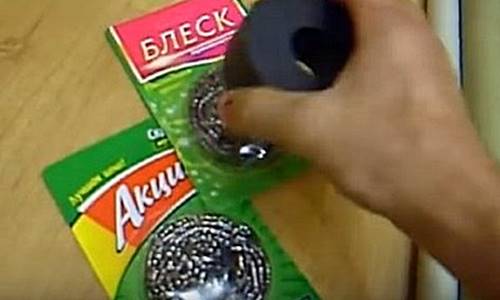
- Steel wire. You can also take a bar of metal with a diameter of 6-7 mm. From a wire or a bar small pieces (4-5 mm) are cut. These segments will act as a heat exchanger (core) of the inductor.Instead of steel pieces, you can use a metal tube of smaller diameter or a steel screw.
- PCB sticks or rodsOn which the induction coil will be wound. The use of PCB will save the pipe from the heated coil, because this material is resistant to high temperatures.
- Insulated cable 1.5 mm cross section2 and a length of 10-10.5 meters. Cable insulation must be fiber, enamel, fiberglass or asbestos.
Induction heating boiler is assembled according to the following algorithm. Fill the body of the heat exchanger with metal products, as discussed above. At the end of the pipe that serves as the body, solder adapters that are suitable in diameter to the pipes of the heating circuit.
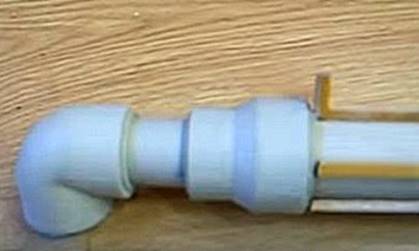
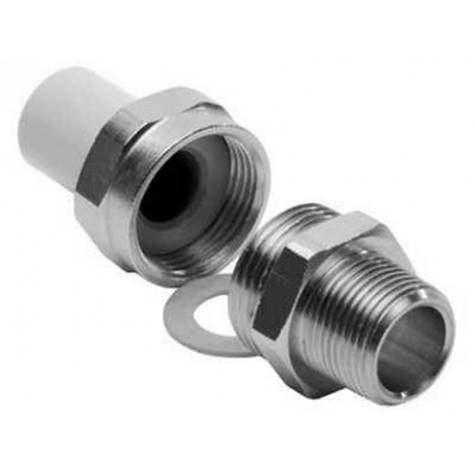
If necessary, you can solder corners to adapters. Should also solder American coupling. Thanks to them, the heater will be easy to dismantle, for repair or maintenance inspection.
The next step is to stick the heat exchanger to the housing. textolite stripson which the coil will be wound. You should also make a pair of racks 12-15 mm high from the same PCB. They will be located contacts for connecting the heater to the converted inverter.
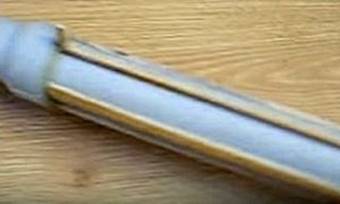
Wrap a coil over textolite strips. Between the coils should be a distance of at least 3 mm. Winding should consist of 90 turns of conductor. The ends of the cable must be fixed on previously prepared racks.
The whole structure is placed in a casing, which will serve as insulation for safety. A plastic pipe with a diameter larger than the coil is suitable for the casing. In the protective casing, it is necessary to make 2 holes for the output of the electrical cable. Plugs can be installed in the pipe ends, after which holes should be made in them. Through the last boiler will be connected to the heating line.
Important! Test the heater only after filling it with water. If you turn it on “dry”, the plastic pipe will melt and you will have to reassemble the heater.
Next, the boiler cuts into the heating system according to the scheme below.
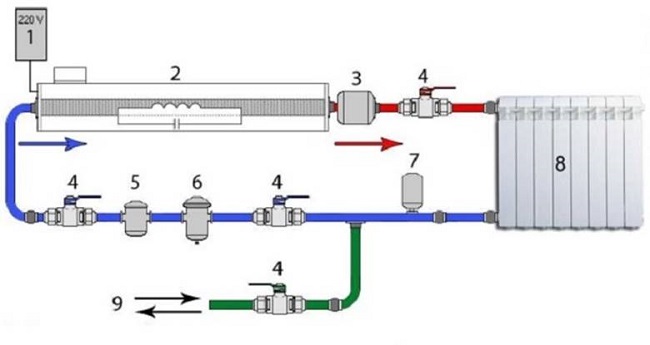
The wiring diagram consists of the following elements.
- High frequency current source. In this case, it is a modified inverter.
- Induction heater.
- Safety features. This group may include: thermometer, safety valve, pressure gauge, etc.
- Ball Valves. They are used to drain or fill the system with water, as well as to shut off the water supply in a certain part of the circuit.
- Circulation pump. Thanks to him, the water can move through the heating system.
- Filter. It is used to clean the coolant from mechanical impurities. Water purification extends the life of all equipment.
- Expansion tank membrane type. It is used to compensate for thermal expansion of water.
- Radiator. For induction heating, it is better to use either aluminum radiators or bimetallic ones, since they have high heat transfer with small dimensions.
- Hose, through which it is possible to fill the system or to drain the coolant from it.
As can be seen from the above method, it is quite possible to manufacture an induction heater by yourself. But it will not be better than the purchased one. Even if you have the necessary knowledge in electrical engineering, you should think about how safe the operation of such a device will be, since it is not equipped with either special sensors or a control unit. Therefore, it is recommended to give preference to finished equipment manufactured in the factory.
/rating_off.png)


