Variants of homemade pump assembly at home
At the summer cottage or in a private house, it is often necessary to pump liquid into storage tanks from various sources: open water bodies, wells, wells, etc. For these purposes, quite expensive pumping equipment is used, both electrical and mechanical. If this equipment is not available, the question arises: how to make a pump with your own hands with minimal material costs? This task can be solved in various ways.
Content
The simplest pump from plastic bottles
A simple pump for pumping fluid in just a few minutes can be made from a plastic bottle.
The process of making the simplest pump is as follows.
- In the bottle cork, make a hole corresponding to the diameter of the hose.
- A hole is also made in the side of the bottle. Air will be pumped out through it and water will flow out.
- Next, you need to insert the hose into the plug and tightly fasten it using an adhesive gun.
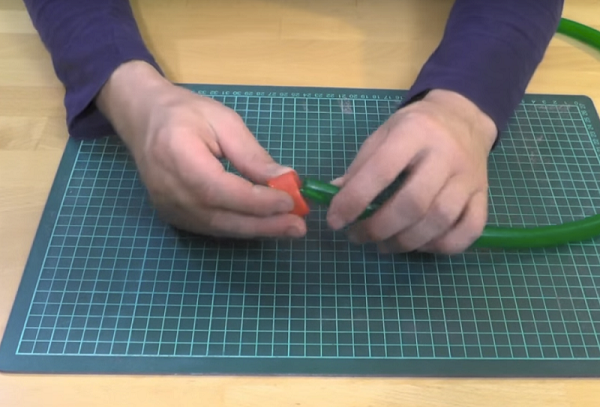
- Screw the cork with the hose onto the bottle.
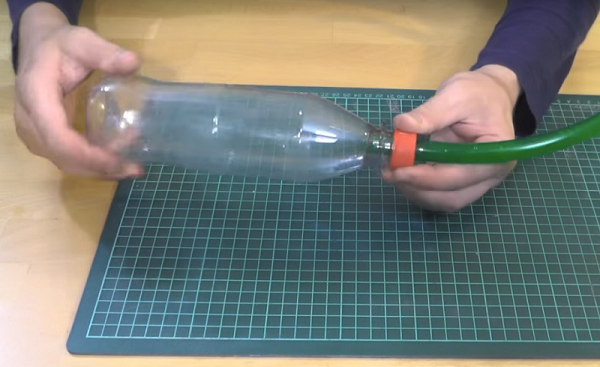
- Dip the free end of the hose into a container of water.
- Use your left hand to squeeze the air out of the bottle, then close the hole on it with your right hand finger.
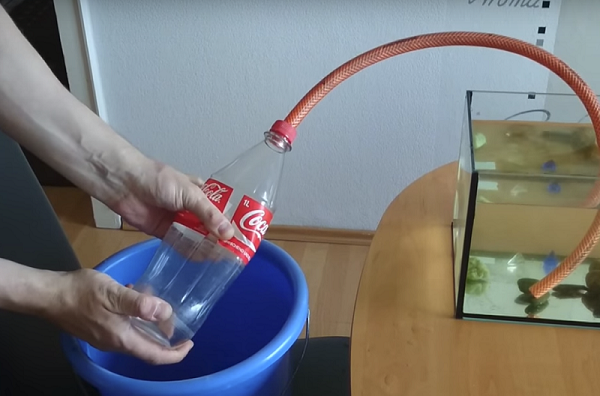
- After releasing the fingers of the left hand, the bottle will begin to level off and suck the water out of the container. If to lower a bottle below capacity with a liquid, then it will flow by gravity.

This homemade pump can be improved by not making a hole in the side of the bottle, but inserting a hose into the bottom of the bottle.
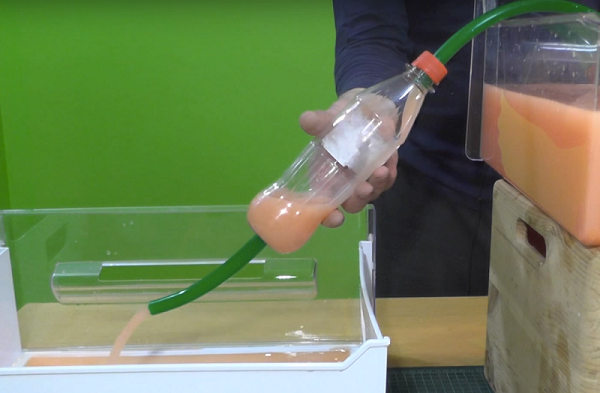
Only after squeezing the air out of it, it will be necessary to close (bend) the exhaust hose to allow fluid to suck in.
Wave pump
This design works by wave energy and is able to pump water from the nearest reservoir.
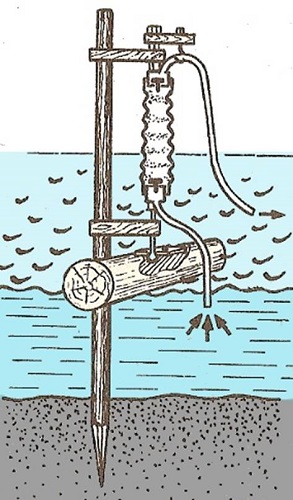
The main working part of the pump is accordion-shaped hollow cylinder. Shrinking and stretching, the harmonica changes its internal volume. One end of the corrugated pipe is connected to the log, which is in the water, and the other end is connected to the holder on the pile, which is driven into the bottom. On both sides of the accordion has valves installed in the bushings. When the waves run, the log begins to rise and fall, thereby transmitting oscillatory movements to the corrugation, compressing and unclenching it. If water is poured into it, the valves will start working and the pump will begin to pump water.
If a corrugated pipe with a diameter of 50-60 mm is used, then the log should be 60-80 kg. To prevent the log from breaking the lift when high waves occur, a stopper should be attached to the pile. A bolt is passed through it and fixed in a log. The head of the bolt must be under the cover plate, so that the log will rotate freely in different directions and will not break the pile if unwanted torque occurs.
Important! If there are problems with the search for a corrugated tube, then there is a wave pump design that works without it. Instead of corrugations, rubber annular diaphragms are used, connected in series in a single package.
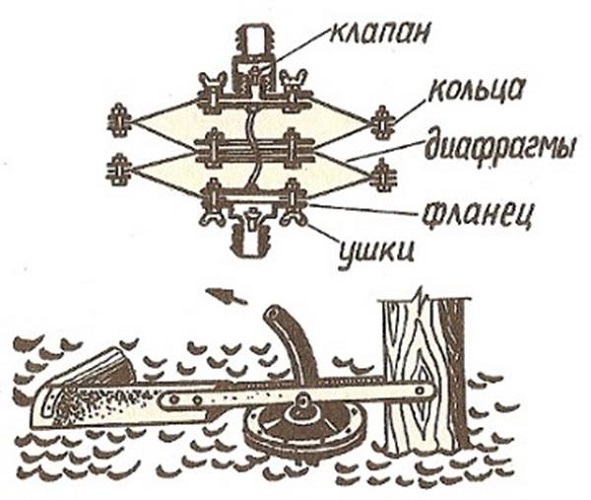
Ring-shaped diaphragms metal rings around the edges, inside and out. The inner rings are made of metal and make holes in them. A cord is attached between the rings, which will limit excessive stretching of the pump. Also at the top and bottom of the pump valves are installed.
When the log moves upwards, the bag of membranes is stretched, the lower valve opens, and the pump begins to fill with water. When the log is lowered, the bag is compressed, the lower valve closes, and the upper one opens. Through him the water is squeezed out.
Bake pump
It is possible to assemble a firing pump using metal barrels per 200 liters.
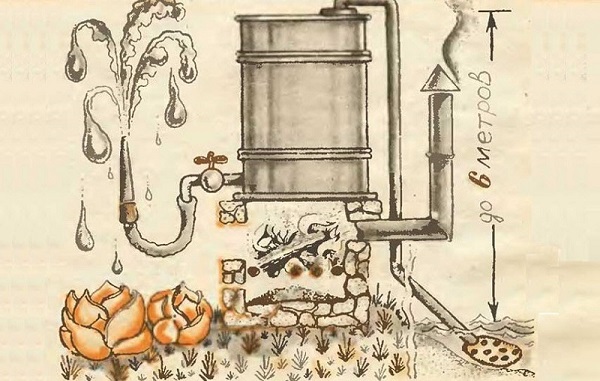
This design is assembled as follows.
- Build a simple stove with bricks. If desired, it can be provided with grate bars.
- At the bottom of the barrel must be fixed output valve.
- Pour several liters of water through the hole in the lid of the barrel.The crane must be closed.
- Next, secure the rubber hose tightly in the top cap hole. It is very important that air was not drawn around the hose.
- At the other end of the hose, install a strainer.
- Lower the filter hose into the pond.
- Kindle firewood under the barrel (the tap must be closed). As the barrel heats up, the air in it will begin to expand and flow along the hose into the pond.
- When the air stops coming out of the barrel, make a fire. When cooling the barrel in it vacuum is formed, and the water will begin to be sucked into it from the reservoir.
Solar pump
In addition to the energy of fire for pumping water, you can use the energy of sunlight.
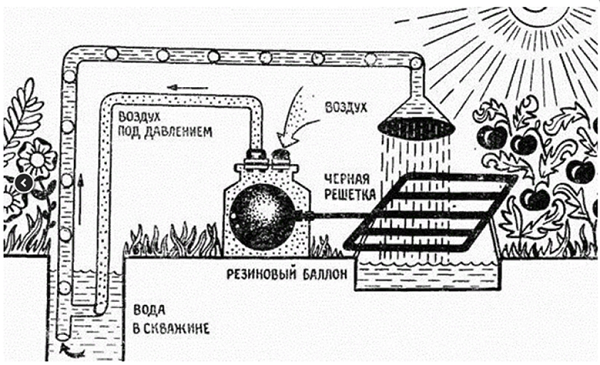
To make a solar pump, follow these steps.
- Find or do it yourself tube grid. Exit the grille should be one.
- Paint the grille with black paint for better absorption of sunlight.
- Hermetically insert the tube coming out of the grille into the side of any container, for example, a can.
- On the lid of the can set intake and exhaust valves. Valves can be fitted with tire nipples. The outlet valve must have a nozzle for connecting the hose to it.
- To the tube going from the lattice inside the tank, you need to attach rubber bottle, which can be made from a piece of car camera.
- Connect the hose connected to the outlet to the pipe, as shown in the figure above.
- Immerse the hose with the connected pipe into a pond, well or well.
- The pipe coming out of the well is sent to the storage tank. In this case, the pipe must be withdrawn and installed at its end garden watering can.
When the lattice is heated by the sun, the air inside it expands and enters the rubber balloon. He, in turn, swells and pushes air from the can into the outlet hose. Air passing through the hose reaches its lowest point and enters the pipe. Rising through the pipe, the air carries along the water inside it. One part of the liquid enters the storage tank, and the second cools the grid. After the lattice cools, the balloon is deflated, a vacuum is created in the can, which opens the inlet valve.A new portion of air enters the can and the cycle repeats.
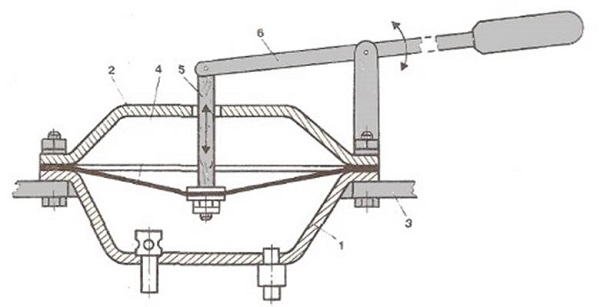
Downhole piston pump
Manual piston pump is assembled from improvised means in the following order.
- Housing. It is made of a metal pipe. The length of the latter can be chosen between 60-80 cm. The diameter of the cylinder must be at least 80 mm. In order to provide easier movement of the piston through the cylinder, it is recommended to grind the pipe on a lathe. A hole is made on the side of the case and a pipe is installed to drain the water.
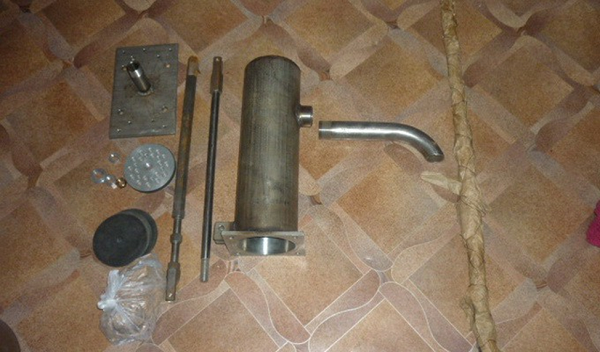
- Brackets. Welded to the pump housing to install a lever on them. Brackets can be made from the corner.
- Cap. The pump cover is made of plastic sheet or metal. It makes a hole for the rod. You also need to make the bottom cover, and install a check valve on it. It is necessary to weld or fasten the branch pipe to the bottom cover to which the water intake pipe will be attached.
- Piston. The piston can be made from metal, plastic or wood. It has the form of a plate and consists of two parts: a body with a thickness of 20-30 mm and a piece of rubber that overlaps it. In the piston body, it is necessary to drill several holes with a diameter of 10 mm.These holes are covered with rubber, which will act as a valve. A hole is made in the center of the rubber for the stem. The latter is attached to the piston itself.
- Bottom valve. The inlet valve can be made of thick rubber or other heavy material. The valve must be tapered and overlap the inlet. In the center of the valve should be installed guide, allowing it to return to its original place after opening. Below is a drawing showing the installation locations of the valves.
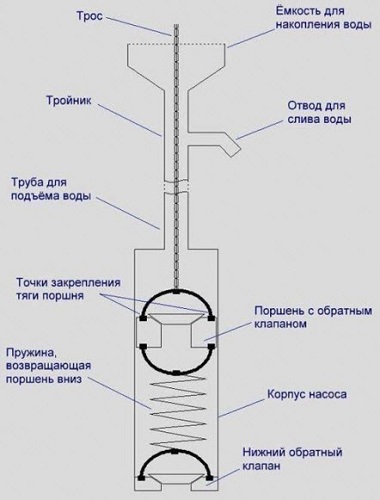
- Pump rod. Can be made of metal bar with a diameter of up to 10 mm. One end of the rod is attached to the piston, and the other - to the lever.
- Lever arm. For the manufacture of a lever, a pipe with a diameter of 3 cm will fit. The upper part of the pipe should be flattened and drill a hole in it for the bolt with which the stem will be fixed. A hole is also drilled in the middle of the pipe. It is necessary to secure the lever between the two brackets using a long bolt.
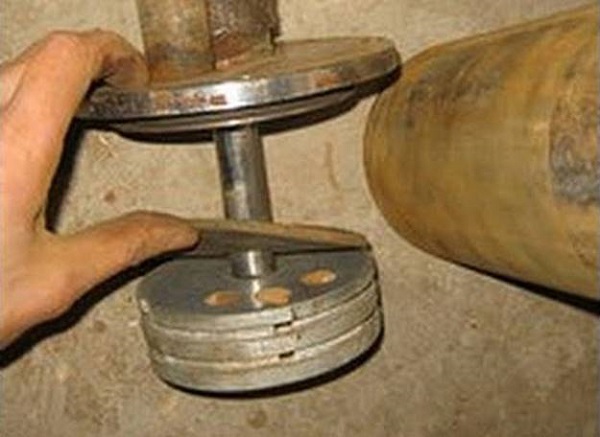
When all the parts are ready, it only remains to assemble the pump:
- connect the bottom cover to the case;
- insert the bottom check valve into the housing;
- insert the piston with the rod;
- close the top cover;
- install the lever;
- connect a water intake pipe to the bottom of the pump and lower it into a well or well;
- secure the pump to the platform.
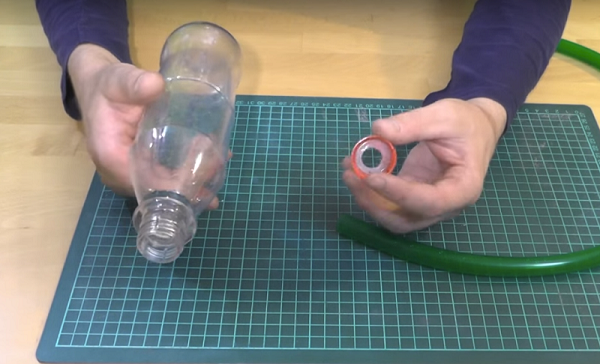
Manual pump
The water pump pump is a very simple and inexpensive device with which you can quickly pump water from a well, barrel, etc. To assemble the pump you will need the following parts:
- PVC pipe Ø 50 mm - 1 pc .;
- pipe Ø 24 mm from PPR - 1 pc .;
- PVC coupling Ø 50 mm - 1 pc .;
- outlet Ø 24 mm from PPR - 1 pc .;
- a piece of rubber 3-4 mm thick and Ø 50 mm - 1 pc .;
- PVC cap Ø 50 mm - 2 pcs .;
- 330 ml empty bottle (you can use a silicone bottle) - 1 pc;
- check valve with a diameter of 15 mm - 1 pc .;
- coupling clamp - 1 pc .;
- nut with a diameter of 15 mm - 1 pc .;
- rivet or pair of screw-nut - 1 pc.
Manufacturing check valve
The check valve is made of Ø 50 mm plugsIn which several holes with a diameter of 5-6 mm are drilled. A hole is made in the very center of the plug for the rivet or screw and nut. The cap must be inserted inside rubber circle with a diameter of 50 mm.
Important! This disk should not rub against the wall of the plug, but should cover the holes drilled in it.
The rubber disc is attached to the center of the plug with a rivet or screw and nut.
Manufacturing pump sleeve
The length of the liner is selected taking into account the depth of the well or any container so that it reaches the water. Pipe Ø 50 mm is cut to the desired size, after which it is inserted check valvemanufactured earlier. It can be fastened with a pair of screws on the sides. A plug with a pre-drilled hole of Ø 24 mm for a pipe made of PPR is put on the second end of the pipe.
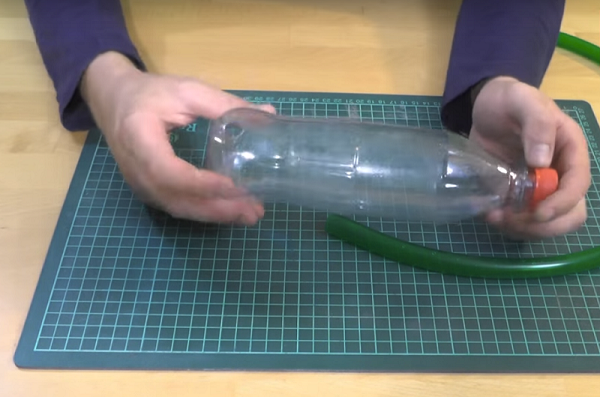
Piston assembly
Cut the spout from an empty bottle, then heat it and insert it into the sleeve. Cylinder diameter must match the diameter of the PVC pipe. Next, place the can on the non-return valve. Cut off the excess part of the bottle and secure it with a Ø 15 mm nut.
Making rod for pump
The stem should be approximately 50 cm longer than the sleeve. One end of it is heated and inserted into the check valve. Tighten the hose clamp until the pipe is completely cool.
Build pump
Insert the rod into the sleeve, then fasten the plug through the sleeve (acting as a slide bearing). Further, to the upper end of the stem is mounted a tap Ø 24 mm from the flow tube.
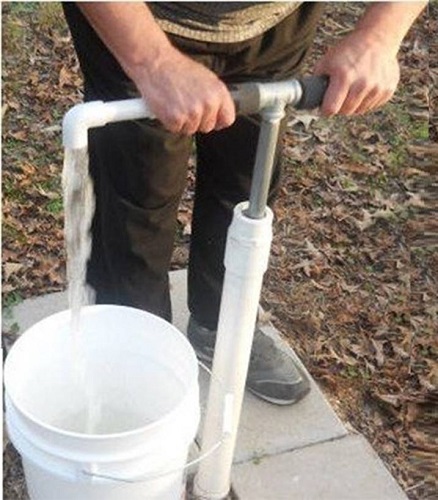
The tap will serve as handholds.
Diaphragm pump
Diaphragm pump is made at home from the brake chamber from any truck, for example, from MAZ-200.
Made diaphragm pump as follows.
- The camera is disassembled, and all the holes on the base (1) are repaired. Bolt holes do not need to be plugged.
- At the bottom of the base are drilled holes for the intake and exhaust valves.
- The diaphragm (4) is made of a car chamber and is fixed with a brass rod with two brass washers. The diaphragm is glued around the perimeter to the body and additionally pressed with bolts.
- The pump is assembled according to the drawing above.
Electric pump
A simple pump with an electric motor at 12 volts is capable of raising water to a height of about 2 meters. Made electric pump as follows.
- purchase windshield washer motor from VAZ;

- remove the cover from the washer and unsolder a couple of contacts from the electric motor;
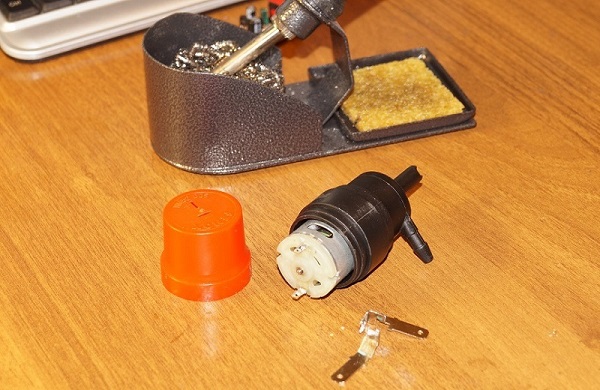
- further, it is necessary to solder wires to the motor contacts and lead them through the cover;
- Apply sealant to the place of connection of the cover and tightly put it on the engine;
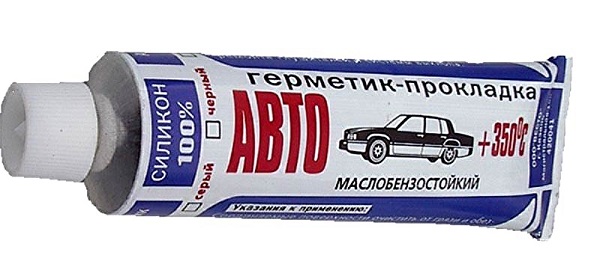
- seal well the holes through which the wires go;
- remove the rest of the sealant from the casing and cover of the pump and put it on its branch pipe, silicone tube.
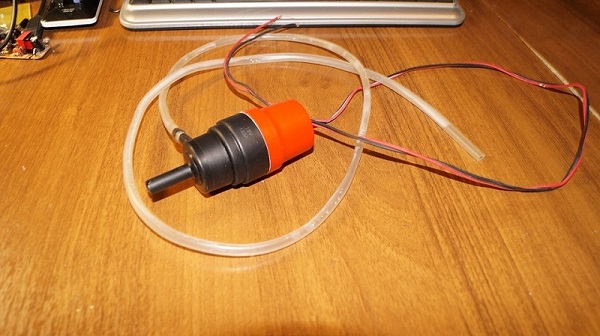
The pump is ready for operation. It remains to connect the electric water pump to a power source of 12 V.
/rating_off.png)