Proper operation of the tiller and cultivator
The work of the tiller is closely related to agricultural activities, so its successful long-term operation depends on the knowledge of the characteristics of use. It may seem that it is not so difficult to use the tiller, but each type of work requires a certain skill from the owner. Not having installed the right wheel, hitch or plow, it is difficult to talk about further work with the tool. There are also models with support wheels, in which correct installation is primarily important. When driving on these wheels, there will be a support with the redistribution of the weight of the entire device for its optimum stability.
Content
How to plow the land
Working with the device on the site may vary depending on the tasks. You need to know where to start, how to properly assemble the device, what equipment to install and what efforts to make.
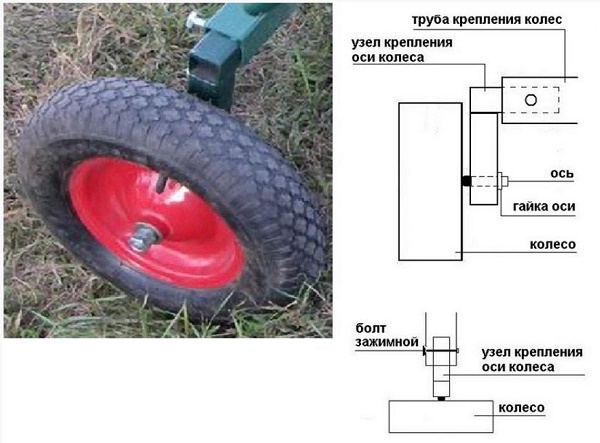
Step 1. Install the wheels
Plowing of land device assembly. In order for it to be assembled correctly, you must first hang the wheels, and only then install the plow. For optimal stability, we recommend that the wheels of the machine have a diameter of 50 mm and their width is not less than 20 cm. If these proportions are not met, it is impossible to plow the land qualitatively, since the necessary immersion will not be provided. Each of the two indicators indicated above has clear engineering calculations. For example, if the width of the wheel is insufficient, then the whole device will shake in both directions when driving straight.If the diameter is chosen incorrectly and the wheel is too small, the distance between the soil and the gearbox will be insufficient, which will lead to poor-quality plowing.
When choosing such an important attribute for a motoblock as a wheel, it is important to remember about the rim. Best of all, if it is solid. If there are lugs, they will fall into the ground, dry out and prevent normal rotation.
Step 2. Adjust the plowing depth
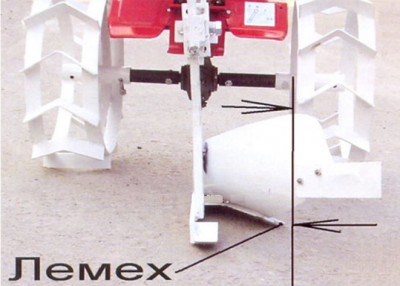
Before plowing it is necessary to set its depth correctly. Different devices have different types of settings. So for example for plows with index PTK-9-35 setting is as follows.
- Under both left wheels, transport and pneumatic, special liners are laid, whose height is slightly less than the required depth by 2-4 cm.
- Using the screw mechanism of the support wheel and the stop screw of the left pneumatic, the housing is lowered in such a way that the supporting plane fits onto the platform. The right support wheel remains on the plane of the housing.
- To pass the first furrow, the right wheel of the support is raised with the help of an adjusting screw to a height that is equal to V3 from the depth specified for plowing.
- On the subsequent furrow, the right wheel descends to the level of the reference plane of the housing. During operation, the depth of immersion of the plow is adjusted using the stop screw of the left pneumatic.

Plow PTK-9-35
Semi-mounted plow (index PLP-6-35). Plowing a plot with this type of equipment is possible after adjustment. The frame of the plow is aligned with the help of the screw mechanism of the support wheel, after laying the lining under the metal wheel. Often in the alignment process involved the right slanted hitch mechanism of the motoblock itself. Each hull should touch the ground with both toe of the plowshare and heel of field boards. The adjustable upper linkage is shortened to the limit in this case. \
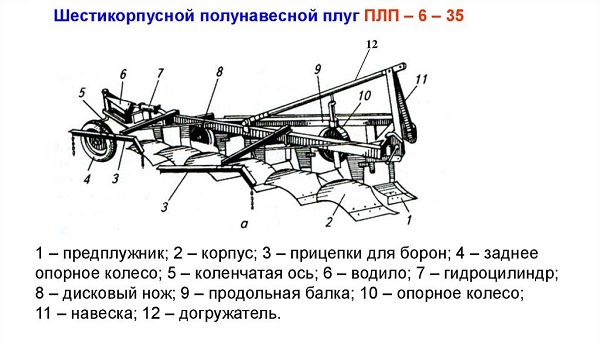
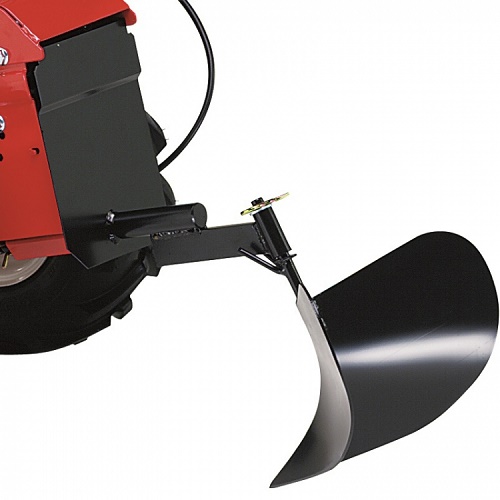
PLP-6-35 plow
Mounted plow Soil tillage with a mounted plow requires careful debugging. The setting principle is generally similar to the previous item. The length of the upper thrust at the hitch of the motoblock itself and its bracings changes, then the frame is installed, but here it is worth remembering that this should be done strictly parallel to the site. The liner is placed under the wheel, which serves as a reference point, whose height corresponds to the required depth of immersion with an error of up to 3 cm.During the first pass, the right brace of the suspension of the motoblock is reduced in such a way that its first body plowed half the depth that was originally set. In the second pass, the skew of the frame on the right diagonal is eliminated; this manipulation takes place in the transverse-vertical arrangement of the equipment.
In general, the process on tractors of different models and motor blocks will not differ much from the one presented above. Significant changes in the configuration are available for power regulators mounted on heavy agricultural machinery. Here the wheel, which serves as a point of support for the plow, is raised upwards or completely removed. To activate the regulator, the hatch opens under the seat, rotate the lock, inserting the shank into the corresponding groove. Rotate in this case, it is necessary to the left. Each valve of the distributor is placed in the neutral position, while the handle of the FGP remains in the locked position. The knob responsible for the regulator moves forward. The longer the knob moves forward, the greater will be the depth of the surface being plowed. When the required depth of the plow is found,the position is fixed by the handle of the power regulator of the handwheel-limiter.
To check the quality of plowing is a special control. To do this, use the furrow gauge.
Step 3. Adjust the angle of attack
Plowing a vegetable garden with the help of a motoblock is impossible without precise pre-setting of the equipment. The angle of attack, or, to put it more simply, the slope of the field board is a slope that shows the level of the plowing plane relative to a flat surface. Adjustment of this angle occurs with the help of a conventional knob with a screw mechanism. To perform the adjustment, you must perform the following steps in the correct order.
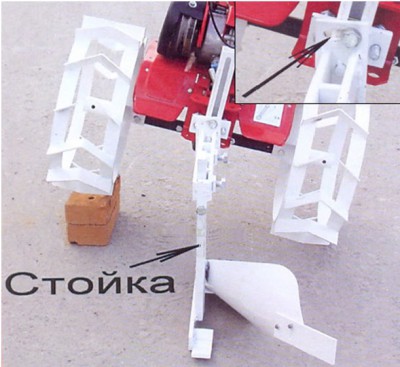
- Put the machine itself with a plow on a special stand, which was mentioned above.
- Unscrew the knob of the regulator to the limit so that the field board remains completely pressed to the surface (even small gaps are not allowed).
- Then you need to start twisting the handle in the opposite direction until the back side is about 3 cm above the surface.
In order to make sure that the settings are correct, it is necessary to proceed to the plowing, at this stage it will be easy to establish whether the walker is moving easily or it strongly abuts the ground. If a angle of attack will be large enoughthen the plow will perform the function of the anchor, thereby quenching the potential of the tiller transmitted from the internal combustion engine, respectively, the efficiency will decrease dramatically. This will result in slippage and obstruction of movement in the forward direction. At insufficient angle of attack the necessary layer of soil simply will not be removed.
For high-quality plowing, it is necessary to make an even and clear straight line from one edge of the section to the other. All subsequent lines and the accuracy of the work performed as a whole will depend on this. To simplify the task, you can align the plot with pegs and rope, at the same time clearly marking the boundaries and setting reference points for plowing.
One wheel of the machine must be placed in the furrow, the plow is oriented so as to remain perpendicular to the ground. The easiest way to achieve this with the help of a square. If it is inconvenient to tune in directly on the surface of the soil, you can put a stand that will match the depth of the furrow. After completing the setup process, you can go to the second and third grooves.
Step 4. Install the plow to the width of the track
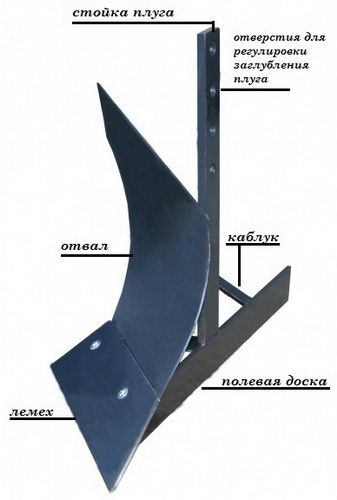
Even if the angle of attack is already set, do not rush to plow a motor-cultivator.For competent and productive operation of the plow must stand on the surface of the soil not only heel but also toe. This fact can be easily confirmed even visually: if the stand is located vertically, then the setting is correct. If the plow is on its heel, it will lead to unnecessary pushing to the surface. When becoming on the toe, the equipment will go deep into the soil.
At the moment of plowing, the load on the plow is not at all symmetrical, as it may initially seem. During operation, the tiller will constantly open to the right side. Usually the most difficult step is plowing the first furrow. For such needs, an stretched cord or a drawn line is used, which serves as a guideline. The first furrow should be shallow - about 12 cm. It will be easier to work further, because the right wheel of the motoblock will go along the furrow.
It happens that hitch spine quite long. In this case, it is best to plow using a fulcrum, for example, a wheel. It will help to create the necessary depth of immersion of the plow. Typically, such a device can roll on both sides, both left and right.
Recommendations for plowing various plots of land
The plowing of virgin soil or any large area of land on which agricultural work was conducted not so long ago is not an easy task. Experts first recommend focus on the shape of the existing plot.
- a rectangular area is best plowed in a circle;
- square plots are best plowed in a zigzag fashion.
In both cases, it will be more convenient to form a bed along the entire perimeter, placing them parallel to each other. In the future, this can greatly simplify the work of digging and disembarking.
There are often cases when the soil is too hard. This problem can not be solved at once. It is best to carry out plowing in stages, first with heavy machinery (a walk-behind tractor with a rear adapter is perfect). With each subsequent treatment, the soil becomes softer.
Ground layers well give in to processing by means of a mill of the motor-block.To carry out such manipulations, one should travel to the same place several times, more and more plunging the equipment into the soil.
Many users are wondering how many acres can be processed by a walk-behind tractor? Experts and experienced farmers argue that using a tiller, you can easily handle a plot of up to 10 acres. However, with persistence and diligence, some cultivate whole hectares of land.
Work with potatoes
One of the common scopes of the motoblock is working with potatoes. The device is used at all stages, starting with digging and ending with harvesting.
Hilling
Hilling potatoes is extremely important. In addition to the fact that the process itself is greatly facilitated by technical devices, it carries several critical aspects for the formation of the future harvest.
Hilling is the process of oxygenation by loosening the top surface of the soil. It helps to clear the plant from weeds, because also weeding of potatoes is carried out.
To perform this task on the walker tractor grousers are installed, and the capture of both wings increases to the maximum value. Spud at the smallest speed, so as not to damage the root system of plants. Each wheel should go exactly along the aisle, without damaging the rows and not touching the bush. If available single row hillerIt is necessary to use only rubber wheels.

Landing
Planting potatoes is also possible with the help of a hiller. To do this, it is enough to stick to a simple scheme.
At first prepare the technique: we install lugs and extension cords instead of wheels. Instead of a central support, a hitch is installed, a hiller is attached to it. If the device is two-row, you need to set the appropriate distance, as a rule, it does not exceed 65 cm. If the device is single-row, set the width to 70 cm.
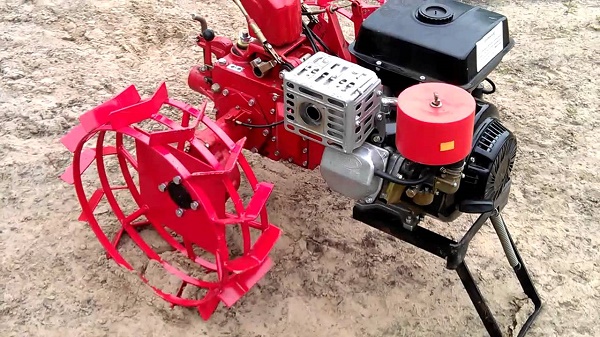
Motoblock with grouser
Before planting potatoes with a walker with a hiller, you need to properly mark the plot. You can use the tool at hand. For inter-row processing of potatoes, it is enough to have one wooden crossbar with three pegs attached to it, so that the distance between them is 65 or 70 cm.
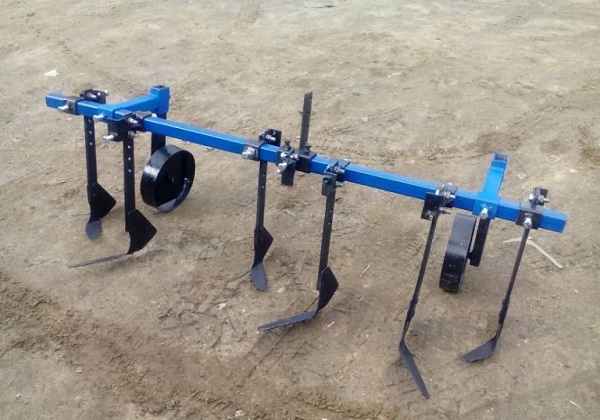
Okuchnik to the motor-block
To plant potatoes, you need to run the cultivator along the markings and start making a furrow. For this perfect slowest speed. Cutting furrows for planting potatoes is a very important point, because after the work is completed, it will be quite problematic to remake it.
The hitch can be adjusted using a special handle. The furrow either deepens, or the degree of its deepening decreases.
When the furrow is ready, you can start yourself landing process. Germinated tuber is thrown into the hole at a distance of 40 cm from the previous one. After the sowing is completed, the hiller wings should be extended, the walk-behind tractor should be placed opposite the earthen shaft, and bury the indentations with tubers.
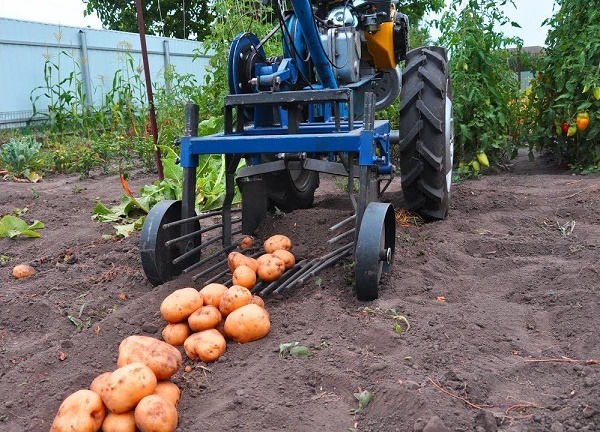
Potato harvest
Digging potatoes is not the most difficult process. First needed mow tall tops. For this you can use a braid or a trimmer. To harvest, you can again resort to the services of the hiller. First you need to set the lugs and the required width, and then send the walker to the garden bed.The furrow should be cut at the slowest speed possible, preferably in the “one through one” mode. Hiller (or Hiller) smoothly and gently plowing the soil, pulling grown tubers at the very edge of the furrow.
It is easy, quick and easy to dig a potato tiller, the main thing is to observe the rows and remember: if you plan to re-sow the plot in the spring under the plow, you will need to change the direction of the rows. In this case, the top layer of soil will not move in one direction, and the landscape integrity of the site will not be affected.
Weeding
After hilling the potato bushes need additional processing. Many who have already used the walker for weeding potatoes know that in order to effectively remove the weed it is necessary to loosen the soil properly in order to expose the roots of the plant. For this, a different technique is used.
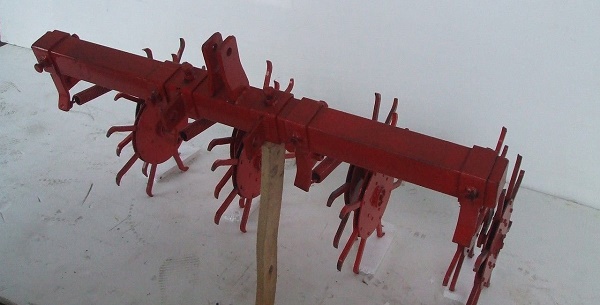
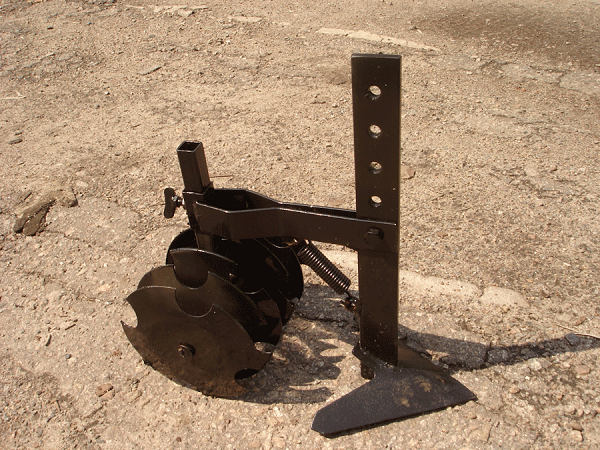
- Rotary harrow or special attachments that are installed on the device. In common, this device is called "Hedgehog". This device is a few rings of different diameters, interconnected. On the rings are spikes and teeth. This whole structure looks cone-shaped."Hedgehog" is always set in pairs, observing a certain slope. In the case of a homemade harrow, discs can sometimes be used, but this design has a number of drawbacks: the ground is often clogged inside, as well as leaves and stalks of weeds. The principle of operation is quite simple: being immersed in the ground, hedgehogs loosen the upper part of the soil, hooking the root of a weed plant, turning it upwards. On a similar principle, some loosening cutters work, but they are more often used for weeding potatoes.
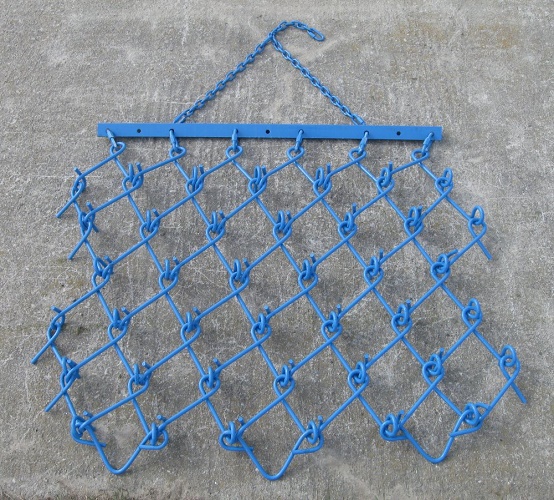
- Harrow. This equipment is considered the most effective, because can be used at almost any stage of agricultural work. In fact, this harrow is the usual "scraper", the frame, inside which is a network with teeth. Each cell has a width of up to 20 cm, the shape is either square or hexagonal. In another case, the teeth are located on a chessboard, however, a comb with spikes can be more frequent and more rare, depending on the need. Installation of the harrow is strictly at an angle of 45 degrees. The advantage of the net harrow in the width of the treated area.The apparent disadvantage is that the aisle remains undeveloped. Such weeding is most relevant after the moment of plowing before the beginning of hilling, or else for weeding the upper part of the beds until the first shoots appear. In any case, the device is best used in conjunction with other devices.
- Paws. There are also special cutting blades, called "paws". It is “paws” that are best to wield in the aisle, the most problematic place during the operation of the motor-block. The device "paws" is quite simple and understandable. One blade is attached behind the other, and the stalks of weeds are cut off on the principle of a razor. There are both paired knives and knives made in the shape of V, and, in this case, the fork is carried forward. You can also find a single "paw", which has an end towards both the center of the aisle, and against it, putting the cutting edge out. In this case, the bed will pass between him. Immersion of the "paws" is carried out to a depth of 5 cm, and a cut of a weed plant is simultaneously carried out. Unfortunately, with this type of weeding, weed roots remain in the soil.
- Attendant. The special frame having a special knife in the bases. Behind the frame is a drum lying on its side. The walls of this drum are the blade-plate. Before the beginning of the weeding, a pair of wheels is placed in the aisle (either in the neighboring or one through one). The wheels are fixed on a special axle-cross-bar, which facilitates their adjustment along the width of the bed. The knife rips up the soil and hems up a stalk of weeds, and the drum captures with its blades the remaining weeds with bare roots, leaving them behind. There is one more kind of the worker. This option has no lead frame. Instead, it has several knives bent in the shape of the letter “G”, which are mounted from the front side of the cylinder across its entire solid surface.
Alignment of a site by means of the motor-block and a cultivator
This type of equipment is suitable not only for agricultural needs. Cultivator or tiller can be used for landscape works. It is possible to level the dacha with improvised means, a shovel and a rake, as well as with the help of ancillary equipment, but if the area is hilly or replete with stumps and a developed root system, heavier equipment may be required.
Leveling the site with a cultivator is only possible if there are minor irregularities that can be fixed without resorting to additional technical means (a tractor with a bucket, etc.). The motoblock is able to sink a little deeper, but on average, the immersion area reaches 15-17 cm. Further leveling occurs using the rake. Loosened soil should be evenly distributed throughout the site.
If the soil on the site is too hard, stony, or if there are loose stumps, etc., it would be better to resort to the services of a tractor. Solid objects, such as large stone, recessed into the soil for a considerable distance, or an overgrown bush, deeply rooted in the area, it would be better to dig in advance with a conventional spade. Only by removing the parts disturbing the loosening and removing large debris, you can begin to work with the help of a motor-block.
It is important to remember that the operation of the motoblock and the cultivator on hilly terrain and other irregularities is associated with an increased risk.
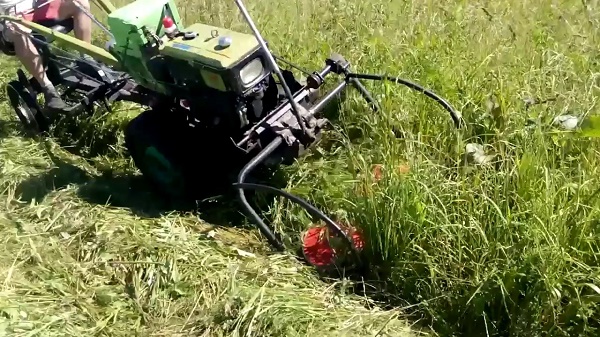
Mowing grass with motoblock
Motoblock can help with the harvesting of hay.To do this, it is not necessary to get an old instrument from the barn and go for haymaking; it is enough to use the appropriate nozzles. Most often, the mower is the basic nozzle that comes with. The mowing process itself should not cause any complaints, just carefully study the instructions and properly prepare the unit for operation.
The main problems when working with a mower are dull blades-knives and scrolling belt drive. Knives will be enough to remove, clean and sharpen. The belt must be inspected visually and, if the weakening is noticeable to the eye, just slightly tightened to the norm using a “native” hexagon. Since the walk-behind tractor operates at higher revs during operation, some bolts may loosen. This may cause hum and vibrations. To solve this problem, it will be enough just to pull all fastenings “in a circle”.
The better mowing, tiller or lawn mower, the user decides. The petrol trimmer is more mobile, but makes a lot of noise, besides it requires constant topping up of fuel and control of fuel and lubricants. The electric trimmer is ineffective in the field where there is no place to plug in the socket, and it is there that, most often, haying is carried out.Motoblock can be completely useless in a limited space.
Conclusion
The operation of the motoblock and the cultivator is a convenient and useful process, inextricably linked with the oldest type of human activity, agriculture. The equipment greatly simplifies and simplifies the work of a modern summer resident or farmer, leaving him much more time to breathe fresh air and enjoy nature.
/rating_off.png)