How to disassemble and repair the oil heater
Repairs oil heater do it yourself is quite real. Many owners successfully restore the performance of these sources of heat without resorting to the services of masters.
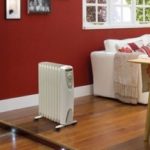
Device device
Starting to repair any electrical device, you need to know two things - how it works and how it works. Oil heater consists of:
- metal case;
- TENA (heat-heating element);
- control unit;
- connecting wires.

Oil is poured into the body of the heater, which when turned on is heated by heating elements. Heat is transferred to the walls of the housing, and from them to the heated space. When a certain temperature is reached, the control unit triggers and the heating stops. The cycle repeats as long as the heater is connected to the mains.As a result, a constant temperature is maintained in a heated room.
Main malfunctions
The reasons for which the oil heater does not work is not so much. Conventionally, they can be divided into two parts - electrical and mechanical. Failure in work electrical equipment most often falls on heating elements and control communications - thermal relay, switch, thermal fuses. There may be a problem in the wiring, but this happens very rarely.
TO mechanical Damage includes various body holes, as well as the formation of shells on it, through which oil flows. As a rule, these are fruits of corrosion activity. Determining the type of fault is not difficult. Mechanical damage is always associated with the presence of oil stains under the heater. All other faults are related to the electrical part.

Workplace preparation
To fix the heater, you first need to create for this condition. One of the main prerequisites for successful repair will be preparation for it. First of all, you need to choose a place where you will disassemble the heater.It should be spacious enough and well lit. Best for this is a garage or a separate room.
Then the instrument and accessories are prepared. Since the heater device is not difficult, then the tool will be the most common. A set of screwdrivers, pliers and side cutters, a small hammer and an awl will be enough for repair. Before repairing at hand, you must have a soldering iron, a tester, WD-40 liquid, lubricant (Graphite or Litol-24) and some alcohol to wipe the contacts. Must be clean rags. If the cause of failure is determined in advance, it means that we need spare parts to replace the failed parts.
Getting Started to Repair
The question of how to repair the oil heater with your own hands, arises for everyone when the device stops working. Meanwhile, the difficulty in this matter is absolutely not. First of all, you need to disassemble to get to the object of repair. To do this, disconnect the control panel from the case. As a rule, it is fastened with snaps. But there is a mount and another kind. For example, screws or staples.

Therefore, you must first carefully examine the heater to determine how to mount the panel. Then, carefully, without making much effort, remove it. Disassembly must be carried out without the use of brute force, since all fasteners are made of plastic.
Before starting repairs, the heater must be de-energized.
Checking the power cord and switch. From this it is necessary to begin work on the restoration of the oil heater. The fact is that during long-term operation at the junctions the wires usually burn, and the contact is broken. In this case, it is enough to disconnect the wire and strip it, and at the same time the place of connection. After that, collect everything again. Contact reinstated. Tester check whether this is true. At the same time you need to check the power cord for a broken wire. Rarely, but such a malfunction occurs. This is done simply by using the same tester.

Next stage - inspection of all contact connections in the control unit. It is necessary to carefully examine each contact for burning, oxidation and loosening.Screwdrivers, fine-grained sandpaper and cotton wool moistened with alcohol will be quite enough for repair. It is possible that somewhere you will need a soldering iron for soldering the detached wiring.
It may happen that originated fault in thermal relay, or temperature controller. In this case, you need to carefully remove and disassemble it. After disassembly, the bimetallic plate that is inside is removed and replaced with a new one. The thing is that there can be no more faults. After replacing the plate, the relay will restore its potential.
Thermal Fuse Repairwill be to check their performance and replace if necessary with serviceable ones. Verification - a simple dial tone tester. Thermal fuses, or they are also called thermostats, may be several. We check everyone.
Left check the status of heaters. For this, it is enough to measure their resistance with a tester. It must be less than 1 kΩ. One connection is tested for open circuit. Thus, if the tester shows great resistance or shows nothing at all,then it's time to change the heater.

This check the electrical part of the heater can be considered complete. Go to the mechanical faults.
Of these, only one is relevant - oil flow. In this case, the heater will have to disassemble to drain the remaining oil inside. In the presence of damage to the case, it is important to determine exactly where it happened. Then you need to carefully clean the place found grinding sandpaper. This is done to determine the method of repair. If it turns out that the hole is small and there are no signs of corrosion around, then one of the repair options would be to screw the screw or suitable screw diameter into the hole. Another option would be to use a special sealant, which is called "cold welding." Before use, he stretches his hands to the state of clay.
Rolled ball sealant is superimposed on the hole and carefully leveled on the surface. After 15-20 minutes, it hardens so much that you can use a heater. It will be somewhat more difficult to eliminate the rust hole.In this case, it will be necessary to strip the emery cloth of the whole rusty stain to the “living” metal Then again you need to carefully inspect and estimate the size of the hole. If it is not very large, then it can be soldered. If the hole is large, then here you need to apply welding, that is, to put a patch and scald it. In this case, the repair of the oil heater will be more serious and will require not only special tools, but also skills.
The body of the heater is soldered with brass solder or its replacement. Just not tin. Welding is better to implement a semi-automatic. That is, the wire, not the electrode.
As you can see, the repair of oil heaters, and even their own hands, the power of anyone who is familiar with the basics of electrical engineering and plumbing. Therefore, before you throw away the heater, you need to carefully examine it. If the damage is minor, it will be much cheaper to repair than to buy a new one..
/rating_off.png)