How to install the boiler with your own hands
Installing a boiler in a private house, in an apartment or at the cottage is a reasonable solution for providing hot water to the required premises. Installation of the device can be entrusted to specialists, and if you have the necessary skills, installing a water heater with your own hands will not cause difficulties.
Content
Types of boilers
There are several types of boilers, and how the water heater will be installed depends on the design and type of unit.
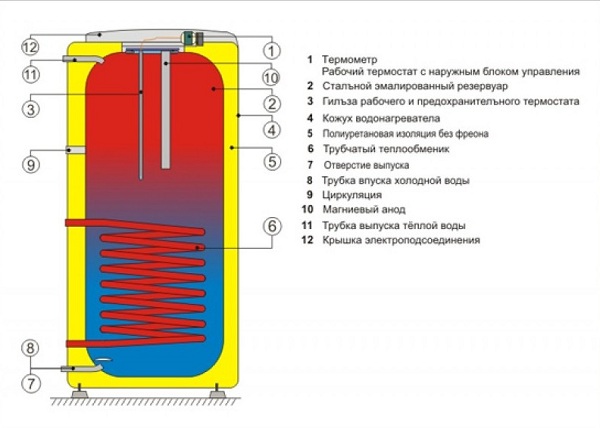
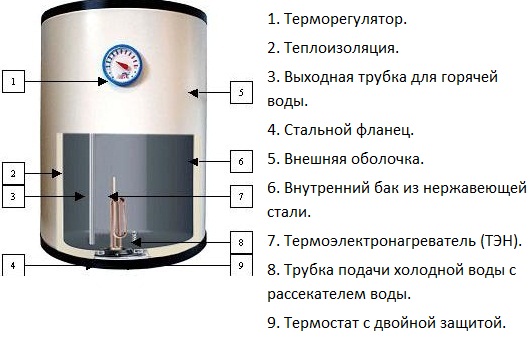
- Indirect heating unit. There are no heating elements in them, and the liquid in the tank can be heated from external sources (heating systems, using solid fuel or gas boilers, solar systems, using solar batteries).Devices can be both wall-mounted and floor-mounted (capacity can reach up to 1000 liters, and during installation they have to be put on the floor).
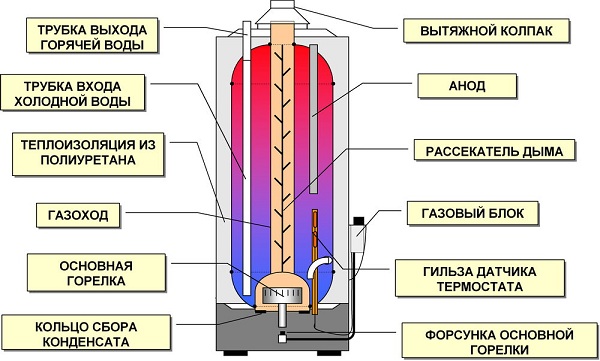
- Gas storage boiler. This type of apparatus should not be confused with gas columns, which are essentially flow-type heaters. The water in the gas unit is heated by the combustion of gas and is in a special tank. Installing the boiler with your own hands is not recommended due to the fact that the connection to the gas must be carried out by specialists. In addition, you need to ensure good exhaust for products of burnt gas.
- Electric storage unit. Electric boilers are most popular. The liquid in them is heated with the help of heating elements installed at the bottom of the tank. Temperature is regulated by the built-in thermostat. On the example of the Termeks water heater, it can be seen that there is also an electronic control of the heating of the fluid in the unit. Electric devices are compact in size and easy to install and connect.
General rules
If the issue with the choice of a water heater has already been decided, and the wall version of the electric unit has been purchased, you can proceed directly to its installation.But before that you should take into account some of the nuances.
- The first step is to determine the place of installation of the device. The location of the unit must be such that preventive maintenance and, if necessary, repair work can be carried out with ease.
- Before installing a water heater, it is necessary to assess the condition of the water pipes. If a old pipesit is recommended to replace them completely or at least a part of the tie-in.
- In the overwhelming majority of cases, the device is mounted on the wall (an exception may be installation of a boiler of indirect heating, which can be either floor or wall), therefore the wall must withstand a load 2 times larger than the tank capacity. For example, with a tank volume of 100 liters, the wall must withstand a mass of 200 kg. Of course, drywall for these purposes will not work.
- In the case of installation of the heater in the country on a wooden wall, make sure its strength.
- In addition, since the unit uses powerful heating elements, before you hang the water heater, you need to consider that the wiring must withstand a certain load. It is therefore recommended to separate line from the meter with the installation of a circuit breaker in front of the device. Wire cross section should be 2.5 mm.
Water heater on the fortified wall of a country house
Installation of a water heater
After all the preparatory work, you can proceed to the installation (installation) storage water heater on the wall.
- It is necessary to take into account, before installing the storage tank, that between the ceiling and the tank must remain gap at least 20 cm. Therefore, we put the mark below the ceiling by 20 cm.
- Next, from the top of the device, we measure the distance to the mounting rail welded to the back of the device.
- On the wall we mark this distance from the already drawn mark, and with the help of the level we draw a horizontal line. At this height, we will mount the unit.
- Now you need to determine the center of the line, from which the distance to the loops will be delayed. If you want to install a storage water heater in a niche, then there is a central point between the walls. If the installation is done in a wide room, then move away from the wall the required distance, and then measure the distance between the centers of the mounting holes.
- From the center of the line on the wall, measure in both directions half the distance between the loops. So you get a projection of the mounting holes.
- Using a puncher, drill a wall to the desired depth (depth depends on the size of the dowel or anchor bolt). Water heater mount to the wall from brick It is better to produce using a plastic dowel with a hook. In the drilled hole, using a hammer, drive dowels and twist the hooks into them.
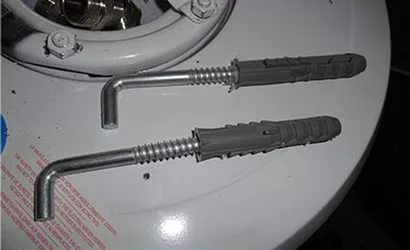
Dowel with hook
- For fastening the boiler to concrete wall better to use anchors. Knock them into the hole and, rotating the hook, firmly fix.
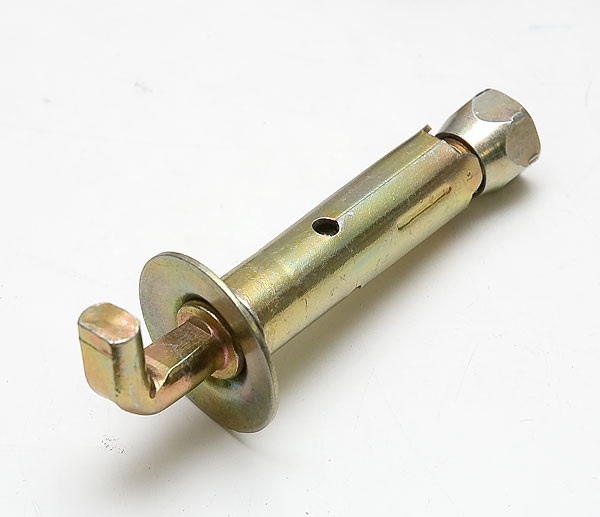
Concrete anchor
- Now that the hooks are in place, it’s easy to hang the water heater on the wall, hooking it to the mounting bar. The initial installation of the storage water heater can be considered complete.
Installation diagram
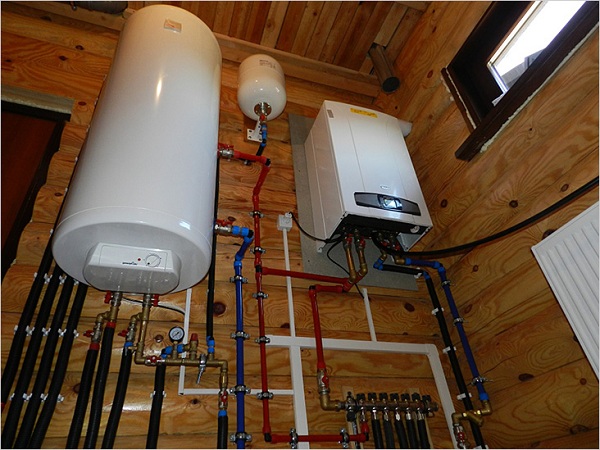
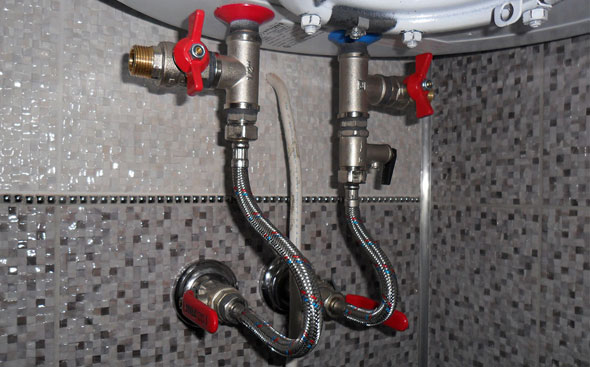
The next important point of the installation of the water tank is connecting it to water pipes. On the Internet there are lots of video lessons on this topic. But you can use this instruction. The figure shows the installation of the water heater.

The eyeliner is done as follows:
- The red arrows show the movement of hot water, and the green arrows show cold when installing an electrical unit. On the layers of the risers (2 and 3) must be installed stopcocks (4 and 5).
- The valve (4) is used to shut off the water supply to the boiler, for example, if repair of the unit or preventive descaling is required.
- The faucet numbered 5 blocks the supply of the main hot water supply if heated water is used from the apparatus.
- Further, continuing the installation of the boiler, it is required to embed the pipes going to the apartment tees (6 and 7), from which the wiring will go to the device.
- It is recommended to install valves (8 and 9) on the outlet on the device. They are useful during preventive maintenance of the unit, so as not to disconnect the main wiring. Also from these cranes begins liner pipes (10 and 11) to the nozzles of the device. You can use metal-plastic pipes, flexible hoses or polypropylene pipes.
- Installation on a cold water pipe safety valve (12). This element protects the unit from excessive pressure. If in the tank of the device excess pressure is formed,With the help of the opened safety valve, the water will be discharged into the sewage system or a special container through the drain pipe (13).
- One more tee is installed above the safety valve, and the valve (14) joins it. With this tap you can drain water from the device if necessary. It is recommended to put the same tee with a valve on the hot water pipe in front of the boiler nozzle. It serves as an air leak for quick discharge of fluid from the apparatus. In working condition must be closed.
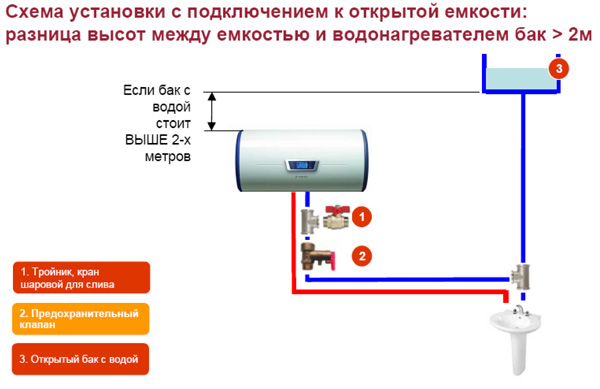
How to install a water heater with your own hands in the country, if there is no centralized water supply? To ensure the normal operation of the electric water heater, it will be necessary to install a storage tank for water. Usually it is located on the roof, but it does not matter. The main thing is that the height of the storage tank above the unit should be at least 2 meters.
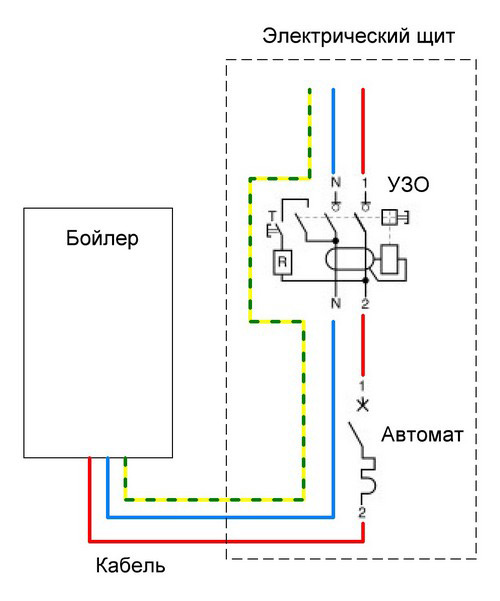
Electrical connection
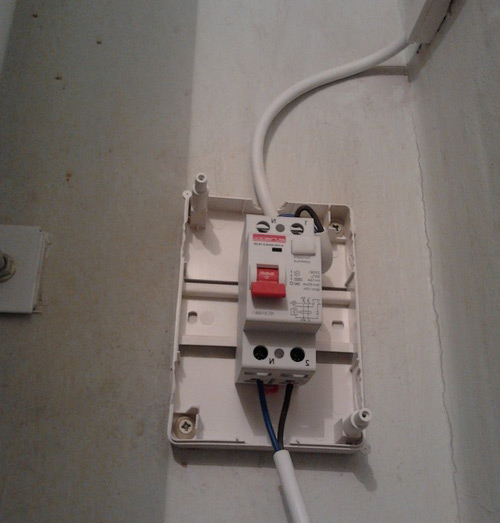
To connect the unit to electricity, it is desirable to do for him separate switchboard with a circuit breaker, and place it not in a damp room. After that, stretch the cable to the boiler and connect it to the contacts of the device.The cable must be three-core (with a cross section of 2.5 mm), with a conductor for grounding. The circuit breaker will protect the device from power surges that can damage the heating elements out of order. The machine should be designed for a current of 16 A. It is also recommended RCD application (devices of protective shutdown) which will save the person from electric shock.
Below is a diagram of connecting the device to the network.
If you are not well versed in electrical installation, it is better not to tempt fate, and contact a specialist who will make the correct connection of the appliance.
What is not recommended to do
How to install the boiler correctly was considered above. But there are recommendations on what to do during installation and use of the unit, you can not:
- include an installed unit that is not filled with water;
- connect a pipe from the water main to the water heater if its pressure is greater than 6 atmospheres;
- remove the protective cover of the unit and drain the liquid from it without disconnecting it from the power supply;
- install, if you do not know how to install the boiler with your own hands;
- use of “left” components, different from those recommended by the manufacturer;
- When installing the unit, ignore the installation of the safety valve;
- Do not follow installation and safety rules.
To choose a boiler for your home, you should be guided by your needs, as well as take into account its size and compliance with the interior. Installation can be entrusted to a specialist or done independently, especially since it is not such a difficult task, if everything is done correctly, following the above recommendations.
/rating_off.png)