View surveillance cameras via the Internet
Modern technologies offer many useful functions for users. One of them is the ability to connect to the camcorder via the Internet and watch the recording anywhere in the world. You can access the video from any device that can connect to a Wi-Fi network.
Content
- 1 Necessary equipment for the organization of surveillance with remote access
- 2 Connect one camcorder
- 3 Networking with a router
- 4 Wi-Fi camera connection
- 5 How to find out the exact IP address of the camcorder
- 6 Programs for viewing video from a smartphone or tablet
- 7 Video surveillance through cloud services
Necessary equipment for the organization of surveillance with remote access
The organization of video surveillance with the ability to view video remotely is not a difficult task, and a user who has a minimum set of knowledge in working with PCs and related equipment can handle it.To create such a network requires certain equipment.
- Digital video recorder. Its task is to receive recordings from cameras, process the signal if necessary (if the recording device is analog) and record it on a storage medium, for example, a hard disk. To access the video via the Internet, the recorder must have a network interface. It can be software or server. In the first case, the PC will have to install a special software, which usually comes bundled with the registrar on the disk. In order to view the video from the recorder with the server interface, just go to the browser and go to a specific page. Many manufacturers of such equipment provide the user with the ability to download a browser extension from the site, which simplifies the task.
- The local network. It is necessary in order to connect the camera, router and DVR. The local network can be organized wirelessly and by wire.
- Router (router). It is used to create a local network if it is organized via Wi-Fi, and also connects the existing system with an external channel, that is, the Internet.
- Ip camera
- Softwareto view the camcorder from a tablet (smartphone).
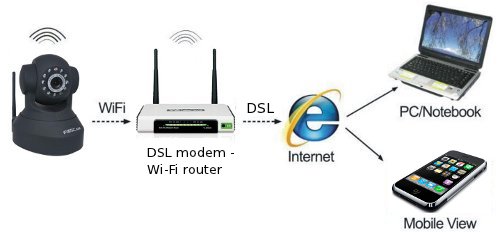
Important! In addition to the equipment, you will need to get a static IP address. Usually providers provide it for a fee. The second way is to use cloud storage for watching videos.
Connect one camcorder
Obviously, the easiest way to create video surveillance with viewing over the Internet involves connecting a single recording device. The procedure is simple.
- The IP camera connects to the PC and its IP address is typed in the browser. It is possible to learn it from the instruction, sometimes it registers on the pasted device label. This will be discussed in more detail below.
- After entering the address in the browser opens the network interface of the camera settings. It is necessary to choose to automatically obtain an IP address or manually register your static ip address (can be found on the Internet by the request “find out your IP address”). Here you should also register a username and password to access the video remotely.
- Next, you should specify the port through which the camera goes to the Internet. It usually has a value of 80.
- After specifying the desired address, the camera disconnects from the PC and connects to the Internet.
- Video viewing is available in the browser from any device. To do this, it is enough to enter the IP address in the search string, and specify the port after the colon.
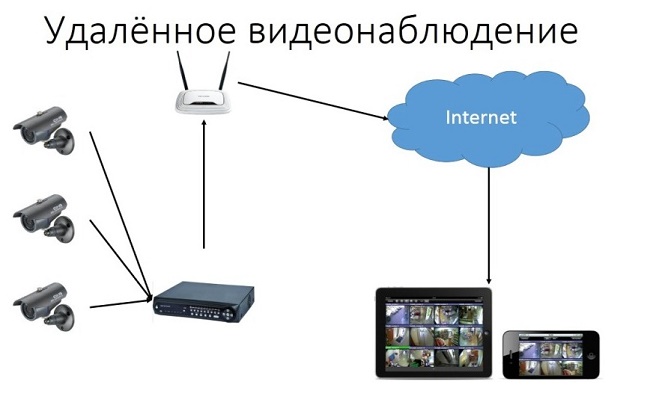
Networking with a router
To create a system with multiple cameras, you will need to use a router: it creates its own subnet with access to all devices. The principle of setting is similar to that described above. By analogy, enter the settings of the router and assign a port to each camera. Most often this can be done in the menu Routing. This item allows you to transfer external requests to different IP-addresses of the system, that is, in the case of video surveillance on the camera.
So, the principle of operation will be as follows. Each device is allocated its own external port and its own IP-address, which has already been assigned by the manufacturer. For example, the external port of the first video camera is 8080, and a specific IP is tied to it. The second is port 8081 and its IP. And so for each camera in the network.
After configuring the router is done, you need to configure each camera. The setting is described above, but there is a slight difference: the IP address is not assigned to the general (through it, the user can connect to the entire system), but for each camera its own. After setup, connect each IP video camera to the router. You can see the recording upon request in the browser “static IP address: external port of a specific camera”. Connecting the system with the DVR is completely similar. There are no differences on the setting here.
Important! Many users, when properly configured, cannot view videos remotely. The problem is that they often try to connect to cameras from the same network in which the entire video surveillance system is registered. That is, a request to connect to it is made from the same IP address. Obviously, this is not logical, and the device itself will not be able to connect. You can watch the video only from other IP addresses.
For example, to connect the system to the tablet, you need to disable Wi-Fi on it and enable the mobile network. The second option - the tablet must be connected to another network that is not connected with the organization of video surveillance.
Wi-Fi camera connection
Connecting an IP camera with a Wi-Fi router as a whole is carried out in the same way, but to view the video, you will need a special programs for viewing surveillance cameras via the Internet. Most often this is a proprietary software manufacturer of the camera itself.The program is downloaded from the Internet and installed on the smartphone. Connect the camera to the phone through this program.
How to find out the exact IP address of the camcorder
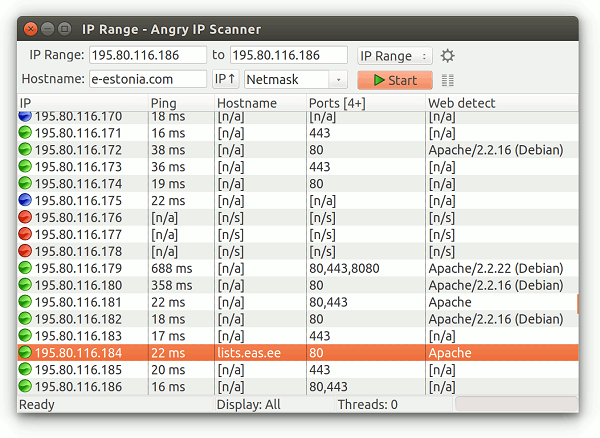
An IP address is required to connect the camera to the Internet. You can learn it from the instructions on the device box, sometimes with a sticker that is on the camera itself. Often this address is not entirely accurate, since it was registered for a family of video cameras (model line), but not for a specific device. In this case, you will need to use a special software to determine the IP camera. One of the easiest ways to find the IP camera is to use the proprietary utility that comes with the camera.
If there is no disc, you can download the popular Angry Ip Scanner application. With it, you can find the address of any device connected to this local network. Another way is command line. In it you need to type the command "arp-a" or "ipconfig".All connected devices will be displayed.
Programs for viewing video from a smartphone or tablet
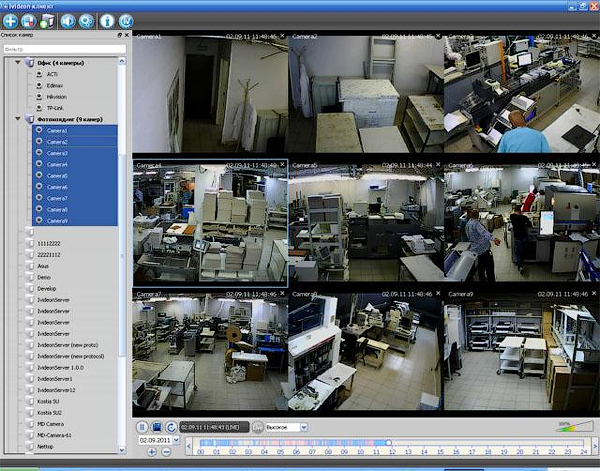
To view the video from a smartphone or tablet, you do not need to specifically configure the device. Above was described the method of viewing in a web browser, but it is much more convenient to download a special application for this purpose. Currently there are a lot of utilities for the tasks described above, but the most popular are 3 applications.
- TinyCam Monitor Pro Supports up to 16 cameras simultaneously. Able to work with cameras from different brands. There are several multiscreens. Settings can be transferred from one device to another. You can directly from the program to write data to any media. There is the possibility of digital zoom.
- Ip cam viewer allows you to work with several cameras at once, combine them into groups, record video on media. There is a zoom feature.You can install the application widget for quick access and up-to-date information. Supports about 700 models.
- Exacq mobile. Works on Android and iOS, supports simultaneously 48 cameras, easy navigation in the application, zoom function.
An interesting feature of these applications is that they can work with any IP cameras around the world. You can connect not only cameras installed at home, but also in other places. If the camera has no login and password, then simply enter its IP address in the application settings. With the help of such applications you can connect to the video camera of the entrance, courtyard, parking. It is enough to find out from those who installed the camera, its IP-address, username and password.
Video surveillance through cloud services
Cloud surveillance technology is different in that the video is sent directly to the network storage, and from there it can be viewed. To work you need a recorder or a camera with P2P technology support. But a static IP address is not required. To set up a device, just go to its menu and tick the “Cloud” or “P2P” checkbox. The recording begins to be carried out in the cloud storage.
There are paid and free services that offer video storage space. One of them is shareware Ivideon: Connect up to 15 cameras for free. It is enough to go through a simple registration, and you can use the services. In order to view the video, you must log in remotely to the site and enter the login and password on the site in the form.
Important! The downside of this way of organizing video surveillance is the speed limit, which can affect the bitrate of the video stream (video can slow down).
/rating_off.png)


