Attachments on a mini tractor with their own hands
Tractor is an indispensable device for a small farm or a country site. To improve the efficiency of working with it, you should use a variety of attachments. The best way to save money is to make attachments on a mini-tractor with your own hands.
Most often in the farm uses the following types of attachments:
- universal mounted bucket (KUH);
- front loader;
- excavator bucket;
- blade or shovel.
About what these tools are for, and how to make them by hand, will be described below.
Content
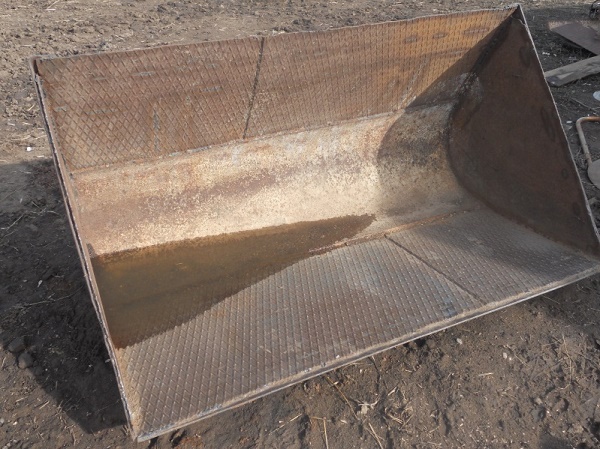
Universal mounted bucket
Homemade KUN on a minitractor is one of types of front loaders. It is indispensable in the case when it is necessary to transport or somewhere to load large volumes of bulk (and not only) materials, for example, sand, gravel or grain.
By itself, the mini-tractor differs in size from a full-fledged tractor. The use of a bucket allows you to make a simple technique for a variety of types of work from a simple tractor.
Front loaders have a whole a number of advantages:
- easy maintenance;
- reliability;
- ease of installation and dismantling of equipment;
- serious lifting capacity for a small tractor;
- ease of management due to enhanced hydraulics.
Bucket manufacture
You can buy a bucket for a minitractor at any hardware store, but this is not the cheapest pleasure, so it’s easier to do it yourself. There is no need for special knowledge or materials. To work you need to stock up on drawings, grinder, welding machine and the material itself.
- First you need to make fasteners. It is welded to the box and the engine, and a metal corner is welded to the bottom for reinforcement.
- KUHN itself is made of sheet metal pieces. Bending the sheet under the shape of the bucket does not make sense. It is much easier to cut the rectangles of the desired size and weld them together so that you get a ladle. The durability of the product depends on the quality of the seams. As racks it is better to use pipes with a diameter of 100 mm, and for rods - 50 mm.
- Next stage - installation of the hydraulic booster. For greater mobility it is recommended to use a pipe with a diameter of 30 mm (it should not be more than 50 mm, otherwise the pipes will move poorly inside each other).
- Now, the support is welded to the front of the tractor and combined with racks to strengthen use "kerchiefs".
- A cylinder is used to control bucket rotation. It is usually installed to the right of the bucket.
Safety when working with a bucket
Making a bucket for a minitractor is not very difficult, the main thing is to have knowledge and experience in working with welding, to be able to work with drawings. In order for the attachments to work properly, you need to take a responsible approach to work and do everything strictly according to plan, otherwise the result may not meet expectations, and the mini tractor with KUN will be a danger to the operator.
To ensure safety during operation, it is worth observing operating rules:
- KUH can be used only for its intended purpose;
- when working you should carefully monitor the bucket;
- when driving with a loaded bucket, it should be kept in the lowered state, that is, near the ground.
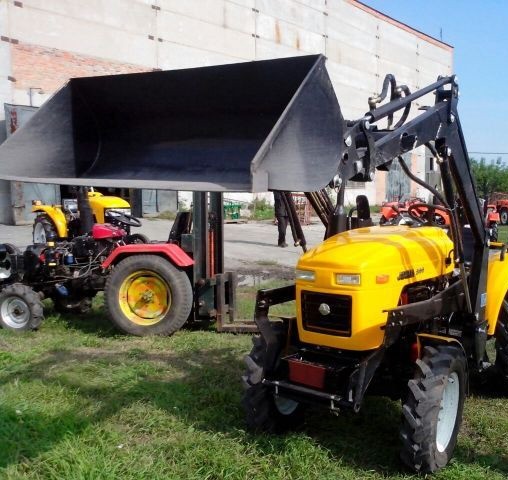
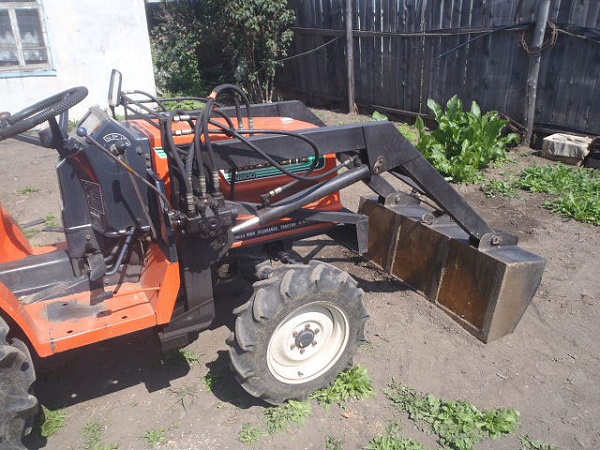
Front loader
The self-made loader consists of three main elements:
- ladle;
- hydraulic lifting mechanism;
- bucket attachment and control system.
Important! In the manufacture of a loader on a mini-tractor with your own hands you need to take care that the weight of the sample matches the weight of the tractor itself. Otherwise, in the loaded state, the bucket with a load may outweigh the tractor and lead to injuries.
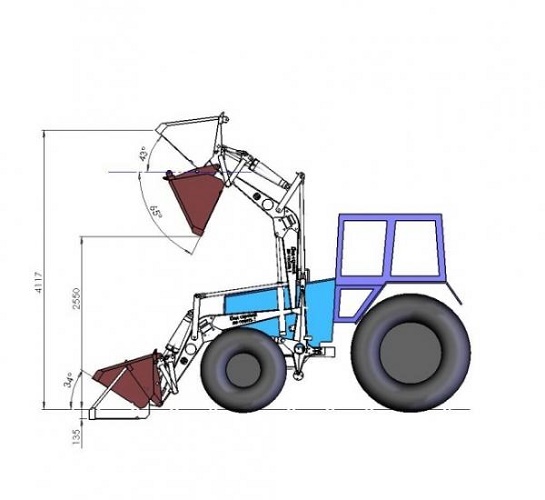
First of all follows make a bucket. This is not the hardest task. It is welded from pieces of metal plates, the thickness of which should not be less than 6 mm. Sideways welded triangles that close the bucket from the sides. To the bottom of the longitudinal weld special ridgeswhich will contribute to the seizure of materials.
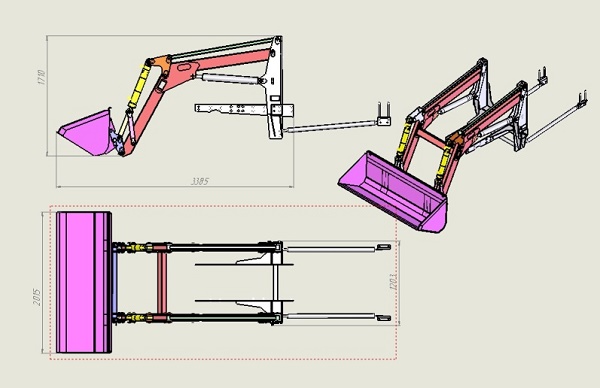
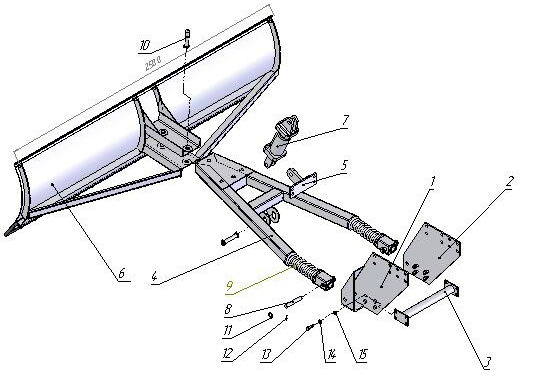
The second stage of the assembly of the front loader is hydraulic lift system. For its manufacture you will need 4 levers, an arrow and hydraulic lifts in the amount of 4 pieces. Lifts is better to buy ready-made. A square tube with the desired cross section will be suitable for the levers, and for the boom you can use the U-shaped channel. On the one hand, it joins the bucket, and on the other, it connects to the minitractor.
In addition, you will need different connecting elements. When assembling, it is necessary to correctly calculate the center of gravity; otherwise, overturning of the equipment may occur when working with a front loader.
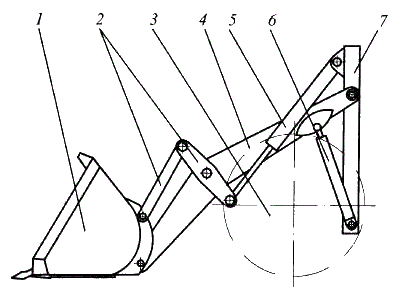
In the picture: 1 - bucket, 2 - levers, 4 - boom, 5 and 6 - hydraulic lifts, 7 - fastening to the tractor, 3 - the position of the front wheel (there should be a center of gravity).
When assembling any mounted unit, the most important point is to comply with all proportions, deviation from the plan can lead to bad consequences.
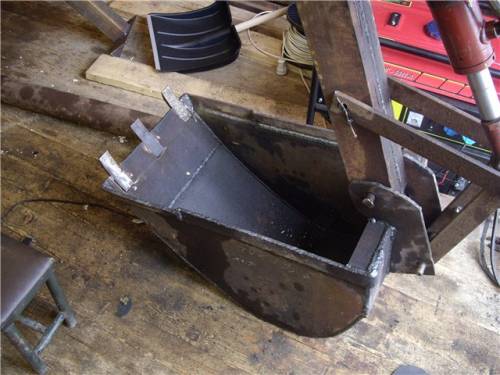
Excavator bucket
You can make a mounted excavator on a minitractor by analogy with a front loader. The principal difference is the shape of the bucket, as well as the arrow, which will consist of two parts.
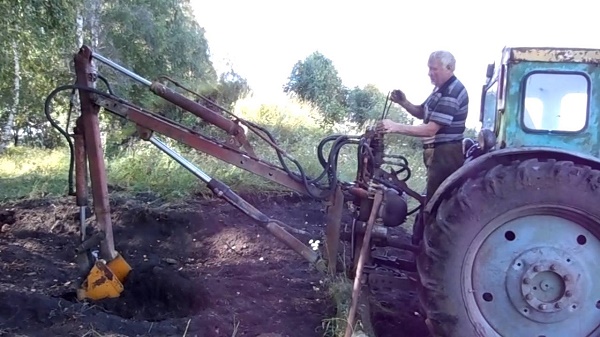
For the manufacture of arrows need two square metal pipesconnected to each other in the shape of the letter L. The pipe on which the bucket will be attached must be longer than the pipe attached to the tractor. A hydraulic lift is connected to the ledge that is on top - it will carry out the movement of the boom, on which the bucket is fixed. The second lift provides movement of the boom attached to the compact tractor. The third is responsible for the movement of the bucket itself. It can be made stationary, but for greater efficiency during digging, you need to be able to control not only the arrows, but also the bucket.
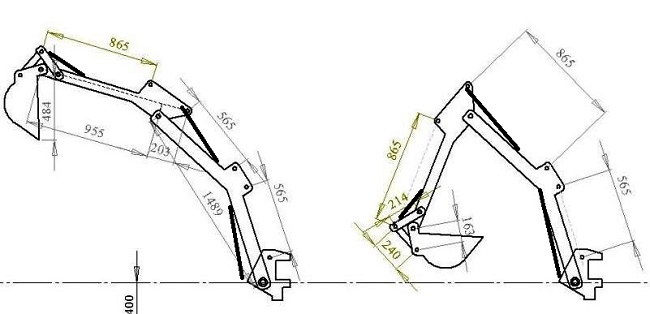
The figure shows an approximate calculation of dimensions, in each case applies its own. Fat black lines - hydraulic lifts.
The bucket itself differs from the front loader in size - it should be narrower and stronger as it is to blow up the ground. For the manufacture of sheet metal can be used with a thickness of 6 mm, it is important to firmly weld the pins for loosening the ground.In general, this node should be more massive in contrast to the bucket for the loader.
Blade
The blade for a minitractor is another indispensable unit when working on a small farm. With it, you can level the site, clean the snow and perform many other tasks.
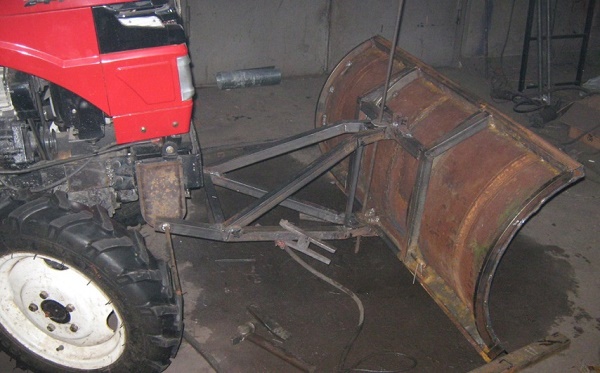
A self-made dump can be manufactured from a piece of steel pipe with a diameter of at least 70 cm and with a wall thickness of 8 mm, and an old heating boiler or barrel will also work. To make a dump on a mini-tractor, you need to cut a pipe longitudinally, but this should be done not in the middle, but approximately by three-quarters of a full circle. Thus, an ideal bend to grip is obtained.
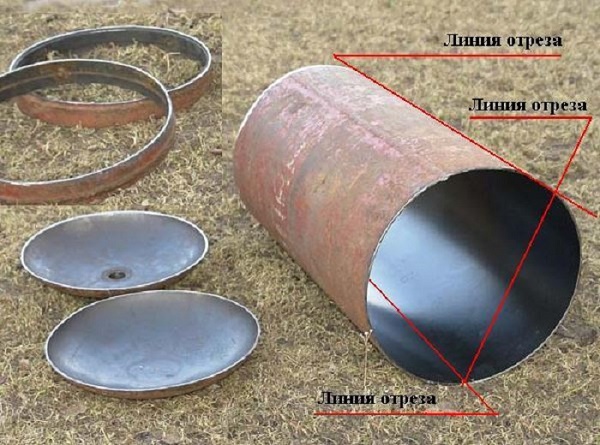
When making a shovel for a minitractor, you need to consider its power and size in order to choose the right width. It is not recommended to make a blade wider than 20 cm wider on each side.
To strengthen the blade you need to do longitudinal stop, for which a square tube with a size of 4 * 4 cm is ideal. In addition, it is recommended to make vertical stops in the amount of 4-8 pieces. It is best to fix the longitudinal stop just below the center of the spade, and provide its lower edge with a rubber casing to protect it from damage when it comes into contact with a hard surface, for example, asphalt or concrete. Another important element - knife that is welded to the bottom edge. You can make it from a metal plate 5 mm thick and long, corresponding to the width of the shovel. To attach the cuff for every 10 cm, drill holes with a diameter of 5-6 mm.
You need to install the shovel on the welded structure, which resembles the letter A. In the place where the middle jumper is located, you should weld a special bracket for fastening the hinge to the tractor. Raising a spade will provide hydraulic unitwhich is best to buy immediately in the store.
Conclusion
Tractor with a bucket, an excavator and a shovel are indispensable assistants in the work on the site. In fact, all these mechanisms are driven by a hydraulic system, which is easiest to buy in a store. The units themselves are quite realistic to make with your hands, the main thing is to carry out the correct calculations and carefully follow them when assembling. If your knowledge is not enough, it is better to ask for help from knowledgeable people in order to get a really working mechanism, and not a pile of useless metal.
/rating_off.png)