How to fix malfunctions of a snowblower with your own hands
The snow blower is a type of equipment that becomes very popular in winter. Particularly in need are gardeners and owners of private houses. So that during heavy snowfall your equipment does not let you down, you need to prepare it for winter in advance. Preparation consists in a routine inspection of the unit to identify possible malfunctions. If they are found, then in most cases repairing a snowthrower with your own hands is quite possible. Below will be considered the typical malfunction of a snowplow, and methods for their self-removal. But first you should be familiar with the internal device technology.
Content
- 1 Structural elements of a snowplow
- 2 The principle of operation of the unit
- 3 Common malfunctions of snowthrowers and their causes
- 4 The snow blower will not start
- 5 Replacing the drive belts in a snow plow
- 6 The snow blower auger does not turn or turns slowly
- 7 Friction ring repair
- 8 Tips for proper operation of the snowthrower
Structural elements of a snowplow
All snow machines, whatever the engine on them has been installed, consist of the following elements:
- engine;
- ladle;
- rotor or auger;
- discharge chute;
- caterpillars or wheels;
- control knobs;
- control panel (not in all models).
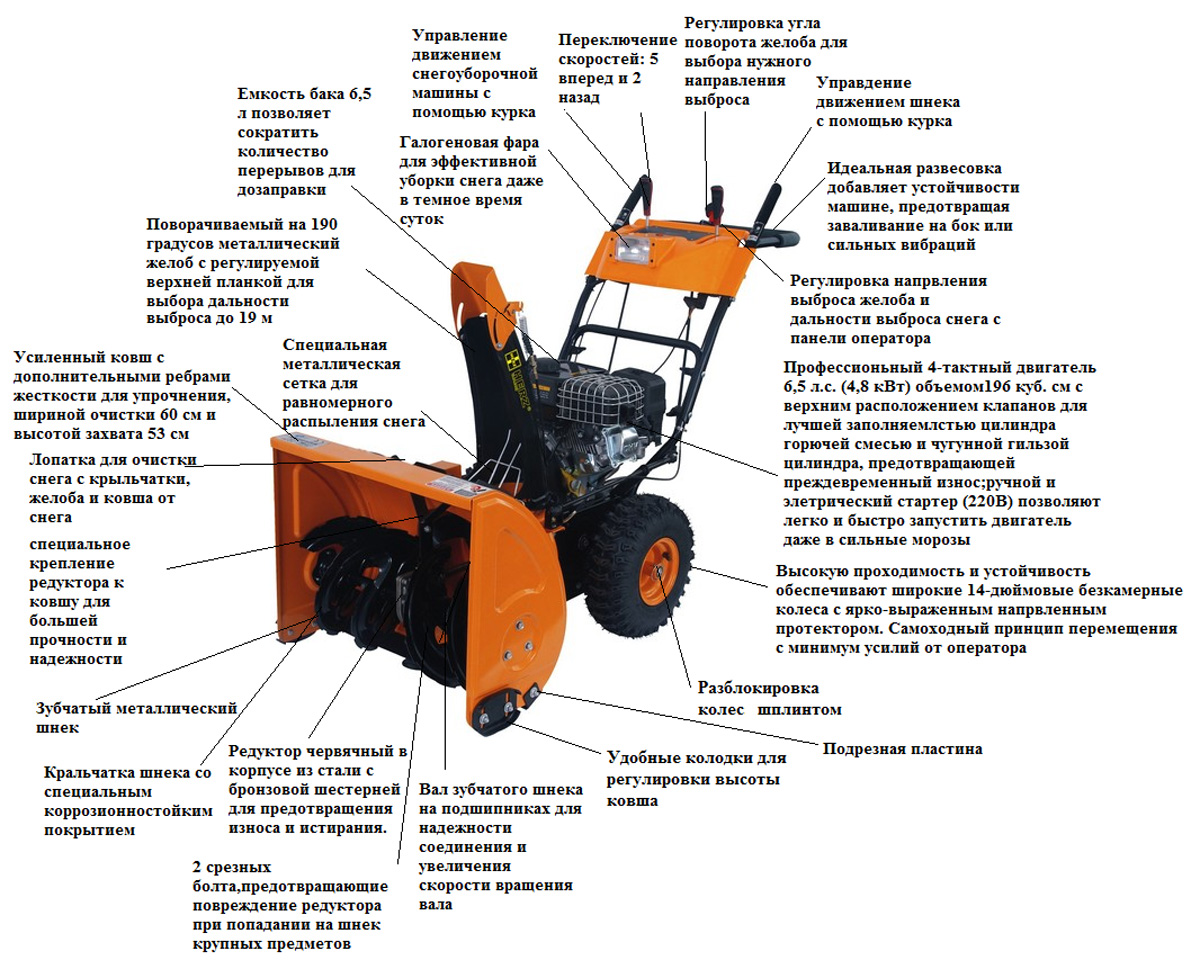
Engine
On the snow blowers installed 2 types of engines: petrol or electric. The engine drives the snowblower, which includes either a screw or a rotor. Also, if the unit is self-propelled, the wheels and tracks are driven by a drive connected to the engine.
Ladle
It is also called the casing. It is installed in the front of the unit and serves the case for the snowplow. The bucket can be made of sheet steel or durable plastic.
Gutter
The main purpose of the gutter - to direct the ejected snow from the unit in the right direction. Also on some gutters there is ability to regulate the range of release. The part can be made of durable plastic or metal.
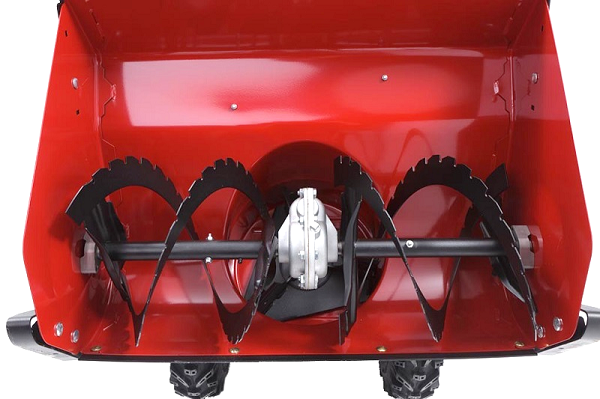
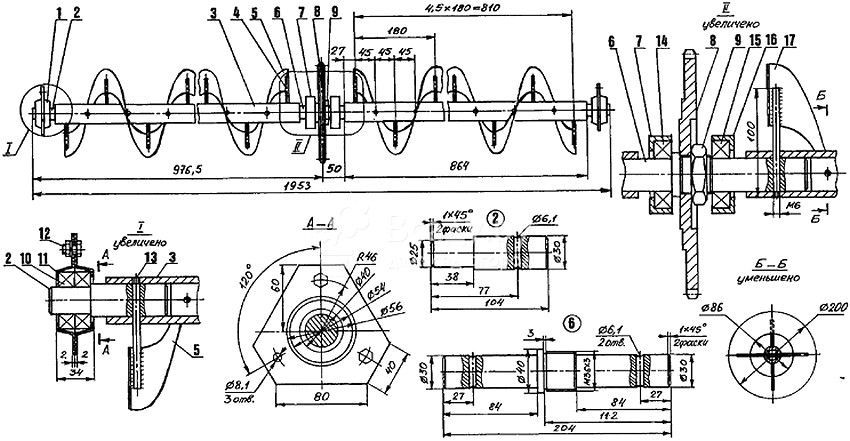
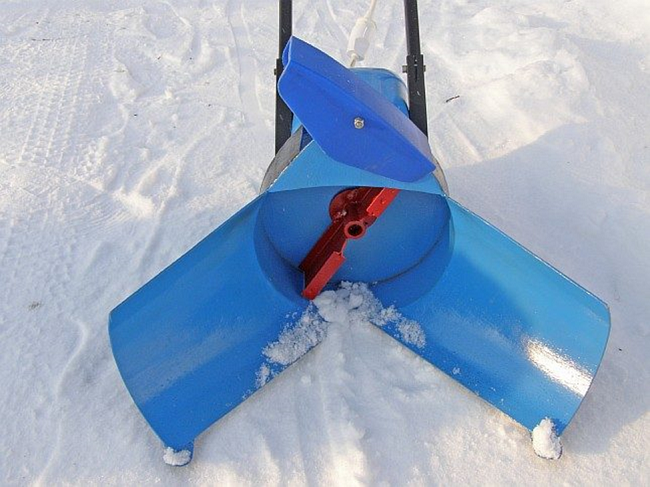
Screw
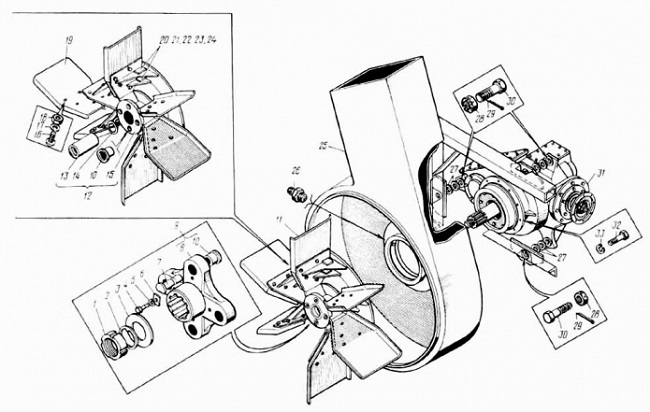
The main working body of the snow plow is a screw. It is made on the principle of the Archimedes screw and is designed to capture and move the snow to the center of the bucket. The screw from metal is made. The edge of the auger can be both toothed and smooth. Gear screws cope better with icy and packed snow.
Below are the drawings of auger snow removal mechanism, which can be used in the repair of this site.

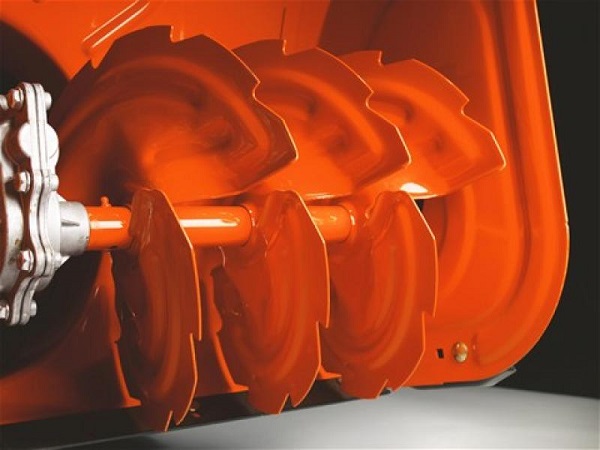
Rotor
Just like the auger, the rotor is the main organ of the snow plow, but only rotary type. This part is made of metal and has the form of a disk with two / several blades or the form of a propeller with several impellers turned inward.
Below is a diagram of the rotary type snow plow.
Important! There are two-stage snow blowers in which both augers and rotors are installed. In this case, the auger feeds the snow onto the rotor, and he is already throwing it out.
Wheels
Chassis snowthrower have a standard design: a metal rim and rubber tire.

For better traction of wheels with the surface and to reduce their slipping tires have “Winter” tread pattern.
Caterpillars
To increase the permeability of heavy snowthrowers, as well as aggregates of average weight, use tracks instead of traditional chassis.
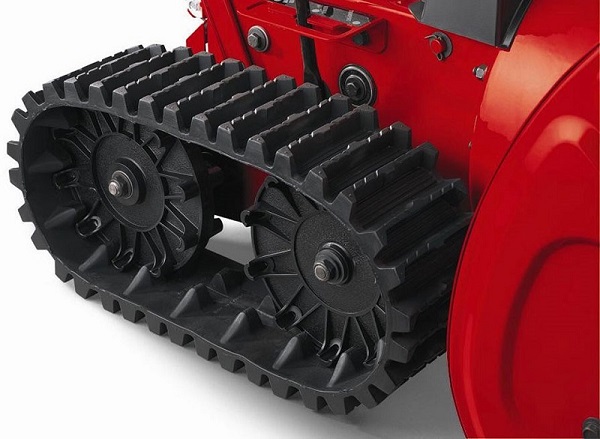
Thanks to the tracks, the unit becomes more stable, which allows it to be used on terrain with difficult terrainFor example, on slopes, steep descents and ascents.
Control knobs
To move the snow plow (not self-propelled) and to perform various maneuvers, long handles are used.
The start button can be placed on the handle (if the unit is electric) or the gas lever in the case of a gasoline snow blower.
Control Panel
On some self-propelled snowplows one can observe a complete unit control panel.
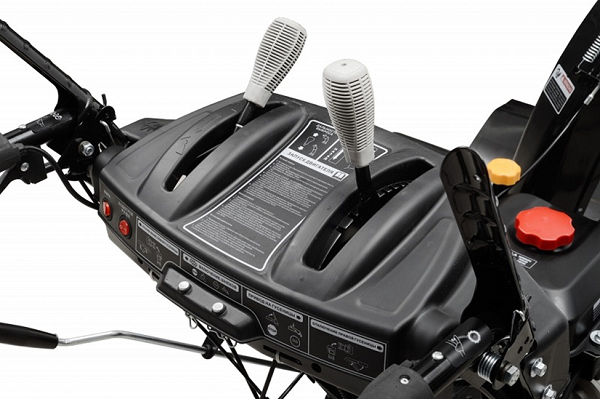
On the panel can be placed: ignition lock, wheel or crawler drive control levers, speed selector (front and back), chute tilt lever, auger control, engine controls, halogen headlight on button.
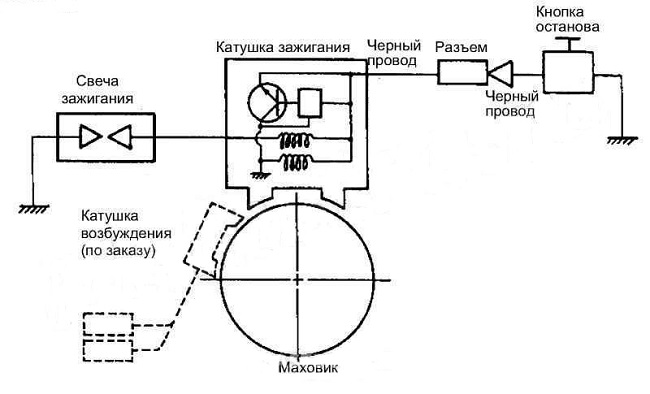
The following is electrical system ignition system of a gasoline unitwhich does not differ in complexity and is standard for this type of devices. It can be useful in troubleshooting the ignition system with your own hands.
The principle of operation of the unit
Auger Snow Blower It works according to the following principle. After starting the engine, gasoline or electric, the auger begins to rotate at high speed. When the bucket sinks into the snow, the auger begins to move it towards the center. Since the blade is installed in the center of the auger, it captures the snow and throws it through the chute.
Principle of operation rotary unit not much different. After starting the engine, the rotor begins to rotate. The bucket is immersed in the snow, the rotor blades capture the snow mass, crush it and throw it through the chute.
Two stage snow blower works like this.After the engine starts, the rotation begins not only of the auger, but also of the rotor installed behind it. When snow gets into the bucket, it is caught by the screw and fed to the center of the casing. Since the rotor is installed in the center of the bucket, the snow is captured by its blades and is ejected through the chute.
Common malfunctions of snowthrowers and their causes
Despite the simplicity of design, snow machines are also prone to malfunctions. Breakdowns can be either simple, which the user can fix on their own, or more complex. In such cases, the repair of a snowblower will not be possible without the assistance of a specialist. The most common malfunctions of the snowthrower are expressed in the following.
- The snow blower will not start. The cause may be a faulty spark plug or poor contact of the high voltage cable in the coil or in the cap of the spark plug.
- Engine is unstable. Often this behavior of the engine is caused by plugging the spark plug electrodes or an improperly installed gap between them.
- Black exhaust. Black smoke may appear due to poor quality gasoline or due to the closed carburetor air damper.
- The unit stopped moving forward. This problem may occur due to the weakening of the drive cable, due to the misalignment of the friction drive or the traction belt.
- Strong vibration. The unit begins to vibrate excessively if the screws that secure the engine to the frame are loosened.
- Starter rope does not pull out. This means that the flywheel is somehow stalled. You will need to open the cover hiding the flywheel mechanism and find the cause of the jamming.
- The unit has stopped throwing snow. There can be several reasons for a malfunction: a foreign object has fallen into the auger (rotor); the protective bolt was cut off; engine running at low revs; drive belt slips due to poor tension or completely cut off; the augers are covered with ice and cannot rotate.
The snow blower will not start
If the snow blower does not start, then first of all you should make sure that the fuel is available and in its quality: the engine will not start if it has been in the tank for about 3 months. It is necessary to drain the old gasoline, refill fresh, pump it into the carburetor (if required by the instructions) and try to start the engine. Usually the replacement of the fuel gives a positive result.
Problems with starting the engine can occur in the following situations.
- Oil sensor blocks engine start. It is necessary to make sure that there is enough oil in the crankcase with a special dipstick. If everything is OK with the oil level, you can try to turn off the sensor. In case of starting the engine after disconnecting the sensor, it should be replaced.
- After pressing the start button, the starter is in place.. In this case, you need to check the battery, because at low temperatures the battery charge is quickly lost. The battery must be charged in a warm room, then installed in the unit and start the engine with a starter. Also, the starter may not start if it breaks. Check it out is quite simple: try starting the engine with a manual start. If the engine starts, repair or replace the starter assembly.
- Starter difficult to rotate the engine crankshaft. This can be heard by the characteristic low sound. It is difficult to crank the crankshaft, usually because of the thickened in the cold oil in the engine. It is necessary to place the unit in a warm garage for a while, until the engine warms to room temperature, and after that the snow blower rolls out onto the street and the engine is started.
Important! Never attempt to warm up the engine with a blowtorch. In most cases, this leads to an explosion of fuel and fire. In addition, many plastic parts are attached to the engine, which can be deformed when exposed to high temperatures.
If the internal combustion engine does not start up either with the help of a manual starter or with the help of an electric one, or it stalls after starting, then there may be 2 “culprits” of the breakdown: an ignition module or a carburetor.
Problems with a candle and ignition
To make sure that the engine does not start due to the spark plug, it must be unscrewed from the cylinder. Inspect her electrodes. If they are covered with soot or flooded with fuel, then clean them thoroughly, dry well and set the correct clearance - it should be 0.75 mm.
Next, do the following. Put the cap on the candle and touch it (with a metal nut) to the cylinder body of the engine. Pull the handle of the machine’s manual starter. In this case, a spark should appear between the electrodes of the candle. In the case when the spark does not appear, it is weak or deviates towards the insulator, then the candle should be replaced with a new one.
If after replacing the spark there is still no spark, then the cause should be sought in the ignition system (coil, magneto, etc.). Most often solves the problem ignition control.
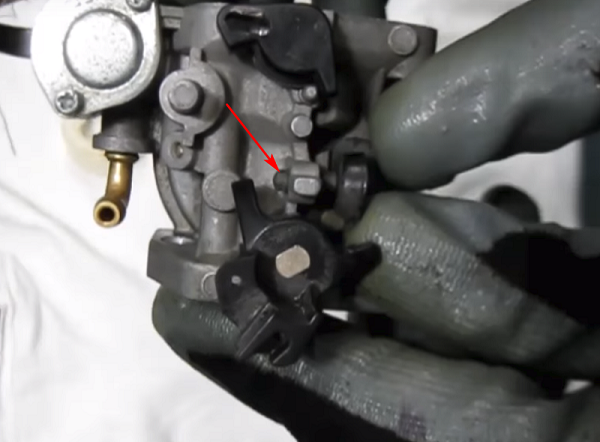
- Remove the cover that closes the magneto.
- Remove the screws holding the ignition module.
- Take a small piece of paper from a regular A4 sheet. Roll the paper 4 times.
- Insert a strip of paper under the ignition module, as shown in the following photo.
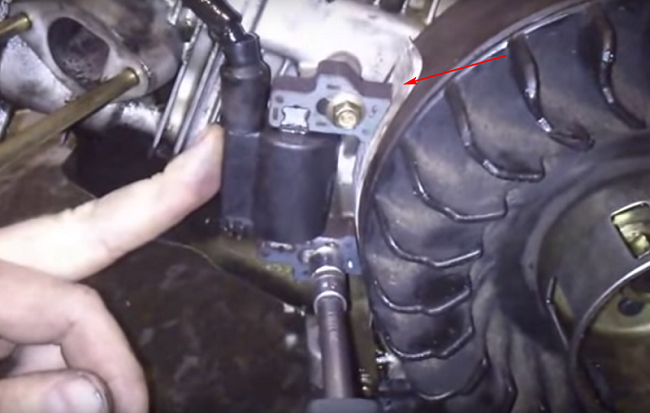
- Press the coil to the magneto and tighten the fasteners. At this adjustment ignition engine snow thrower can be considered over.
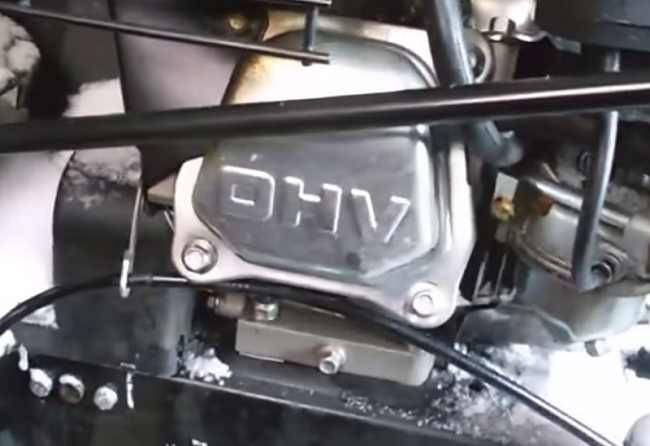
Adjustment of valves
If the snow blower doesn’t start up properly, or after starting the engine, you hear that the revolutions are floating, then first of all check air filter. If it is clogged, rinse it well and dry it well.
The next reason for floating turns is non-regulated valves of the engine. Valves are adjusted in this order.
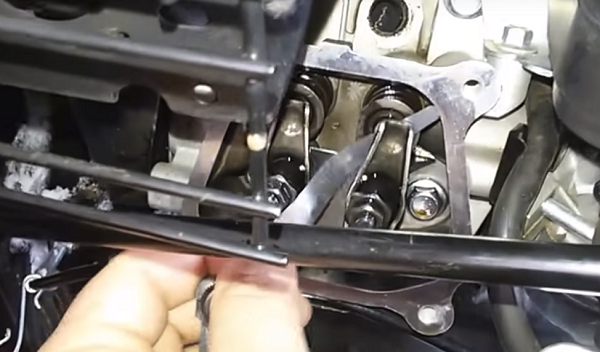
- Unscrew the spark plug.
- Remove the cover covering the valve block.
- Removing the cover, you will see the rocker arms of the valves.
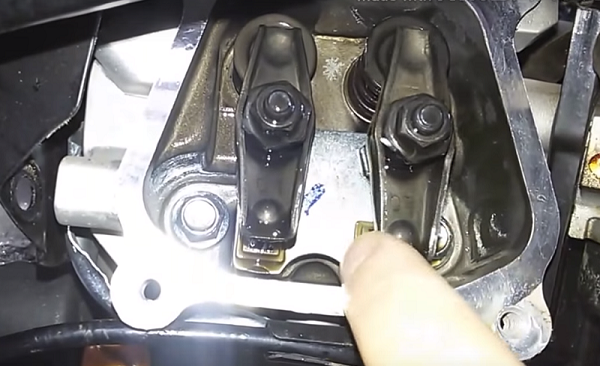
- Next, you will need find the dead point of the piston, that is, its extreme upper position.This is done with a screwdriver inserted into the hole where the candle was located. Turning the motor shaft by the pulley, achieve such a position that the piston is in the upper position. In this case, the rocker arms of the valves should be loose.
- First, the intake valve is adjusted, the one on the right. Between him and the beam should be a gap of 0.1 mm. To set clearance required use a special dipstick.
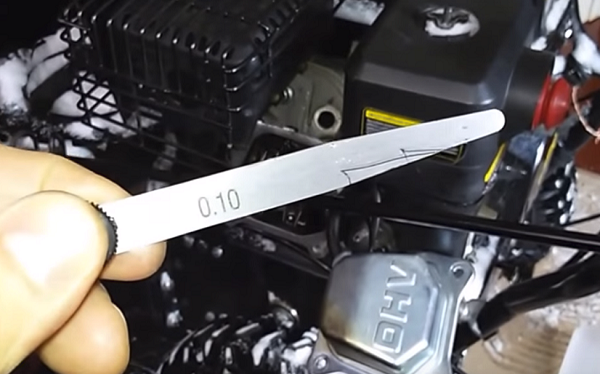 Normally, if you insert the probe into the gap, then it should not walk too freely, but it should not be too tight. First, loosen the locknut (the one that is smaller) on the rocker arm on the right, then release the large nut.
 - Insert the gauge under the yoke and gently pull the nut. Check the clamping force by slightly moving the device.
- After the required clamping force is set, tighten the locknut.
- Adjusting the exhaust valve is carried out similarly. Only need a probe thickness of 0.15 mm.
- After adjusting the valves, close the cover of this unit and start the engine.
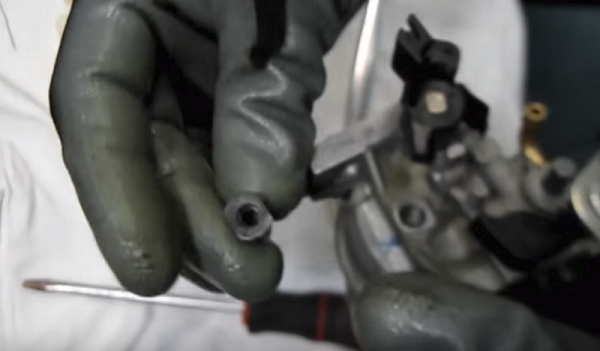
Problems with the carburetor
Another culprit that the snowplow does not start may be a faulty carburetor. The reason that the snowthrower stalls may lie in the clogging of the fuel channels of the carburetor, especially if the engine stalls when the damper closes.
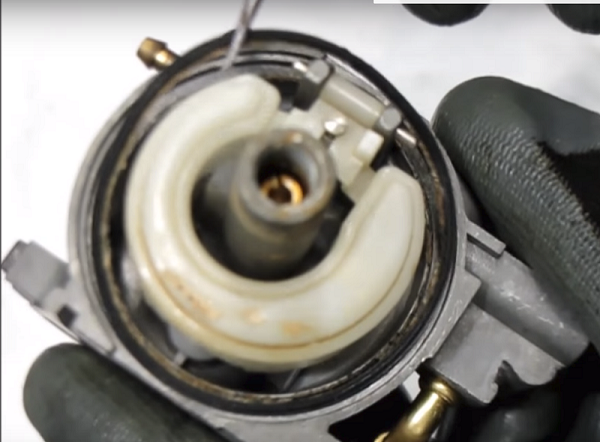
If you look at the carburetor of the snow blower, it may seem that it is quite difficult to build. But actually it is not. The following figure shows a carburetor model that is often present on snow machines.
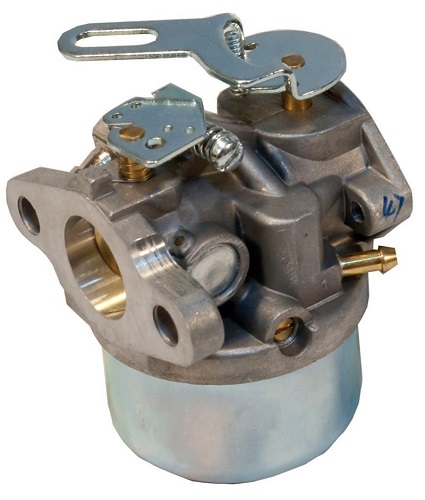
Device carburetor snowthrower:
- float chamber;
- float with needle valve;
- mixing chamber;
- diffuser;
- throttle valve;
- spray;
- fuel valves;
- air valve;
- jet.
For the amount of fuel in the carburetor meets the float. If the amount of fuel decreases, the float is lowered and the needle valve opens the fuel supply. When it is enough, the float rises again and the valve closes the inlet. Further, after the chamber with the float, the fuel passes through the jet and the sprayer into the mixing tank. In it, the fuel is mixed with air, which enters the chamber through the inlet. The air flow is regulated by the throttle.
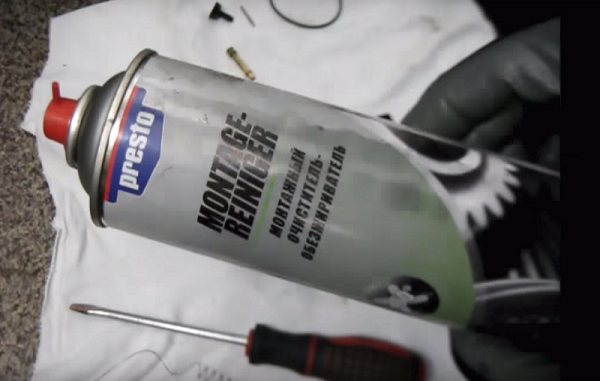
The failure of the carburetor is mainly caused by the clogging of the channels through which gasoline enters the mixing chamber. Therefore need carburetor cleaning.
- Before starting the cleaning, unscrew the side nut located on the carburetor tank. This is a cork with which you can drain gasoline. Do not forget to substitute a small container when unscrewing the cork.
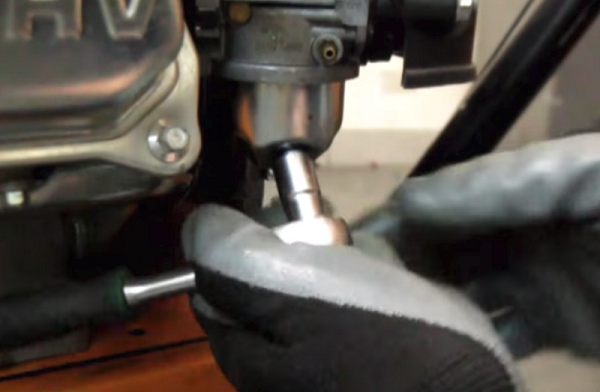
- Next, you should unscrew the cup itself.
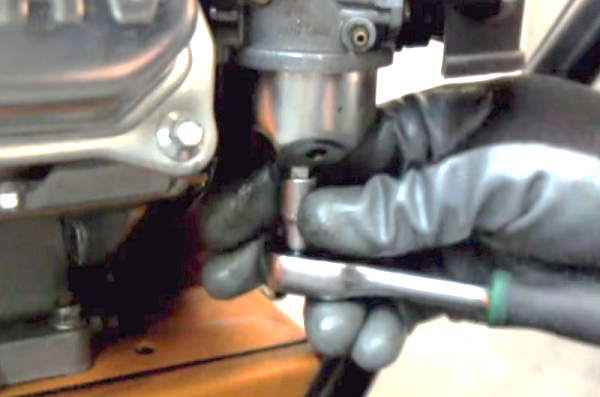
- Often inside the cup one can observe an accumulation of oily dirt that needs to be removed.
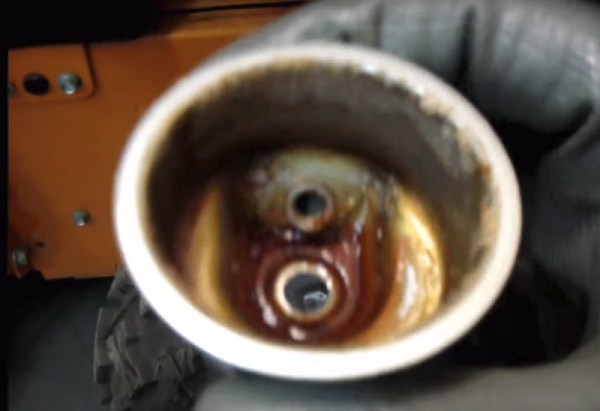
- Since it is clear that there is a lot of pollution, it will be necessary to clean the entire fuel assembly. To do this, disconnect the carburetor from the engine cylinder. Remove the nuts holding the air filter.
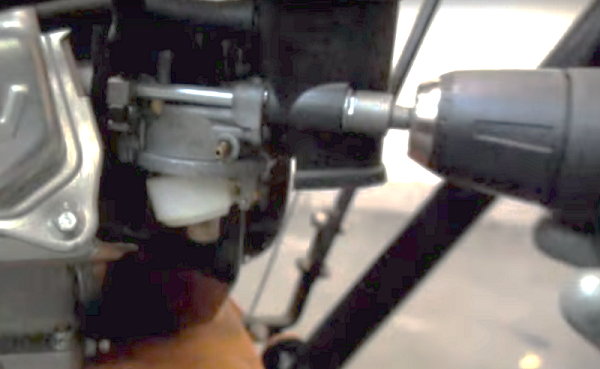
- Remove the filter from the studs.
- Next, disconnect all thrust and fuel hose from the carburetor.
- Disconnect the suction lever from the carburetor and remove the entire assembly from the studs.
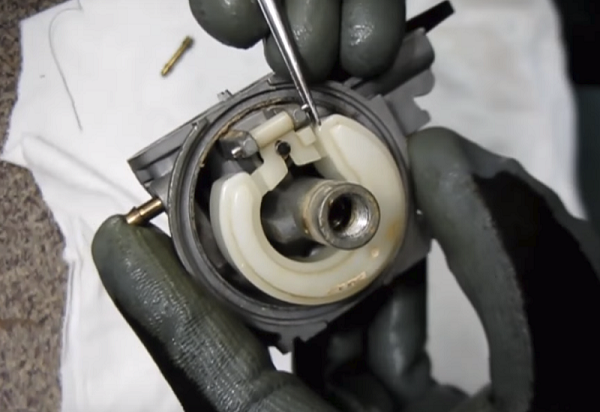
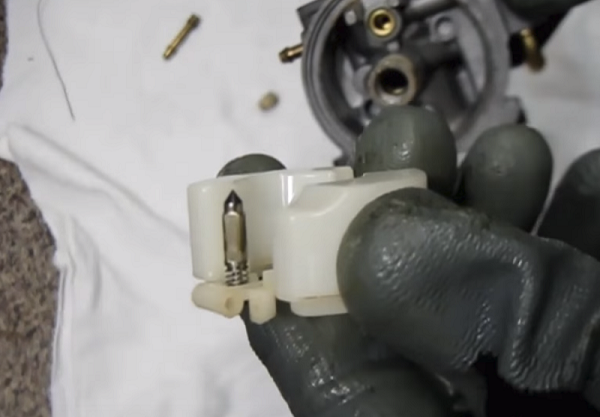
- At the bottom of the carburetor you will see a float and a rubber seal. It must be removed and rinsed well.
- Next, you need to clean the jet. It is located in the central part of the body. It can be unscrewed with a screwdriver. To clean the nozzle you can use a sewing needle or a thin wire.
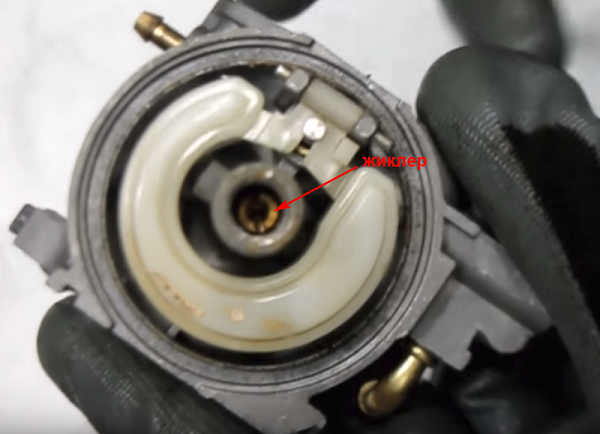
- Under the nozzle is a small sleeve in the form of a tube. It should also be removed and cleaned all holes, including the side.
- Next, remove the float with a needle by pulling the pin with tweezers. Wash the part in gasoline and dry it well.
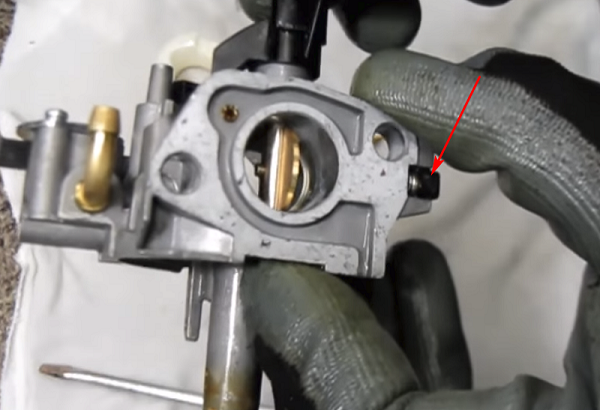
- To continue cleaning the carburetor, you need to unscrew the plastic screw at the top of the assembly. But before unscrewing, you need to remember how much it was screwed. In this example, the screw protrudes approximately 2-3 mm.
- Unscrew the screw, you will see a rubber stopper. It should also be removed.
- The hole in the body, in the place where there was a stopper, must be washed and blown with compressed air. You can use a compressor or an ordinary hand pump. For washing, you can use gasoline or special washing liquid.
- Pour the liquid into all the inner and outer holes in the carburetor body that you will see, then blow them with air.
- The assembly of the carburetor and its installation on the engine occurs in reverse order.
Usually, carburetor adjustment is not required, since the thread of the adjusting screw is fixed by glue.
Replacing the drive belts in a snow plow
Driving belts snowthrower designed to transmit rotational motion from the drive shaft to the driven.
In snow machines there are 2 types of belts. The first belt connects the shaft of the auger unit with the drive shaft, and the second transmits rotational motion to the wheels.
Therefore, if the snow blower does not drive forward, or its screw does not rotate, then you need to believe the belts and, if necessary, replace them. To install the belt on the snowblower, follow these steps.
- Disconnect the chute from the snow plow.
- Remove the protective cover covering the pulleys with belts.
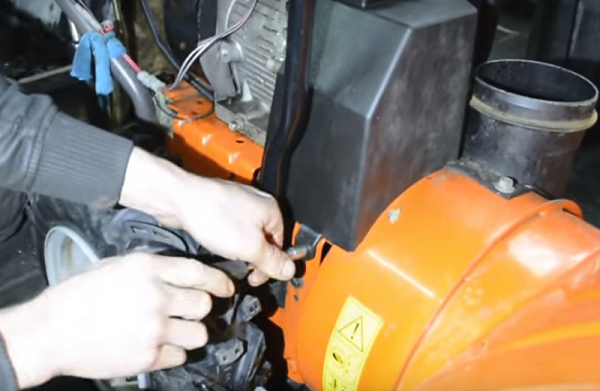
- Disconnect the auger mechanism from the unit's engine by unscrewing a few bolts.
- Next, you need to put a new belt on the pulley of the snowthrower, that is, on the pulley of the auger mechanism. The size of the belt should be the same as that of the torn one.
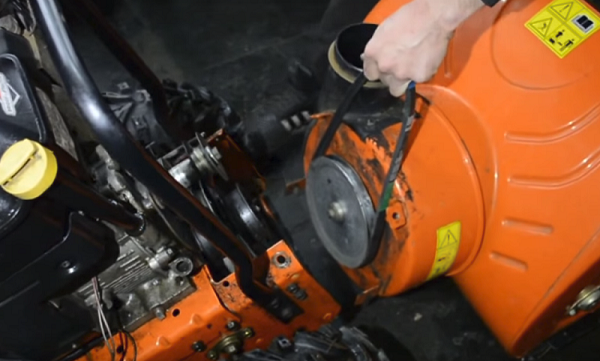
- Pull up the screw mechanism (you may need the help of another person) to the engine and put the belt on the drive shaft pulley so that on one side it falls under the pressure roller with a spring attached to it. The roller serves to tighten the belt.
- When you screw the screw mechanism to the engine, the replacement of the auger belt will be completely completed.
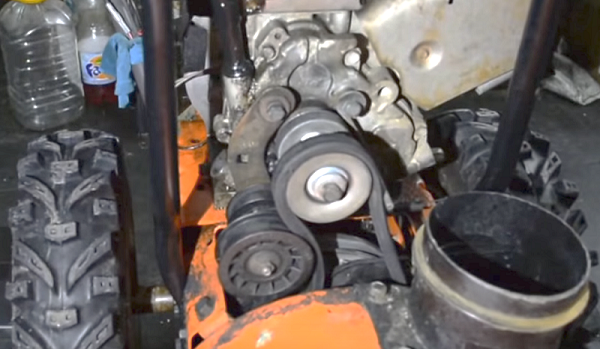
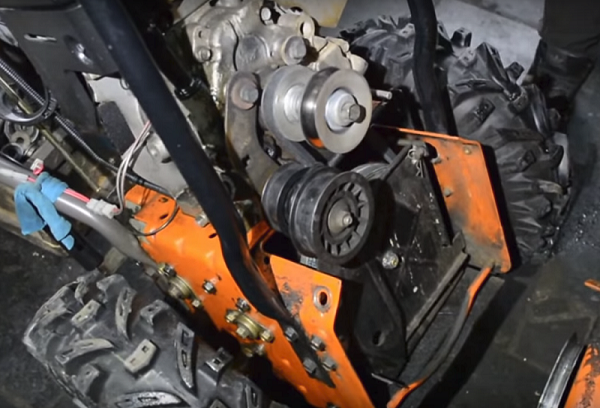
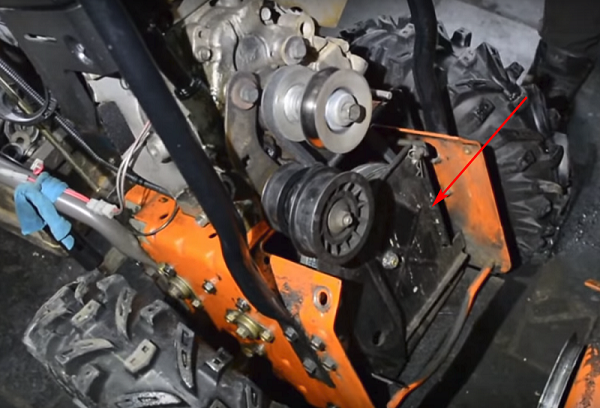
In cases where the unit refuses to drive, there may be 2 reasons: the wear of the friction ring and the break in the wheel drive belt. If the friction is all right, then to fix the breakdown is to change the drive belt.
The drive belt is replaced in the same way as the auger belt. Only after the auger mechanism is disconnected, it is necessary to remove the cover hiding the wheel drive pulley (indicated by an arrow).
The snow blower auger does not turn or turns slowly
Problems with the auger rotation can be caused by several reasons: cutting the protective bolts, insufficient tension or breakage of the auger drive cable, breakage of the screw drive gearbox.
Shear bolt replacement
The fact that the snow-removal screw does not turn can be affected not only by the auger belt, which has been torn, but also by the shear bolts. The latter are made of soft metal and serve to fasten the auger.
If a rotating auger encounters an obstacle, such as a curb or a stone, the bolts are cut off, the auger stops, and you notice that it does not eject snow while the engine is running. Thus, shear bolts perform a protective function and prevent damage to the gearbox, as well as the auger itself.
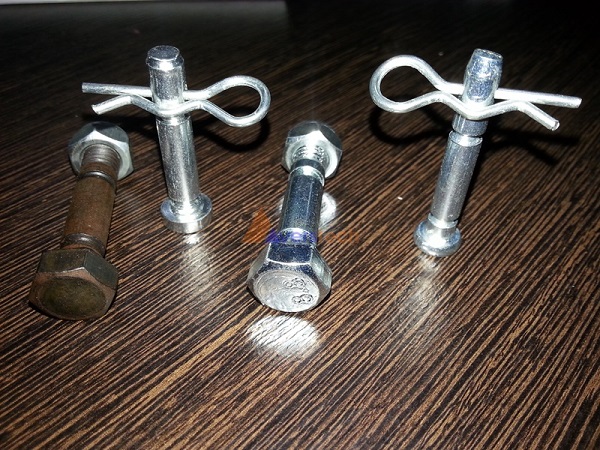
Shear bolt replacementif the auger does not rotate, it is quite simple.It is necessary to align the hole on the auger with the hole on the shaft and insert a bolt into it, then fix it with a nut or a spring clip, as shown in the following photo.
Replacing the auger drive cable
Sometimes the weakening of the auger drive cable causes the snowthrower to throw snow away badly. This is due to the fact that the pressure roller with a cable connected to it with insufficient force presses the drive belt. Sometimes this cable breaks, which causes the snow screw to stop. In this case, it will be necessary to replace the auger drive cable. First, the cable is removed from the handle of the unit, and then disconnected from the pressure roller.
Repair auger gear
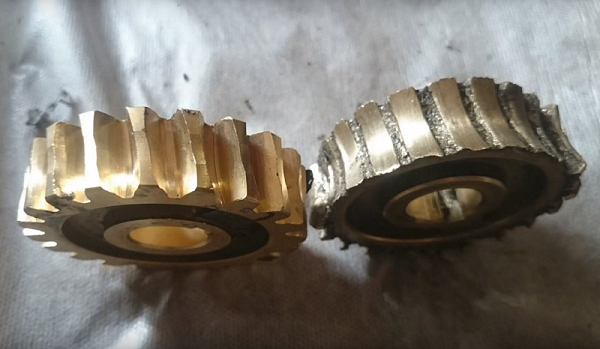
Repair of the auger, or rather of its gearbox, which is responsible for transmitting the rotational motion to the auger shaft, is required when the shaft of the latter does not rotate, or its movements are jerky. Gearbox usually fails due to natural wear gears.
Sometimes the teeth of gears can break if the user installs ordinary (metal) screws on the shaft of the screw instead of cutting bolts. In this case, when the movable screw hits a solid obstacle, the bolts are not cut off, and the entire load falls on the gears of the gearbox, from which they fail.
In the following photos you can see how the new and worn gears of the gearbox look.

To remove the gearbox, you need to disconnect the entire snow removal mechanism from the engine. How to remove the screw, described above. Next, you need to disassemble the auger to get to the gearbox mounted on the shaft.
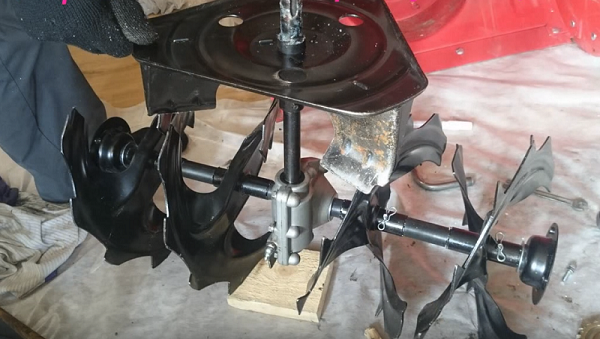
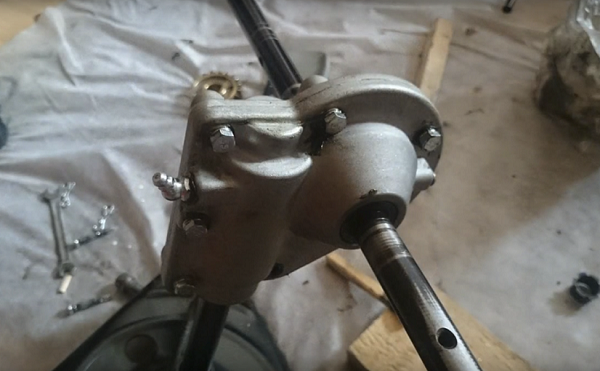
The gearbox housing consists of two halves, which are bolted together. After removing the bolts, the body will split, and you will see the usual gear and worm gear mounted on the shaft.

Most often, the teeth break on an ordinary gear, so it should be removed from the shaft and replaced with a new one.
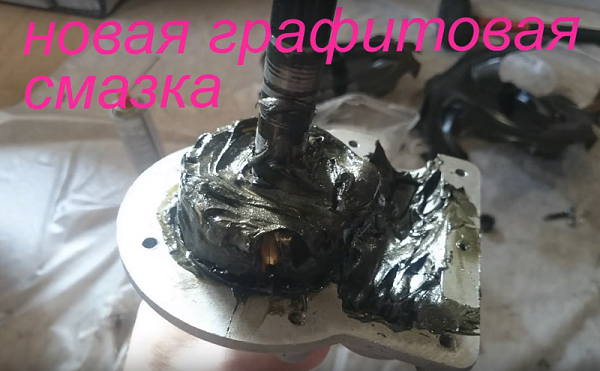
After lubrication, twist the gearbox and assemble the entire snow removal mechanism in reverse order.
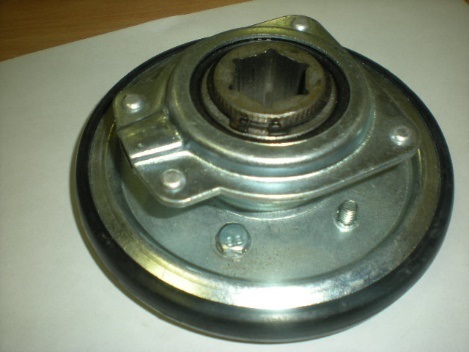
Friction ring repair
The friction ring is a part of the transmission, due to which the wheels of the snow blower are set in motion.
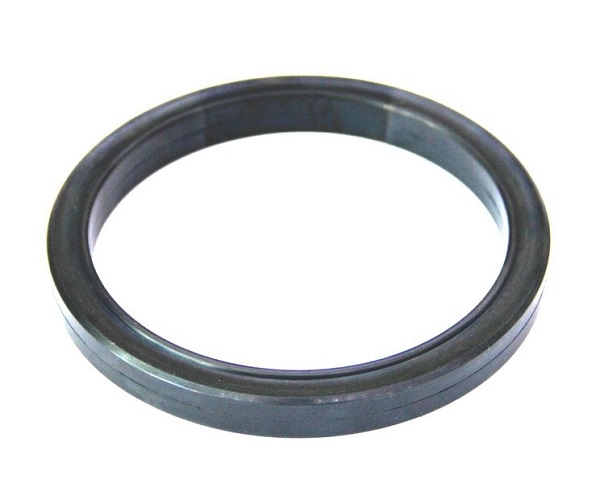
The ring is mounted on the clutch wheel.
In normal operation of the snow plow, in compliance with all the rules for switching speeds, the friction ring is subject to very slow wear.But if you violate the rules, this element is quickly erased and fails.
The reasons for the wear of the rubber clutch ring may be as follows.
- During the operation of the unit the user switches gears without stopping the machine. In this case, the rubber seal is experiencing heavy loads and wear. When the ring is worn, the metal ring also becomes deformed, after which the snow plow stops moving.
- The rapid wear of the ring and the appearance of deep grooves on it causes careless control of the unit. That is, the operator allows for wheel slip, for example, on climbs, on difficult sections of the road or in large snow drifts.
- Also the clutch wears out because of the banal ring corrosion due to dampness. If, after work, no preventive measures are taken to remove snow residues from this block, the ring will rust, crumble, and the friction clutch will no longer perform its functions.
When the friction clutch is worn, the unit begins to jerk or completely stops. There are also problems when switching the speed of the unit and when switching the direction of movement (back and forth).
Repair friction disk with their own hands as follows.
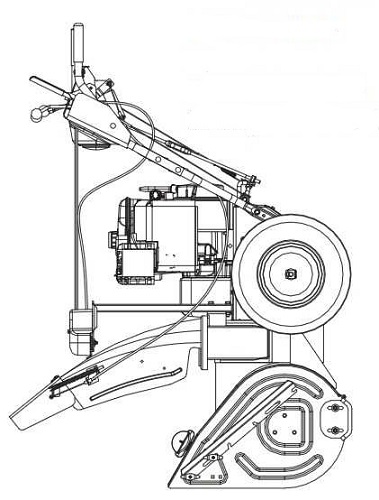
- drain gas from tank;
- set the unit to the position for those. maintenance, as shown in the following figure;
- remove the wheels from the unit;
- remove the crankcase cover by unscrewing 4 or 6 bolts (depending on the model of the device);
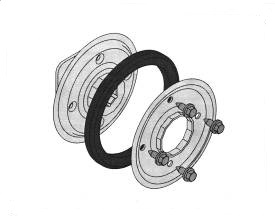
- dismantle the chassis;
- remove the right and left flange (see picture below) - these are the covers covering the bearings;

- move the hex axis to the left and remove the friction disk from it.
If not only the ring is worn out, but also the wheel itself, then a full friction clutch will be required.. To replace the rubber ring, loosen the 4 bolts, remove the worn part and insert a new one into the disk, then re-tighten the fasteners.
The assembly of the entire friction assembly and the snow thrower as a whole is carried out in the reverse order.
Tips for proper operation of the snowthrower
In order to extend the life of the snowplow and reduce the likelihood of various malfunctions, you should follow certain rules for caring for this type of equipment.
- Before the onset of winter is necessary check all mounting screws on the snow blower and, if necessary, tighten them.You should also check the belt tension and the condition of all moving parts of the unit.
- Turning over the device, check scraper shaft integrity, whose task - to scrape the snow from the ground. If this part has worn out and not replaced in time, then in the future this will cause damage to the auger body.
- Watch out for crankcase oil level. For these purposes, on the housing of the crankcase has a special probe. The more often you check the oil level, the less likely the engine will fail. On average, the oil will be consumed after 25 hours of operation of the snowthrower.
- After the end of snow removal, do not immediately turn off the engine of the unit. It is necessary to allow the machine to run at idle with a rotating auger. This will allow moving parts of the snowthrower to get rid of the remnants of snow and ice. It is also recommended to pour the units of the unit, covered with snow or ice, with warm water, then wipe and dry them. If moisture gets into the mechanisms of the unit, then you can remove it using kerosene spray (sold in cylinders). After cleaning the snow plow should be stored in a warm garage or other room.
- At least once a season check and clean the spark plug. If necessary, replace the part with a new one.
- Also, once a season you need to lubricate all bearings, gearbox and eccentrics. For lubrication can use LITOL-24.
- Before sending the snowthrower for long-term storage, it is necessary to: remove the accumulated dirt on all parts of the unit; remove all moisture from all nodes of the apparatus; drain all gasoline from the tank and lubricate all its work items; Remove the battery (if provided by the unit design) and store it separately from the device.
As for electric snow plows, the care of them is carried out in the same way as for gasoline units, with the exception of the rules for servicing the engine.
/rating_off.png)