How to arrange the acoustics for home theater without wires
Imagine that you are watching movies at home, like in a real movie theater. Pure surround sound creates a “presence effect” - you get the feeling that you are close to events occurring on the screen. You might think that such pleasure will be expensive, but there is a solution to how to do it cheaper. In order not to overpay obsessive companies that offer "turnkey home theater installation", you can equip it yourself. In this article you will learn how to build a full-fledged home theater from the audio system and the screen.
Content
Sound setting on systems 5.1 and 7.1
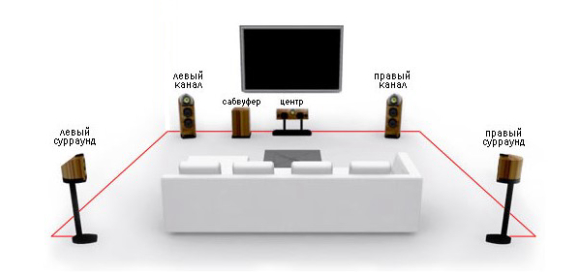
To achieve the effect of "presence" it is necessary to place the speakers at the correct distance and in the right places. This can be done according to one of two standards: 5.1 and 7.1.
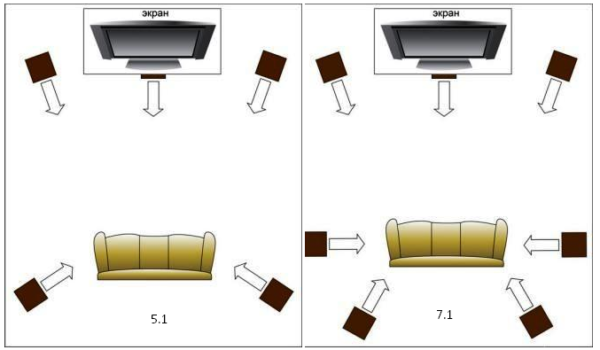
Standard 5.1
This is a simple but popular standard. It needs only 4 equal side speakers, center and subwoofer. If the room is symmetrical and rectangular, place the system as follows:
- We put the screen in the middle of a short wall. If you put it near a long wall, you'll have to put columns closer to equalize the distance to the viewer. This will worsen the sound perception and take more space in the room.
- The columns are placed in the corners at the same distance from the viewer. In this case, the sound wave will reach the ears simultaneously from opposite sides, creating the effect of presence.
- Seats for spectators (armchairs, sofa) move to the middle of the room. Not back to back, because the distance to the rear speakers will be less, and the front will not be heard. Because of this, there will be an effect when the sound from the film will be behind you - obviously not in the cinema.
The distance from the audio system to the viewer must be at least 1.5-2 meters,Otherwise strong bass and high volume will “put pressure” on the ears, which will cause discomfort and can weaken hearing.
Place the speakers30-60 cm above head level the seated viewer - so sound effects are perceived better. To do this, use racks or wall mounts. If the audio speakers are hanging too high or mounted directly on the floor, then you will hear and perceive the sound as if the events on the screen are above or below you.
Alternatively, the rear audio speakers can be placed on the ceiling in the corner, but you need to send them all the same to the viewer's head.
Standard 7.1
This scheme is more effective, since the sound comes immediately from 7 speakers (6 side and center). So it is cleaner and better perceived. As in the previous example, we take a symmetrical rectangular room. The audio system is placed on this principle:
- We equip the screen in the middle of a short wall - for the same reasons as in the 5.1 system.
- We place 4 audio speakers in the corners and 2 on the right and left hand of the viewer, at the same distance to it. The sound wave from the side will go straight to the ears at the same time as the front and rear speakers, which will create a sense of presence.
- Places for the audience, as in the previous example - in the middle of the room, closer to the back wall, but not close to it.
How to set up a subwoofer
Setting up a subwoofer is a fun process, you have to climb on all fours. The method is primitive, but effective. You will need an assistant with a good (not musical, but good) ear. Put it in the place of the viewer, turn on the film, and move the subwoofer along the front wall. As soon as your "experimental" notice that in one place the sound is better than in the others, install a subwoofer there.
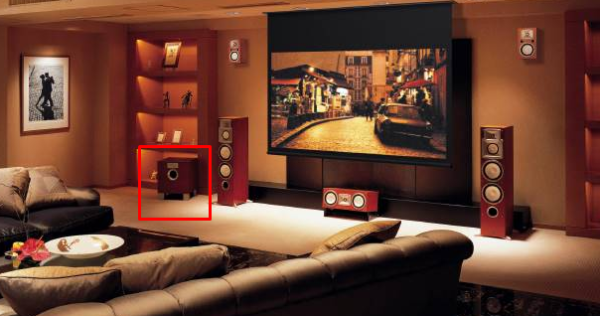
In symmetrical rooms, the most convenient place for a subwoofer is to the left or right of the center channel. Bass on the side are perceived better than the center.
For the 5.1 system, you need one subwoofer, but in 7.1 you can install another one - passive. The second subwoofer will improve the bass, watch blockbusters with explosions and shootouts will become more interesting. Place it opposite the first one behind the seats or in front from the opposite side of the central channel.
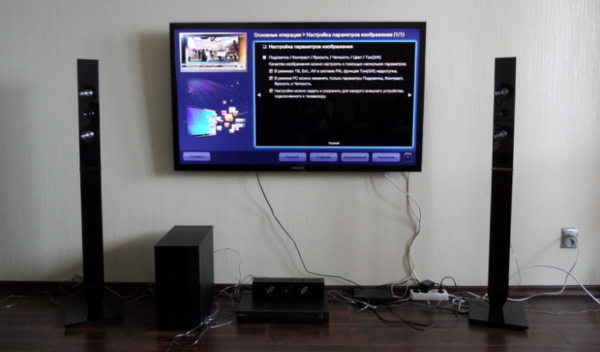
So, you put the audio system and brought all the connections in one place. Each speaker requires power and communication with the receiver. In the room will lie a whole web of wires.This is ugly and uncomfortable, so they are best hidden.
How to hide the wires in the room
The easiest way to do this is still at the repair stage, when you can plaster or put audio sockets without consequences. If you are going to buy or have already bought acoustics, and you want to simply and cheaply equip a home theater, there is also a solution.
Hide wires without repair work
In order not to spoil the interior, you can carefully lay the wire in the cable channel. The acoustics will be safe and you don’t need to make a wall. It is mounted quickly and easily - in an hour you can install the plastic box yourself and put all the wires.
To preserve the aesthetics of the room, you can choose any color: gray, black, oak, anthracite, aluminum, pine. A well-chosen color will perfectly fit into any design.
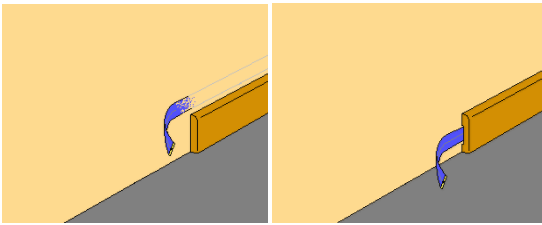
If you basically do not want to install plastic pipes, buy a flat or ribbon cable and lay it under the carpet. So it will be invisible to the touch, and no one will catch hold of it.
In a room with a bare floor ribbon cable can be fixed on the wall along the baseboard and paint over. If you do not look closely, it will be invisible. It is mounted very simply - it is pasted on a double-sided tape.

The problem with the last two ways is that you do not foresee how and when the cable may be damaged.
For example, dragging a heavy sofa, you can hook it on the wall or under the carpet. From this, some conductors will break. So integrity will be broken, and the sound will worsen. Do not risk - run a cable channel.
For acoustics suitable and ordinary plastic cable channels. Along the baseboard install floor or wall, and near the door - the threshold with the cable channel. Thanks to the semicircular shape, even the heavyweight powerlifter will not crush him and the running child will not catch on him.
If it is possible to resolve the issue at the repair stage
The most practical solution is a plinth with a channel. In it the cable of any form keeps within. Mount better after gluing wallpaper or painting, but pre-dissolve the wires.
As an option, you can lay under the plaster, but only in the corrugation. So you do not damage the conductors, and if necessary, you can replace the cable without tearing plaster.
You need to plan so that the acoustic lines do not come close to the power lines. It is necessary to maintain a distance of at least 10 mm.
Network wires create an electromagnetic field that affects the signal transmission through the conductors. Because of this, the sound quality drops.
In parallel with the power lines, only shielded (FTP) and protected (STP) cables are laid.
The metal screen completely blocks interference and the signal is transmitted with minimal losses. If it is impossible to separate the power and acoustic lines by 10 mm in certain places, shield the cable in this area yourself using ordinary kitchen foil.
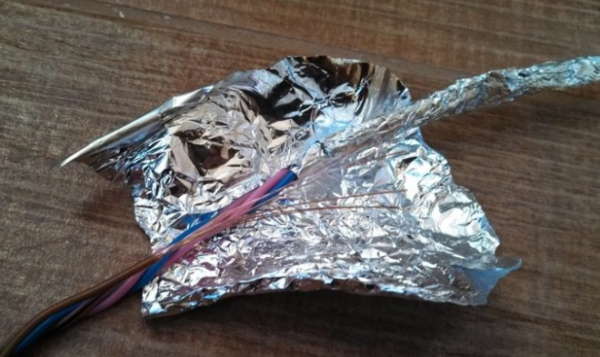
Remember that when self-shielding acoustics will be protected from interference by only 50-80%. If the sound quality is important to you, it is better to immediately buy a shielded wire.
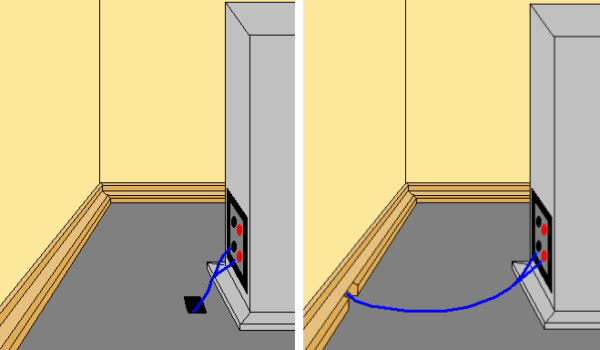
Output connections for speakers can be through the hole in the baseboard or floor. But there is a big minus - when you rearrange the audio system, you will have to redo the whole circuit. This is expensive, because you will need to buy new cables, lay additional outlets: hammer the wall and raise the baseboard. Easier and cheaper - here are the (Hi-Fi) audio outlets.
Choosing sockets for speakers and receiver
Hi-Fi sockets - in size exactly the same as usual, and also mounted in the wall. In the outlet with spring clips easier to connect the wire. To do this, simply lift the handle of the clamping mechanism, insert the bare wires and release. The contact rests on the spring.
Cable cross section should be in the range of 0.75-5 mm2. Too thin will be badly kept, because of what the contact will weaken and the socket will sparkle, and the thick one will simply not fit into the hole.
When plugged into a socket with a spring clip, soft cable must be terminated, otherwise the veins will begin to loosen, break and fall out. Because of this, the contact will weaken and the quality of the sound transmission will deteriorate. Also, due to poor contact, Hi-Fi socket will sparkle.
Fixing the cable in the screw terminal is more difficult, but safer. To do this, you need to wind it on the screw and clamp it, twisting the handle. It is connected longer, but the contact is held stronger. This is good, because because of the contact, the purity of the sound is often “lame”. Supported cross section from 0.75 mm2 up to 6 mm2
Thanks to simple Hi-Fi sockets, you:
- get rid of extra wiring;
- you can connect any audio system without loss of sound quality;
- easily rearrange or expand the acoustics if you want to.
Through the minimum outlet for two wires is connectedonly one speaker. For two, you need a stereo receptacle for four inputs. Eight-pin well suited for installation behind the receiver, as they have more ports.
If several screens are connected to one receiver in adjacent rooms, you must also transfer video through the socket. To do this, fit the special three-pin audio / video sockets. In addition to contacts for sound, they have another one at the top - for video.
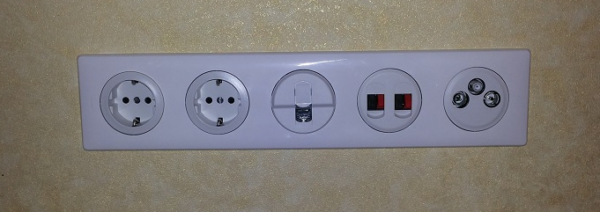
For each remote speaker is displayedseparate audio socket together with the network to connect both power and acoustics. Then all the acoustics are reduced to the receiver. So do not have to "throw" the carrier, through which everyone will stumble.
/rating_off.png)