Making a portable headphone amplifier
Today, finding the right amplifier in the retail sector that satisfies all your requirements is very difficult, and its value will be decent. It will be much cheaper to make an amplifier for headphones with your own hands, and we will try to tell in detail about all the necessary stages of work.
Schematic diagram
On the Internet you can find many different offers, but we stopped at the simplest and most effective amplifier circuit. based on TDA 2003.
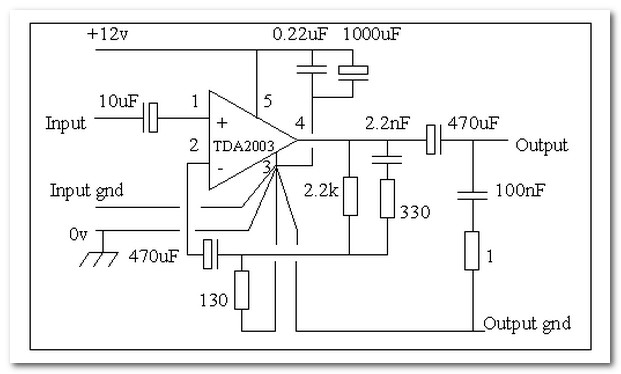
Assembled portable headphone amplifier works in class A, and its gain is about 18 units - such power will satisfy the most fastidious music fan. In some forums on the Internet, advanced amateurs very positively speak about this chip and the presented scheme, therefore after assembly you will have a very high-quality headphone amplifier in your asset.The sound series, according to the assurances of those who have already made for themselves a similar product, is worthy of praise: even low timbres transmitted in full without distortion - separately collect ULF (low frequency amplifier) is not necessary.
On transistors
This scheme looks simple, but in operation, according to experts, it is very finicky - it all depends on the basic parameters of the resistors and capacitors you selected. Its dimensions are also bulky - as a rule, all amateurs use simple two-stage construction on two transistors. Frequently used ones are KT 315 or the like, from such devices you can do anything and a headphone amplifier, including.
Disadvantages:
- A selection of accurate supply voltage is required for the collector, base and emitter:
- Two types of voltages should be suitable for the base: negative and positive along separate lines with the resistance set;
- To ensure the rated voltage, you need to select resistors.
This design is fastidious and to power - you need at least 5 V for its stable operation.
Two-stage design on two transistors
We use chips
When using similar products, you can get the following characteristics: the supply voltage will be in the range of 1.8-15 volts, with the output power up to 1.5 watts. The whole structure is freely placed on a relatively small board with dimensions of 100x150 mm.
After completing all the work on assembling the headphone amplifier, if desired, some users connect small speakers from a stationary computer.
Before you make an amplifier for headphones, you need to go around a few stores that sell radio components, and purchase:
- the main chip is tda 2822;
- resistor variable type: with a constant nominal of 4.7 com - 2 units. and one on 10 com;
- 10 μF capacitors - 2 pcs .;
- non-polar film-type capacitors with a capacity of 100nf - 3 pcs .;
- two sockets for connection - diameter 3.5 mm;
- batteries;
- foil material of a certain size;
- suitable in size housing.
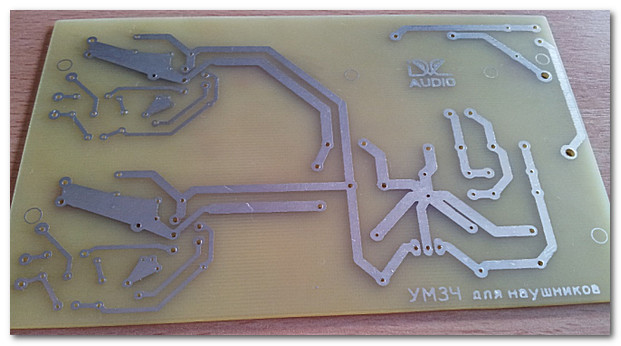
We mark the future position of the parts on the board, after having printed the drawing on the printer using a special technology, which we will discuss below.
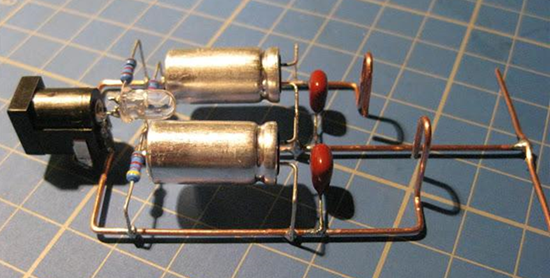
Position of parts on the board
We make a fee
A printed product is the main thing if you want to make a high-quality amplifier. Only with its presence will your product work stably. You can do it at home without any problems, if you know the details LUT technology - this is a transfer of a standard board image using a laser printer and an ordinary iron.
For the implementation of the plan we will use Sprint-Layout 6.0 - Russian version, it has about 4.6 thousand macros. Its distinguishing features are:
- all reference data in Russian;
- inscriptions on the board can be made in Cyrillic;
- ideal for the windows 7 operating system;
- the program interface is changed for novice users;
- You can work from any computer device, stored on a flash drive, leaves no traces in any system.
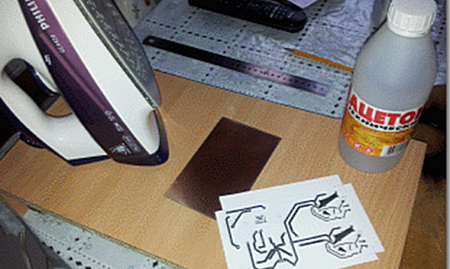
The image is printed only on glossy paper, you can use various booklets that are distributed in subways and shopping malls.
Some hams use thin glossy photo paper - in this case, the imprint turns out better.
It is necessary to print at the maximum, then the copy will be of high quality - the entire picture should be clearly visible. After that, we put it on a low-fat board and iron it,exposed to the third power position, a few minutes. For photo paper, half a minute is enough.
Then need pickle - for this we use a solution of ferric chloride, which is considered by experts to be the best option. With the help of acetone, we clean the copper tracks of the remaining paint and begin their tinning. To make everything work well, it is better to use the alloy Rose, which was invented by the German chemist - that's why he was named after him.
The composition of the alloy: tin and lead by 25%, and the rest of the volume is bismuth - its vapors are extremely toxic, so the whole process should be carried out in a well-ventilated room.
We drop a few granules of this alloy into a prepared container with water (with a flat and even bottom). We are waiting for their complete melting. Then put the plate patterned down and drive it along the bottom with melted granules. With a soft sponge we remove stains and excess flows on paths.
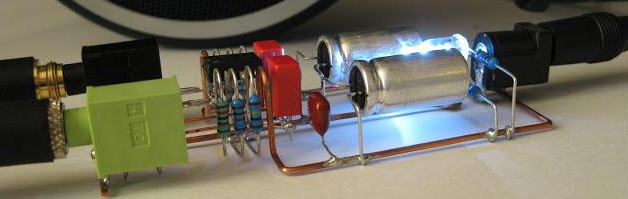
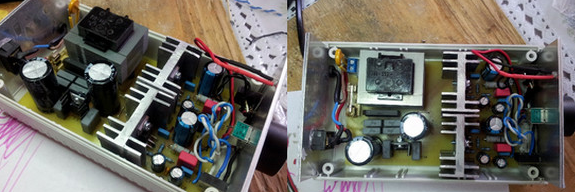
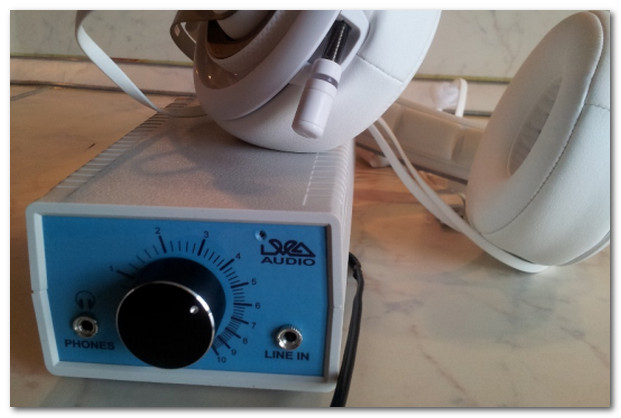
Amplifier Mounting
In order not to confuse anything, we apply the same technology on the reverse side. wiring diagram. After drilling the required holes in the board, we begin the installation of all the details. In the photo, the finished board with the parts is installed in the prepared case.
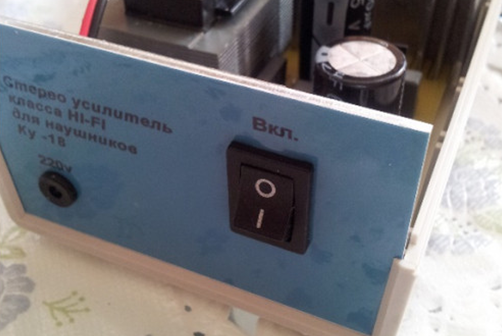
Before fixing them on the body, you need to apply marking on the end panels - for this you can use the Photoshop program, where it is easy to draw any composition, where the names of the sockets and all the necessary symbols will be. Then we make a printout of the drawings with the help of a printer on a thin photo paper with a glossy surface, which we glue on the panel with the technological holes already made and treated with acetone for degreasing. Glue used carpentry.
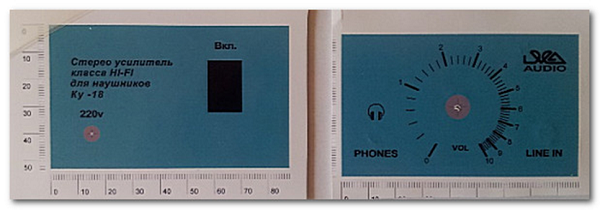
Panels must be placed under powerful press weighing about 20 kg for 24 hours, so that the quality of bonding was perfect. Then we laminate the surface of the panels with a special thermal film using a homemade iron and a sheet of clean paper.
It remains only to install the cover and side panels on the case - and the amplifier is ready for operation. Checking the product showed that the sound amplification is excellent: the sound is quite clear, and if you listen to quality recordings, it can even be described as crystal, which is quite good for a self-made device. All instruments are heard, the bass is excellent without rattling, and the volume is such that you can deafen.
Now at a cost: all costs for the purchase of parts and materials in the calculation turned out to be no more than one thousand rubles, and the cheapest factory-made power amplifier costs from 2.5 thousand p., Not to mention the excellent quality of the products, whose cost is estimated at several tens of thousands. rubles.
/rating_off.png)


