Projection equipment installation rules
If you have a desire to equip a home theater with a large screen, then the best option would be to purchase a video projector. When you install the projector on the ceiling or shelf, the space in the room is freed up and the feeling of a real cinema is created. To properly install the equipment, you need to determine the area of the room, as well as choose the appropriate screen size. Based on these dimensions, calculate what should be projection distance, as well as the vertical offset (these parameters are described in the manual for the unit). Only after analyzing all the above data, the installation of the projector on the ceiling or on the wall will be correct.
Content
Screen mounting
The layout of the room fundamentally affects the place of installation of the screen. It is advisable, if there is such an opportunity, to choose a wall that is not illuminated by direct light, since the clarity of the picture will suffer because of this. If this is not possible, then take care to close the windows well. For this fit thick curtains or high-quality metal blinds (plastic blinds shine through).
Screen placement height
The height at which the screen should be hung directly depends on room spacereserved for the cinema. If the room has standard dimensions, a couple of chairs and a sofa, then the reflecting surface can be placed at a height of 61 to 92 cm from the floor. If you are going to equip the cinema in a large room where several rows of benches or chairs are located, then the reflecting surface can be place and above so that the audience can see the picture, located on the back rows.
Before you adjust (determine) the height of the reflecting surface, you must consider its size. As too big screen can either rest against the ceiling, or climb on it.
Screen size
If we talk about the dimensions of the reflecting surface for projecting a picture onto it by a device, then it should be understood that we are talking about the height and width of the screen. Its dimensions will be taken into account when calculating the distance at which the device must be placed.
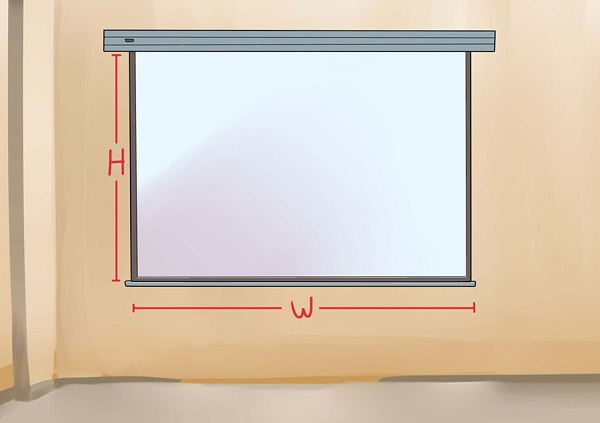
Modern projectors are capable of displaying images on screens with a diagonal of 100 inches (2 m 54 cm). If you are at a loss with the choice of the necessary size, then choose 100-inch. Of course, the room should be the appropriate size.
Projector Mounting
After you have determined where to place the reflective surface, and before you install the projector, you also need to choose a place to place the device. To do this, have a little exercise in mathematics.
Projection distance
The value that determines the distance between the optics of the device and the reflecting plane is the projection distance of the projector (PR). In order to learn it, you first need to look into the manual for the unit. It indicates this type of parameter as projection ratio (BY). It can be indicated by a single number, or, for some models of devices, by a range of numbers.A special formula is used to calculate (OL), and it looks like this: OL = screen width (W) x (SW).
This formula allows the ability to substitute any units of measurement with which the distance is recorded. It can be centimeters, inches and others. If you have, for example, a reflective surface with a 100-inch diagonal (254 cm), while the projection ratio of the device is in the range from 1.4: 1 to 2.8: 1, then the unit can be placed within interval from 355.6 cm to 711.2 cm from the screen (for example, PR = 1.4 x 254 = 355.6, etc.).
By changing the above formula a little, you can calculate the required screen width (EE) if you want the equipment to be placed at a specific point in the room.
The formula looks like this: SHE = OL / PO. For example, installation of the unit is required so that it is no closer than 5 meters from the reflecting surface. In the case when the software documentation ranges from 1.4: 1 to 2.8: 1, the calculations are carried out as follows: SHE = 5 / 1.4 = 3.6, and SHE = 5 / 2.8 = 1.8. Based on the results of calculations, you are entitled to choose a reflecting surface with a width ranging from 1.8 to 3.6 meters.
Accommodation nuances
When the distance range is already known, decide where to place the equipment.To do this, look carefully at the room to find the optimum mounting point. But there are some points to keep in mind.
- Armchairs and sofas. It is not recommended to install equipment above such upholstered furniture where the audience will be located, especially if it has a strong volume or a large mass.
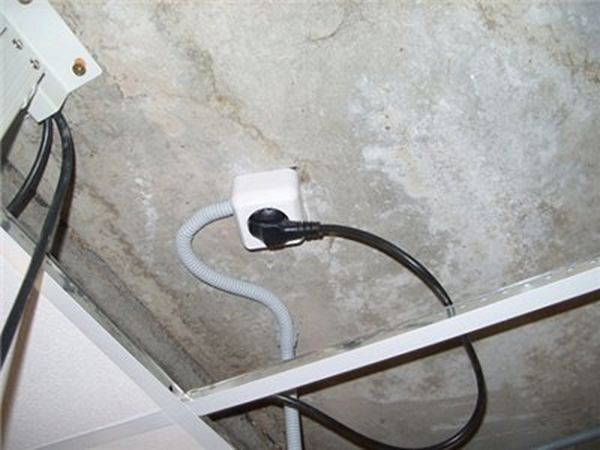
- Cables and sockets. When installing the device should check the length of all wires - it should be sufficient.
- The quality of the picture. Note that when projecting, the image quality will change, regardless of the fact that you correctly calculated the interval of the projection distance. The greater the distance to the reflective surface, the picture will be clearer and more contrast. And if the unit is located closer, the picture will be brighter. Therefore, it is recommended to test the device before final installation, that is, to try to adjust it at various deletions.
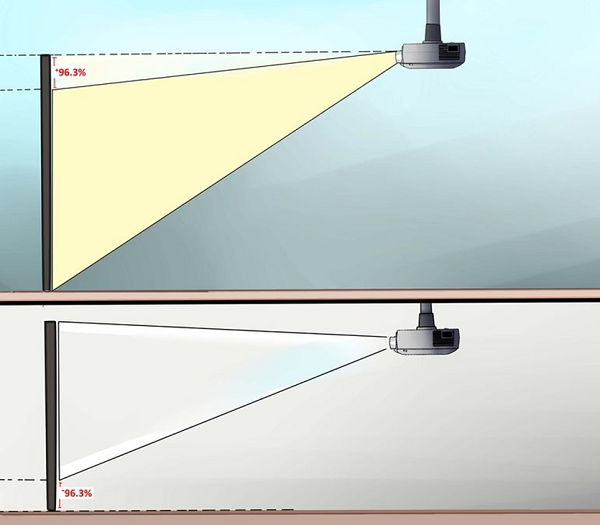
Projector vertical offset (VSP)
This parameter is used to set mounting height apparatus. The quality of the projected image depends on the correctness of the VSP calculation relative to the screen dimensions, namely, its geometry.
Each model of the device can differ in this value, therefore these figures can be obtained from the instructions for the unit. For example, the manual may indicate that the positive vertical displacement of this device is + 96.3%, and the negative - -96.3%. This means if the indicator has a negative sign that the picture is projected below the lens, and if the sign is positive, it is above the optics. But, since the units are installed upside down, it is worth paying special attention to the positive value of the VSP.
Many devices have the ability to adjust the lens vertically. This eliminates the need to move the device itself. With this function, adjust the desired installation height of the unit by moving the optical assembly.
If the optics of your device is not able to move vertically, you will have to calculate the height mathematically.
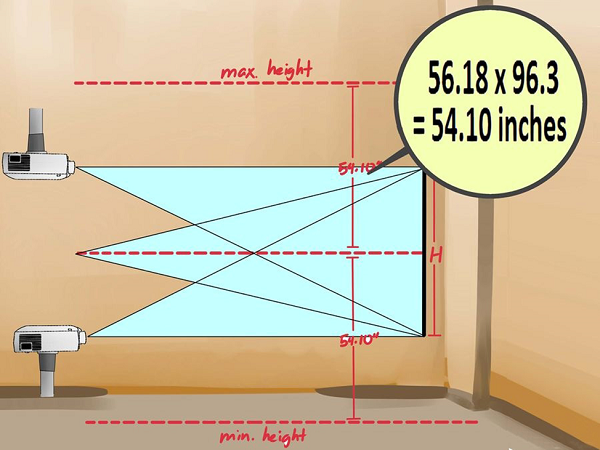
Calculate installation height
To calculate the height of the installation (VM), there is the following formula: VM = VSP x height of the screen. For an example of calculation, you can take an apparatus with an offset height value ranging from -96.3% to + 96.3%.
- In a standard screen, the aspect ratio is usually 1.78: 1.From this it follows that the height of the reflecting surface is 1.78 times smaller than its width. If you take a 100-inch reflective surface with a diagonal of 254 cm and a width of 221.4 cm, then it will have a height of 124.4 cm (221.4 / 1.78 = 124.4).
- Knowing the value of the height of the reflector, you can calculate the height of the installation (VM): WM = 96.3% x 124.4 = 119.8. The result shows that the unit can be placed anywhere, 119.8 cm above, or the same below the center point of the reflecting surface.
Principles of equipment installation
Mount for the projector can be wall or ceiling, with a design that allows you to adjust the position of the unit. Before choosing a mounting bracket, it is worth remembering the following points:
- the bracket for the projector must be chosen taking into account the mass of the device, its type and dimensions;
- it is recommended to purchase mounts High QualityBecause cheap ones have a short lifespan, they often flap and incorrectly position equipment;
- before you install your own projector on a suspended ceiling, you need to buy a special mounting kit.
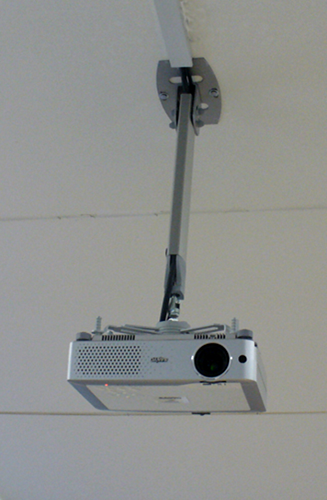
Mounting
Using the enclosed instruction, screw the fastening to the device.Make sure that the size of the mounting plate matches the model of the unit. Also, before hanging it on the ceiling, check how securely the fastening screws are tightened.
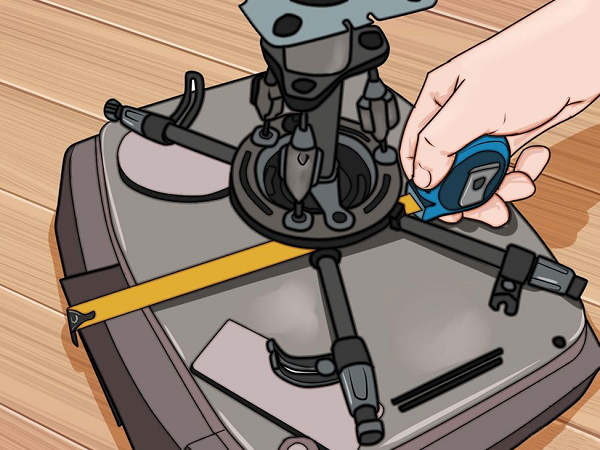
Next, using a tape measure, determine the distance from the optics of the unit, that is, its front plane, to the center point of the bracket. This value is added to the previously defined range of distances to the screen. For example, the length of the segment from the edge of the lens to the central point of attachment is 20 cm, and the projection distance is 5 m. From this it follows that the projection distance is required to be increased by 20 cm (5 + 0.2 = 5.2 m).
Mounting bracket on the ceiling
For the top installation of equipment, the type of ceiling is taken into account, since it can be concrete, stretch, suspended or plasterboard.
- If the room has concrete ceiling, then with a tool such as a perforator, holes should be made in it, after which, plastic dowels should be driven into them. Next, you want to combine the holes on the plate of the bracket with the same on the ceiling, and tighten the screws. Of course, the cable connected to the equipment does not look very aesthetically pleasing.Therefore, if you know beforehand that the room will be used as a cinema before starting repairs, it is necessary to cut (pierce) a groove in the ceiling for laying wires. In extreme cases, the wires are perfectly hidden in a plastic cable channel.
- Plasterboard ceiling Ideal for hanging the projector and making all wires invisible. But, if you are dealing with a previously mounted and painted coating, then the unit can be hung using a dowel butterfly (if the weight of the device is not more than 5 kg). This fastener is different in that when screwing in the screw, half of the plastic dowel opens and is securely fixed on the gypsum board. Before inserting the dowel, it is necessary to drill a hole of the correct diameter so that it fits very tightly into it. Otherwise, when tightening the screw, the dowel will scroll. In the case of a large mass of the apparatus, the installation of the projector is carried out on a metal partition that serves to fix the sheets of drywall.
- Collapsible suspended ceiling consists of cells that are easily removed, after which the bracket is fixed directly to the concrete in the manner described earlier.Next, in the tile, pulled out of the cell, a hole is cut for the bracket arm, after which it is installed in place.
- To mount the projector to stretch ceilingwithout the help of experts can not do. If you are going to install equipment before installing the stretch ceiling, then first the mortgage is attached to the base ceiling, to which the mounting plate will be attached. But if the length of the bar is sufficient, then you can not use the mortgage. After carrying out these works, specialists in stretch ceilings will burn a hole in the canvas and will strengthen it with a special ring. Through this hole will pass the bracket arm. In the case when the stretch ceiling is already mounted, the only way out is to partially disassemble it, and then install it in its original place after fixing the bracket.
/rating_off.png)


