Why do stripes appear on a printer?
Any printer, whether laser or inkjet, in the process of operation comes to this stage of its work, when print quality deteriorates. Printed pages become dull, horizontal or vertical stripes appear on the sheet, the image is printed with spaces (in some places there is no fill), etc. All these troubles can appear for various reasons that depend on the printing technology used in the devices. For lasers - these are problems with the cartridge or the drum, and for the inkjet, if it prints with stripes - malfunctions in the print head, interruptions in ink.
"Striped" print defects on an inkjet printer
There are not so many reasons for the appearance of “banding” on the sheet that came out of the printer.
A manufacturing defect cannot be ruled out, especially if your newly purchased machine starts to draw stripes.
But, if prior to the appearance of this defect, your unit printed quality, in most cases, the problem is fixable at home, and you can do without going to a service center.
Ink level check
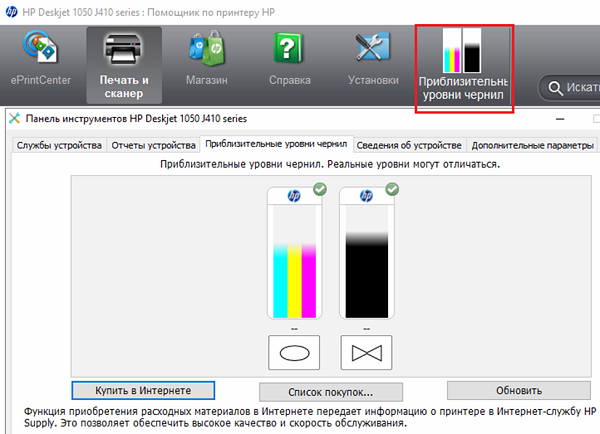
First of all, on the inkjet printer should check the ink level. To determine the level of ink, you can use the software, namely the utility, which is completed with any technique for printing. For example, to determine how much cartridge resources have developed in HP equipment, you need to run a program designed to control the device and select the tab “Estimated Ink Levels”. The utility window is shown below.
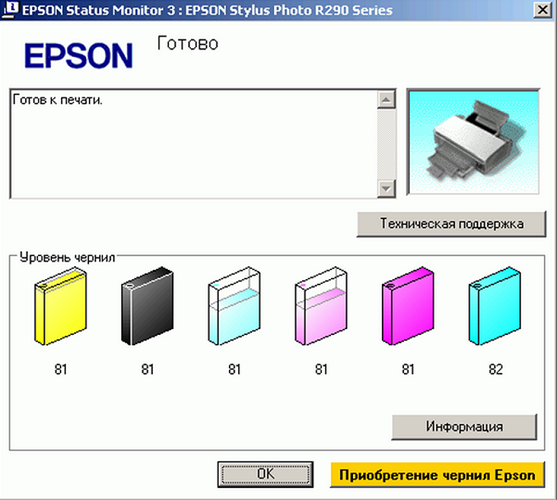
For Epson units, the window will look like this:
When the ink level in the cartridge reaches zero, it must either be refilled,or change to a new one.
If the printer CISS connectedThis program will be useless. The ink level is easily determined if you look at the transparent containers of the CISS. If there is enough paint in them, then you should check the trail, through which the ink enters the cartridges. It should not contain kinks, the plume tubes should not be pinched by anything, and there should not be air plugs (small sections with air) in them. You should also check the air filters on the containers of the CISS. If they are clogged with dust or paint, there will be no leakage of air in the container, and the ink from these containers will stop flowing onto the print head, which will cause stripes to appear when printing.
Head cleaning
For inkjet printers is very important that there was no downtime. Otherwise, due to a long pause, the ink in the print head dries out and clogs the nozzles - the holes through which ink is sprayed onto the paper.
In some models of printing equipment, the printhead is able to dry out in a couple of days of machine downtime.
But for most devices, it takes from 1 to 3 weeks for the ink to dry in the nozzles.In any case, it is necessary to turn on the device regularly so that it can “blow through” the nozzles with ink.
In modern printers and MFPs, the manufacturer has provided the ability to clean the print head with the help of the device itself, with using proprietary utility. For example, for an HP device, this feature is called “Cartridge Cleaning”.

For Epson printers, this function is called “Head Cleaning”. Also, this software allows you to make a preliminary check, which allows you to determine from the printed print whether the nozzles have a blockage. This feature is useful in order to save ink, because when cleaning the print head there is an increased ink consumption: it is with ink and nozzles that are washed.

For Canon devices, to clear the head, in the utility window, click on the “Cleaning” item, or “Deep cleaning” - its more advanced look, with high ink consumption.
If the ink jet prints in strips, it is recommended to repeat this procedure 2-3 times in a row, and let the machine “stand” for a couple of hours, after which it can be used for its intended purpose.
If the hardware cleaning did not help, you will have to resort to hand flush printheadas shown in this video.
If the jet head is built into the cartridge, then it is recommended to soak the nozzles in the Mr. Muscle glass cleaner for at least 24 hours. It is desirable that the liquid was green or blue. Soak nozzles should be such that detergent does not get on the electrical contacts. After soaking, blot the nozzles gently with a tissue, insert the cartridge into the printer, and run the standard cleaning procedure that was described above.
It is not recommended to soak and flush the inkjet head from an Epson printer at home, as it is very “capricious” and it can easily be rendered unusable.. The price of a new head is comparable to the price of a new printer. Therefore, if there is a suspicion that the nozzles have dried, it is better to contact the service center.
Problems with encoder tape and disk
Also, the reason that when printing appears white stripe, which is repeated through the same distance, may be encoder disk clogging. It is usually located on the left side of the machine on the paper feed shaft. The disk is made of transparent plastic and has a special marking.
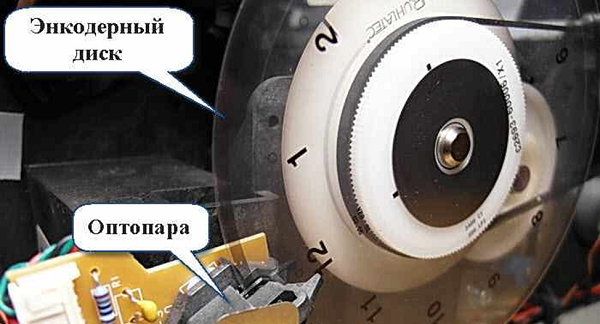
When there is dust, paint or other dirt on the disk markup, the optocouplers are not able to read the information correctly, and the paper is positioned incorrectly. You can also use the “Mr. Muscle” tool to clean the disc. It is important that this product is intended for washing glasses and contains ammonia.
The carriage into which the cartridges are inserted is positioned on the encoder tape. It is a transparent plastic strip with strokes applied to it. It is located near the rear wall (inside the apparatus).
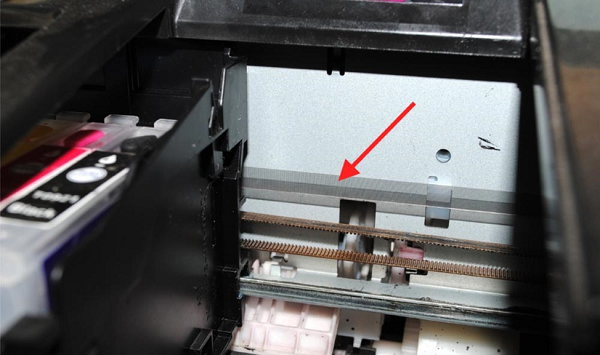
If dirt gets on the tape, then the correct one carriage positioning gets off, and the text or image when printing is shifted to the side, at regular intervals. Wipe this tape with the same means as the encoder disk. Only be careful during this procedure. If the tape comes off the mounts, then in order to put it in place, you will have to disassemble half of the machine.
Important! Acetone and other solvents cannot be used to clean a disk or an encoder tape, as you can erase the markup in this way.
Why a laser printer prints stripes
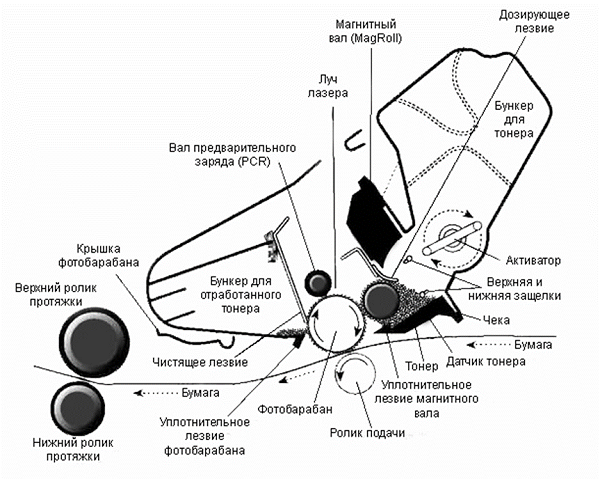
Before looking for the reason why the laser printing apparatus strips, it is necessary to have at least a minimum of an idea about the device of the unit. It can be clearly seen in the following figure.
When printing on a laser printer, the appearance of stripes can provoke the following reasons:
- photodrum damage;
- contact disturbance between the magnetic shaft and the photodrum;
- out of toner;
- damage to the magnetic shaft;
- cartridge leakage;
- waste bin overflow.
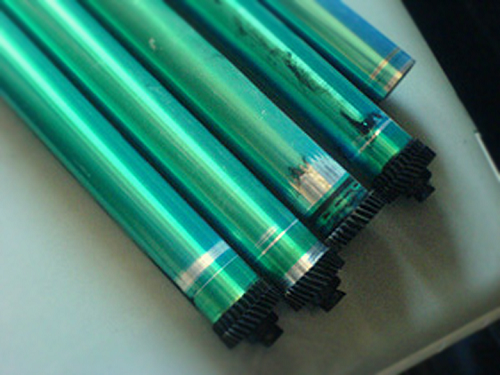
Drum damage
The photodrum is an aluminum shaft that has a special coating that is sensitive to optical radiation. Only the outer layer is sensitive to laser radiation, which over time becomes thinner and in some places erases.
Even if the wear is not visually determined, the thinning of the active layer still affects the print quality.. In this case, on the edges of the sheet black bars appear. As the active layer is worn on the drum, the strips will expand.
It should be noted that the consumption of toner in these places will be higher, since the thickness of its layer on the drum will be high.As a result, other parts of the cartridge or the printer itself, such as the thermal node, may fail.
Although there is a method for restoring the active layer on a photodrum, it is not quite effective. The best way out of this situation would be to replace the part with a new one.
Contact between the magnetic shaft and the photodrum
If a sheet comes out of the printer that has horizontal stripeslocated at the same distance relative to each other, this is a sign of poor contact between the photodrum and the magnetic shaft.
There is such a nuisance when the toner wakes up or the waste bin is full. This defect may also occur. after unqualified refilling of the cartridge or shaft wear, squeegee, photodrum. The problem is solved by replacing the failed nodes or high-quality refill cartridge.
Out of toner
The fact that the cartridge has run out of toner can be understood if a sheet appears white stripeshaving different widths.
What should I do if the toner has run out? The answer is obvious: replace or refill the cartridge.
Damage to the magnetic shaft
The main purpose of the magnetic shaft is to transfer the toner to the drum unit. Since the toner has abrasive particles, it is because of them that the magnetic shaft deteriorates.
If the magnetic shaft is damaged, the following print defects become noticeable:
- white voids appear on the sheet;
- there are gray blots evenly spaced on the paper;
- pale print;
- uneven image fill.
Also with damaged magnetic shaft may appear horizontal wavy stripes.
This problem is solved only by replacing the shaft.
Cartridge leakage
The fact that the leakage of the cartridge is violated, indicate vertical stripes arranged chaotically, and each time in a new place.
You want to remove the cartridge from the device and check if toner is spilling out of it. If this is the case, then this element should be checked for mechanical damage, whether the sealing rubber bands that prevent the toner from falling out are well inserted. At detection of cracks and other irreparable damages, replacement of a cartridge is required.
Waste bin is full
The cartridge has a doctor blade that removes unused toner. The latter is disposed of in a special container called a waste bin.This compartment is usually cleared when replacing the cartridge. If the bunker is not cleaned, then it overflows with toner, which will be poured out. The following figure shows what effect is caused by the overflow of the waste compartment.
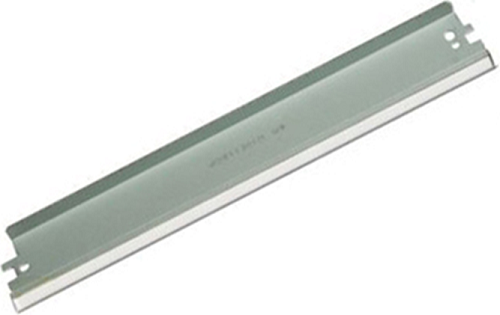
By the way, such a black stripe appears if the squeegee (blade, cleaning drum) is worn, deformed, or a foreign object has hit it, for example, a clip.
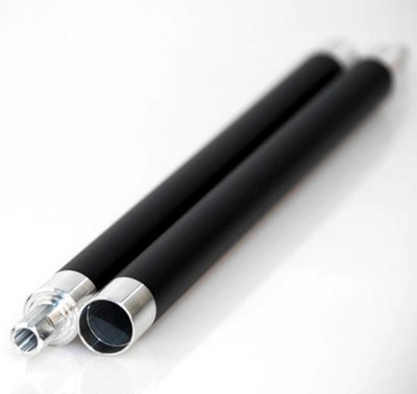
Raquel looks like the one below.
To get rid of a print defect, you will need to clean the waste bin or replace the blade.
/rating_off.png)


