Adjustment and repair of the spray gun for various faults
For uniform spraying of various paints and varnishes (LKM), primers, liquid putties, protective compounds and impregnations are used painting devices, called spray guns. This equipment may differ from each other not only by the device, but also by the principle of operation affecting the quality of the applied coating.
Content
The device and the principle of operation of the spray gun
Most often, both in the household and in the professional sphere, electric and pneumatic paint sprayers with different cistern arrangements are used. Also, these devices may have a pressure gauge embedded in the handle or connected to it.
Electric paint sprayer
The electric spray gun consists of a plastic or aluminum body in which the following elements are placed (see figure below).
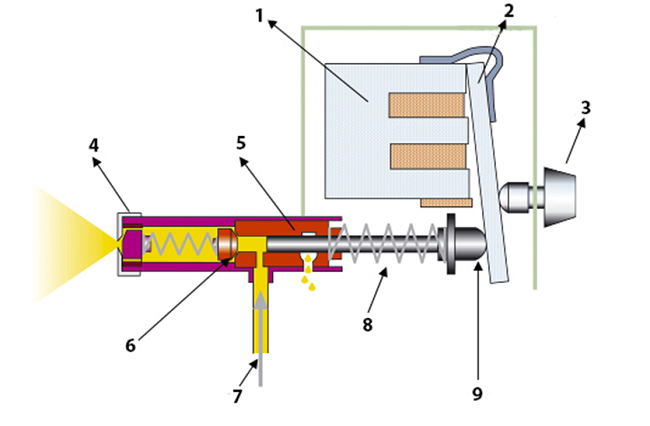
- Electromagnet. Works in a pulsed mode, attracting the bar.
- Oscillating strap. It is attracted by a magnet and pushes the piston forward.
- Paint control knob. Limits the mobility of oscillating strips.
- Nozzle. Sprays paint or varnish or other formulations.
- Cylinder. It is a pump casing in which the piston moves.
- Valve. Opens and closes the ink supply.
- Suction tube. Designed for the absorption of paint. At the end of the tube can be installed filter.
- Piston spring. After moving the piston forward, it returns (together with the bar) to its original position.
- Piston. Sucks and pushes paintwork from the spray gun.
Also, the device has a power button, a fitting for connecting the tank.
Spray gun works according to the following principle. After pressing the start button, the electromagnet (1) receives current in short pulses. The electromagnet at the same time attracts the bar (2), then releases it. The range of movement of the bar, and accordingly the piston, is regulated by a screw (3). The bar, pushing the piston rod (9), sets it in motion. The reciprocating motion of the piston sucks paintwork from the tank and push the composition towards the valve (6). When the piston moves forward, the valve opens and passes paint to the nozzle (4), through which it is sprayed. When the piston moves in reverse, which is provided by the expanding spring (8), the valve closes and the paintwork material is sucked from the tank through the tube (7). Next, the process repeats.
Important! Electric spray models include models with a remote compressor. In this case, the device is slightly different spray gun, and the principle of operation of the spray gun is similar to the work of a pneumatic spray gun.

Pneumatic spray gun
The tool operates on compressed air from the compressor. Below is a diagram (in section), where you can see the design of the device.
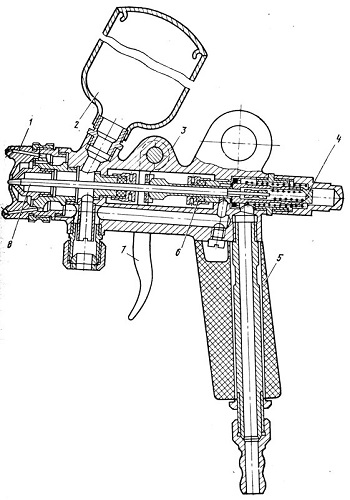
Pneumatic spray gun has in its design the following elements (see diagram above).
- Spray head together with a nozzle (nozzle). Nozzles in the spray gun and air cap are removable elements. They may have a different diameter of the outlet, which is selected in accordance with the viscosity of the composition intended for spraying.
- Paint tank. It is made of either plastic or metal, and can be installed both at the top of the tool and at the bottom.
- Spray gun body. It serves as the basis in which all the elements of the device are installed.
- Locking screw. Adjusts the intensity of ink supply by limiting or increasing the mobility of the locking needle. Some spray guns have an air regulator.
- Lever. Designed to conveniently hold the tool in your hand.
- Gasket Performs the role of a seal in the mechanism that moves the needle.
- Trigger trigger. It drives the locking needle.
- Stop needle. Opens or closes the nozzle opening.
The operation of pneumatic spray is as follows. With a slight pull on the trigger, the air valve opens, and air begins to flow through a separate channel into the air head. By further pressing the lever, the needle moves away, opening the nozzle through which the paint begins to flow. The paint, mixing with the air flow in the air head, is crushed into small particles, forming an aerosol torch.
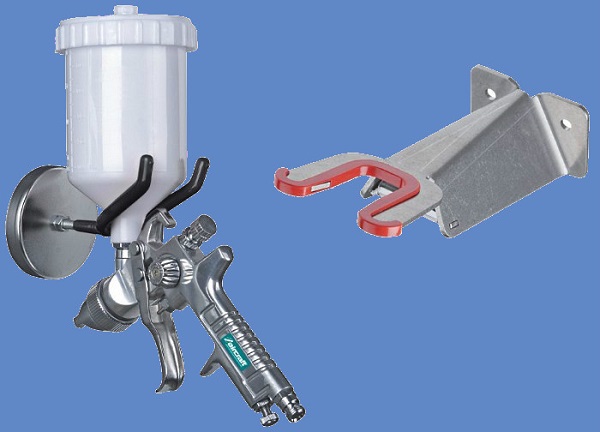
For convenient work with the spray gun use a special wall holder
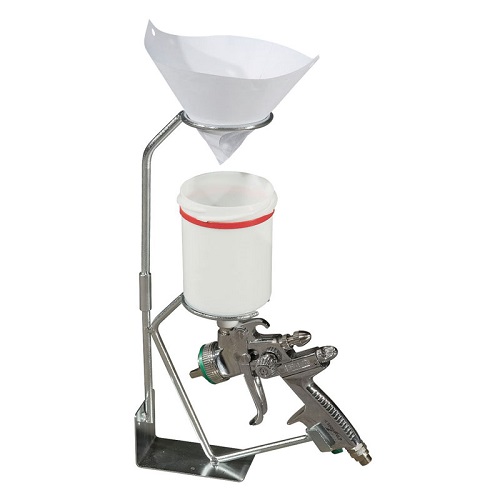
Also painters are widely used. spray standwhich you can easily do with your own hands.
The nuances of the design of paint sprayers with a different type of tank
Spray gun device with top tank, and also the principle of its work, was considered above. The only thing that needs to be clarified is the method of applying paint to the tool body. Since the paint tank is located in the upper part of the device, it flows to the stop needle in a natural way due to the force of gravity.
Spray gun device with bottom tank differs only in the location of the latter.Paint is taken from it due to the dilution created by the air flow inside the device. In the future, the operation of the spray gun does not differ from the operation of the device with the upper location of the container.
In addition, not so long ago appeared on the market of equipment for applying paintwork materials vacuum tanks. They are successfully used instead of the standard tanks spray guns. The vacuum tank is a rigid glass flask with a hole at the bottom, which is inserted into a soft glass with a lid. On the flask marked scale, which is convenient to determine the amount of paint.
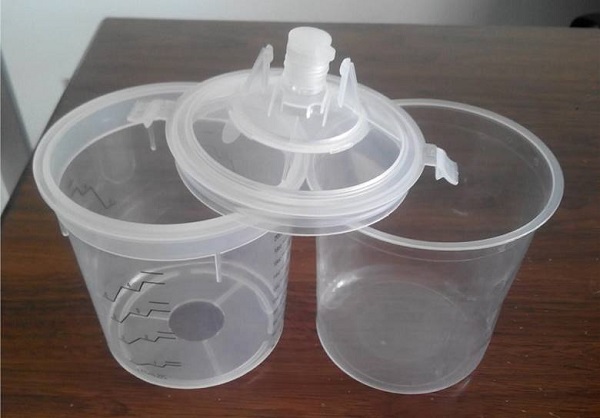
The advantage of vacuum tanks is that they allow the spray gun to work in any position. Regardless of how the device is turned, upside down by the tank or downward, the dye still enters the gun due to the vacuum in the soft glass. In this case, the glass is deformed, and the paint is squeezed out of it completely.
Adjusting the parameters of the gun before work
If you look at the body of the modern paint sprayer, you can see 2 or 3 adjustment screws. The first regulator can be located either on top or on the side of the case, as, for example, in SATA sprayers (seerice below). He is responsible for the shape and size of the aerosol torch.
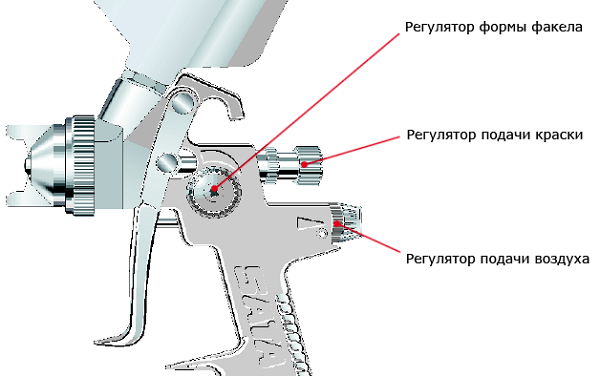
The second screw allows you to adjust the range of movement of the needle, which depends on the amount of paint applied to the nozzle. Some spray gun models have a third regulator. It can be used to regulate the flow of air into the instrument.
Setting the gun implies the correct setting of the balance of “material-air”. By adjusting the optimal ratio, you can achieve the ideal shape of the aerosol plume, which will contribute to uniform dispersion of the composition on the treated surface.
Pressure setting at the spray gun inlet
Important! The input pressure parameter is specified by the manufacturer in those. documentation for the device and is normalized.
The setting of the inlet pressure, ideally, should be done with a regulator, with a built-in pressure gauge, which is connected to the handle of the instrument. This is explained by the fact that pressure losses in the pipeline can reach 1 bar and higher. The longer the duct, and the more bends it has, the greater the pressure loss. Also, this parameter is influenced by the installed filters and dehumidifiers.
With regulator and pressure gauge
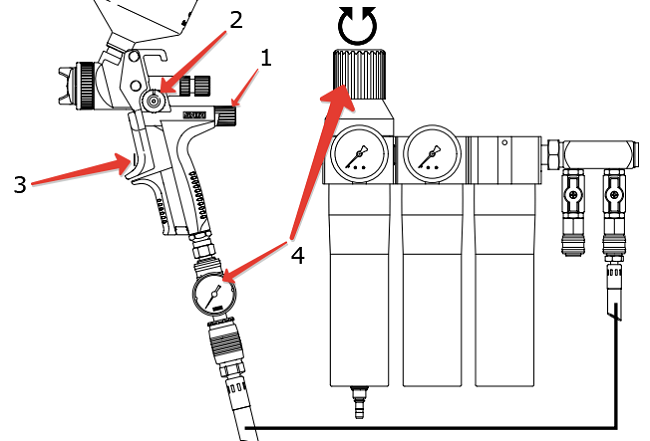
Adjusting the spray gun with the upper tank with the regulator and pressure gauge installed is not difficult:
- First, unscrew the adjusting screw (1) (see the figure below), which is responsible for the air supply, as far as possible;
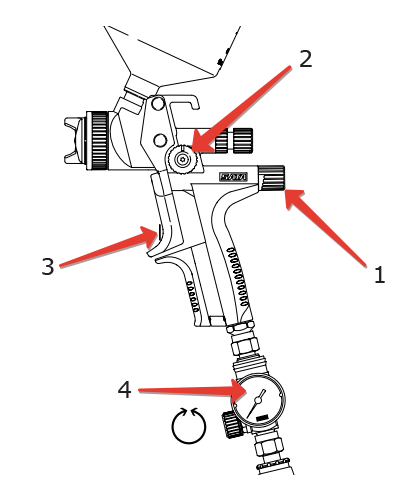
- further, the regulator of a form and the size of a torch (2) gets out;
- after unscrewing the screws, pull the trigger (3), after which the air supply will start;
- at the last stage, you need to set the value on the pressure gauge (4), which corresponds to the recommended one, by turning the pressure regulator.
With electronic gauge
Some “advanced” models of spray guns have an integrated electronic pressure gauge.
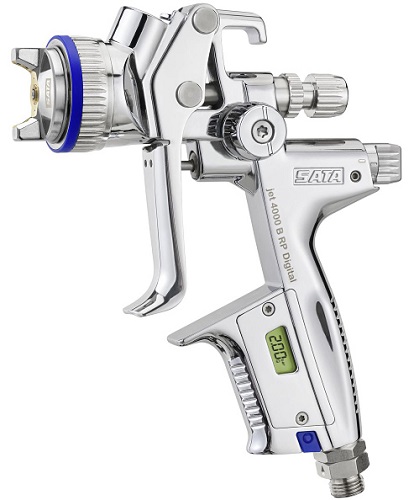
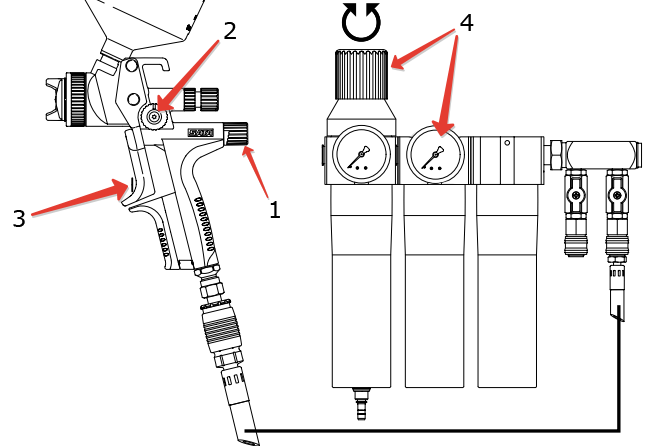
Adjusting the spray gun with an integrated electronic pressure gauge is even easier (see figure below).
- Maximum open the torch regulator.
- Pull the trigger.
- Following the gauge, turn the air regulator until the pressure at the inlet to the device reaches the recommended values.
With pressure gauge without regulator
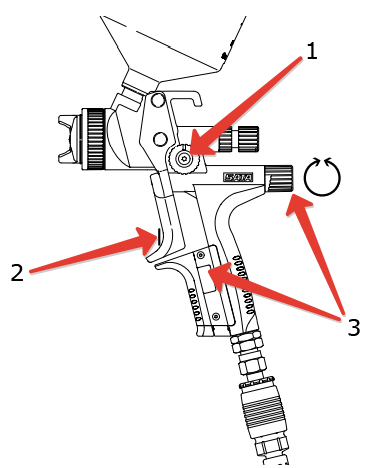
In the case when there is a pressure gauge without a regulator on the handle of the spray gun, then the spray gun can be correctly adjusted as follows (see the figure below).
- Unscrew the air regulator to the maximum.
- Unscrew the maximum torch regulator.
- Next, to ensure the flow of air into the gun, you should pull the trigger.
- Adjust the pressure using a reducer or filter group installed at the outlet of the compressor, referring to the pressure gauge.
Without gauge
If the spray gun is not equipped with a pressure gauge, then a rough, approximate adjustment of the instrument can be made. using compressor reducer, taking into account the pressure loss in the pipeline.
To adjust the spray gun for painting, if it does not have a measuring device, you can use the following method (see figure below).
- Open the air supply on the spray gun.
- Open the flap width adjuster.
- Pull the trigger to open the air supply.
- With the help of a gearbox located at the outlet of the compressor, pressure should be set taking into account its losses in the line. That is, the pressure gauge should be 0.6 bar higher than the recommended pressure, provided that a 10 m long hose with an inner diameter of 9 mm is connected to the instrument. For a more accurate calculation should take into account the presence of filters installed between the spray gun and the compressor.
If the spray gun from an unknown manufacturer
Sometimes there are situations when there is no instruction for the device, or it is impossible to determine its manufacturer in order to find out what pressure is needed for the spray gun. Find out the input pressure required for such an unknown tool, you can only empirically.
- First of all, you should pick up Standard viscosity paint and pour it into the tank.
- Further, it is required to unscrew all the regulators on the instrument and “experiment” with pressure using the adjustment screw on the pressure gauge. It is required to achieve such a value at which a uniform imprint of the torch will appear on the painted surface. In this case, the tool should be kept at a distance of 15 cm from the surface,prepared for the test.
- When you achieve the desired result, record the value of the input pressure. This will be the working pressure for this device.
Important! You should know that the majority of cheap, unknown origin spray guns, for normal operation require increased air flow, more than 200 l min. Accordingly, not every compressor will be able to provide such a tool with the necessary amount of compressed air, which will affect the result of staining.
Paint Spray Size
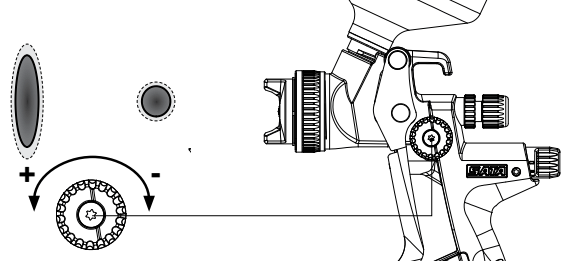
It is no secret that the effectiveness of coating with a spray gun depends largely on the condition of the torch. The larger its size, and the higher the density of the aerosol, the more uniform the coating is applied to the surface with a small number of passes. But in some cases it is required to install a small torch size, for example, if it is required to apply coating on small parts or make painting in hard-to-reach places.
The size of the torch is simply adjustable: turning the screw in the direction of the “+” sign, the width of the torch increases, and, conversely, when the regulator moves in the direction of the “-” sign, the spray area decreases.
Paint supply
When carrying out standard repairs, applying various coatings and painting bodies, it is recommended to open the material feed regulator completely. Usually this 3-4 turns of the adjusting screw. In this case, the nozzle must completely come off after pressing the trigger.
Nozzle size
An important role in setting the spray gun is the diameter of the nozzle. It is selected under the density of the composition that will be used for spraying. Below is a table by which you can quickly determine what nozzle diameter is required for applying various coatings.

The main malfunction of the spray gun
Despite the simple design, the spray gun is still prone to breakage. Frequent malfunctions of the spray gun can be counted on the fingers.
The gun does not paint
This happens in the following situations.
- The air pressure in the system is extremely low. To eliminate the problem, adjust the compressor.
- The ink supply is disrupted due to clogged needles and nozzles. It is necessary to disassemble the spray gun and clean the listed elements.
- Damaged needle or nozzle. Replacement parts required.
Kraskoraspylitel spits
The reason that the spray gun spits can be a few faults.
- Air head is loose. It is required to fasten the part well.
- Paint viscosity does not match air pressure. An acceptable pressure-viscosity ratio needs to be achieved.
- The paint is too thick. It is necessary to prepare a paint of lesser thickness.
- Breather clogged on the tank with the dye. It is necessary to remove the plug and clean the hole in it.
- The pressure in the receiver fell below normal. It is required in the settings of the compressor to set the lower pressure threshold corresponding to the performance characteristics of the spray gun.
The torch is shifted to the side
If the torch of sprayed paint is shifted away from the gun, then the reasons for this may be the following.
- Clogged side holes in the air cap. It is required to remove the head and clean it.
- Damage to the side holes of the air cap. Replace damaged parts.
Asymmetry of the flare spot
In this case, the problem may be caused by the following malfunctions.
- Nozzle cloggingRepair of the spray gun in this case consists in removing the nozzle and cleaning its holes.
- Damage to the nozzle. Part replacement required.
- The clogging of the air cap, namely, its central hole. Remove the air cap, rinse and clean it.
- Damage to the central hole of the air cap. This part requires replacement.
/rating_off.png)


