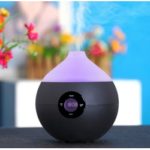
Making a humidifier with your own hands
The ingenuity of craft lovers truly knows no boundaries. For example, many people prefer to make various simple appliances for the home, while spending a minimum of money and effort. In this article we will explain how to assemble a household air humidifier from scrap materials with your own hands and give detailed action diagrams for each described method.
Content
We understand the principle of the device
Before you start assembling a homemade unit, we advise you to understand the algorithm of its work. As a rule, the humidifier functions according to the following principle: water is poured into the reservoir, and then it evaporates. Due to the formed steam, the air in the room becomes more humid. Some housewives apply this rule in everyday life: they pour water into a basin, put a cloth or a towel on top and thus increase the humidity in the room. True, this method is not very effective, and increases the level of humidity only in the immediate vicinity of the pelvis.
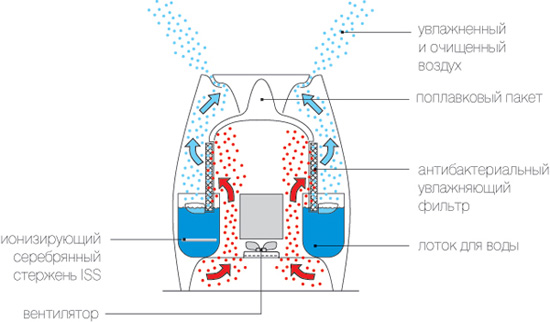
Scheme of operation of the humidifier
Of course, modern devices work much harder, and this should be considered before creating your own humidifier. Traditional humidifiers act on a cold pairusing the built-in fan and filter cartridges. Steam models are similar in principle Electric kettle: their main mechanism is the internal heating element, or heating element. And finally, ultrasound devices are based on the operation of a piezoceramic membrane, which by means of alternating current converts water into tiny particles. water mist, which subsequently enters the room.
Based on this simple knowledge, you should imagine what kind of device you want to receive.We will highlight some of the most popular and understandable methods of manufacturing, as a humidifier and air cleaner.
Bottle humidifier
Yes, exactly like this: the simplest humidifier can be built from an ordinary plastic bottle! This device gives cold evaporation effect.
We will need:
- 10 l plastic bottle;
- stationary cooler;
- Scotch tape or electrical tape.

Next you need to follow the prompts instructions:
- Trim the neck of the bottle so that you can easily insert a computer cooler into the hole. Pour water into existing tank.
- Immerse the cooler in this hole and secure it with tape. It is also possible to cut out fasteners from cardboard or a piece of thick paper. For the second option, it is enough to make a slot that is inferior in size to the very body of the cooler and attach it to the bottle, additionally wrapping it with tape.
- Turn on the cooler in the power supply. As a result, the air in the room will receive enhanced moisture.
Of claydite and buckets
For the development of this device, we need claydite. This material is able to absorb moisture well and, accordingly, excrete it.
Here is a list of items that we need:
- 4 waste baskets: 2 small in size and 2 larger;
- 10-12 l bucket;
- aquarium pump;
- cooler for the computer;
- construction dryer with a high heating temperature;
- plastic ties.
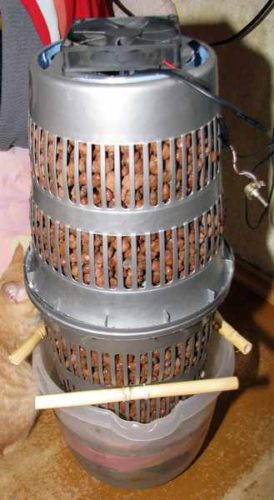
Instructions for creating a humidifier looks like this:
- We attach two medium-sized dustbins to each other along the edges of the rims. This can be done using a household dryer or ordinary plastic ties. This forms the body of the future humidifier.
- In the same way, we connect larger baskets, having placed the body folded from smaller baskets in advance. It turns out a two-layer design, the principle of operation resembles a thermos or heater.
- Cut off the bottom of the basket, which is located on top. In some cases, it is sufficient to simply make a hole large enough to fill the clay. Keep in mind that the expanded clay should be so large that it could not seep through the holes in the trash cans.
- We place the aquarium pump on the bottom of the previously prepared bucket. We direct the tubes from the pump to the uppermost part of the improvised body from the mesh baskets.As a “cover” of the structure, we install a plastic ring with holes. From here, the moisture will flow downwards, passing through the claydite into the bucket.
- Finally, it remains to install a computer cooler at the top of this complex unit. His task is to direct the air into the grids of claydite, saturated with moisture.
- The final stage is also related to the work of the cooler: it will inject the moisture-saturated air through the holes of the dustbins.
We advise you to choose high-quality expanded clay before starting work, because it is up to it that the device functions.
As can be seen from the above instructions, a homemade humidifier is a very real and feasible task.
From fan
Is it possible and how to make a humidifier with your own hands, if you only have a floor fan from the suitable materials available? Attach a thick, damp cloth to the pipe (or even a small pad moistened with water). Suspend the structure to a height greater than the height of the floor fan. It can be a floor lamp, a stick stick, etc. Install the fan directly behind the fabric and turn it on.This method of moistening can not be called very effective, besides, you have to constantly make sure that the fabric or mat remains wet all the time.

By the way, on a similar principle works and incubator humidifiermade by hand. Amateur poultry farmers fit a moistened cloth or large sponge and create an air flow that enhances evaporation. Sometimes natural evaporation of water from previously prepared baths also turns out to be a completely effective method.
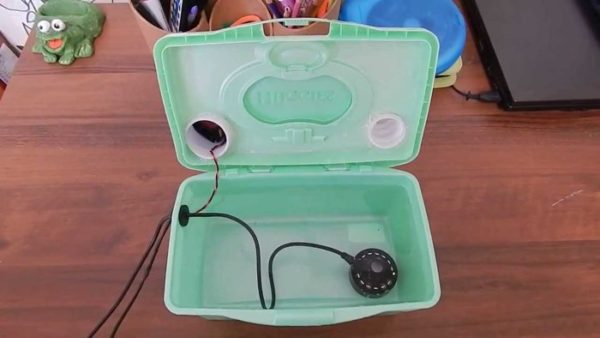
Antibacterial humidifier from a plastic container
If you set yourself the task of not only slightly moisten the air, but also hold it basic cleaningWe recommend using this method.
For the manufacture of the device you will need:
- Plastic container;
- low speed fan;
- filter with disinfectant (antibacterial) properties.
Note that the usual moisturizing sponge impregnated with an antibacterial agent can act as a filter.
Thanks to the pores, it can easily hold up animal hair, hair, large dust particles. Antibacterial impregnation, in turn, provides disinfection.
The following instruction will help you assemble a humidifier and an air purifier with your own hands:
- Take a plastic container (box) and make a cutout on the side. The cut-out height is about ½ of the height of the filter itself.
- Fasten the filter with plastic straps.
- Next, form a cutout in the lid of the container. The size of the cut depends on the size of the fan.
- Fasten the fan to the top of the tank.
- Fill the water inside the structure. The water level should not reach the place where the cut-out for the filter on the side of the box begins, otherwise leakage may occur.
- Turn on the fan.
- The filter must be periodically changed. If you notice that the sponge has darkened, you should probably replace it with a new one.
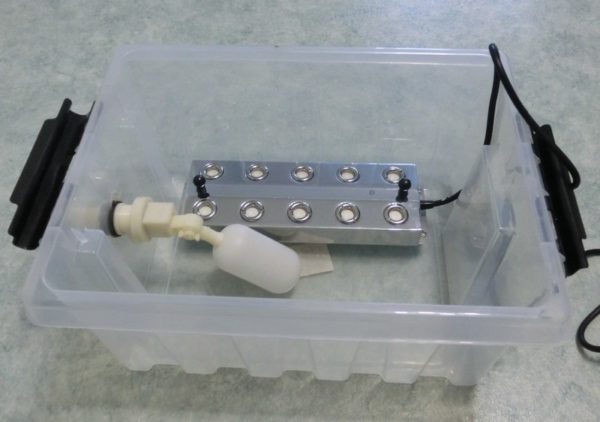
Ultrasonic humidifier
If you decide to make an ultrasonic humidifier with your own hands, then for this you will need to stock up on a few more special devices. So, you will need:
- ultrasonic steam generator (piezo element);
- computer cooler;
- plastic tank up to 10 liters;
- glass;
- Power Supply;
- any flexible pipe, preferably corrugated;
- stabilizer;
- a component of a bagel-shaped baby toy (pyramid);
- aluminum corner.
The final cost of all parts of the assembly will not exceed 1000 rubles, which is much more profitable compared to the "store" humidifier. So, let's start creating the structure:
- Drill punch holes in the lid of our plastic container. Observe the diameter of the holes obtained: the fastenings from the cooler-fan, the outlet flexible tube and the wires of the ultrasonic piezoceramic element-steam generator will be inserted in the future.
- Screw the fan to the tank and insert a corrugated pipe into the finished hole.
- The steam generator needs to stick on some kind of surface. To do this, we will make a platform floating in the container, on which we will install a steam generator. The platform can be constructed from a measuring plastic cup and a donut from a children's pyramid. Place the cup in a bagel, making a small hole in advance at the bottom of the cup. Attach a piece of thick fabric to the bottom with a rubber band - it will act as a filter.
- Install the UV converter into the glass.
- This device operates due to the impact of a direct current voltage of 24 V.For normal operation of the fan, 12 V is enough, so the power can be adjusted thanks to the stabilizer chip.
For this model of humidifier requires the constant availability of water in the tank. Also, make sure that the water is distilled, otherwise the device will quickly fail, scaling will appear.
Conclusion
Create a humidifier at home - not at all difficult, and sometimes very exciting. This will save a lot of money, as well as develop the skills of the novice master. And the final effect of the hand-made humidifiers is sometimes not inferior in quality to the factory models of famous manufacturers.
/rating_on.png)
/rating_off.png)