How to work the inverter
Welding equipment today is represented by many varieties. But the most popular among home craftsmen were inverter machines because of their compactness and versatility. The welding inverter is the equipment that allows the master to perform various kinds of welding work. But in order to conduct them qualitatively, it is not enough to have an expensive unit, you also need to learn how to use a welding machine.
Content
Installation and connection of the unit
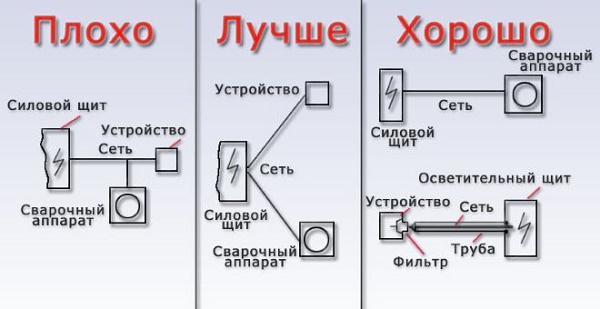
To effectively and safely use the inverter, first of all, it is necessary to properly prepare it for operation. This process is carried out in several stages. The first task is to install and connect the unit. Inverter installation must be carried out according to certain rules:
- the unit must be placed so that it is at a distance of at least 2 m from the walls or any objects;
- the device must be grounded;
- the welding site must be chosen so that it is far from flammable objects;
- It is recommended to cook either on a free platform or on a metal table.
It is possible to connect the inverter to a household network (220 V), and to the network, with a voltage of 380 V, which is usually used in production. If you intend to use the unit away from electrical networks, then it can be connected to the generator, diesel or gasoline.
Electrical connection
Connecting a welder to a household electrical outlet often causes problems. The cause of their occurrence may be old wiring or insufficient diameter of its wires. Typically, the wiring is designed for current up to 16 A.And since all turned on appliances in the house can exceed this value, for safety purposes automatic circuit breakers (circuit breakers) are installed. Therefore, when connecting, it is necessary to know the power of the welding machine so that it does not cause the automatic triggering.
Connect the inverter to the home network
You should also pay attention to network drawdown. If when you turn on the inverter, you notice a decrease in the voltage in the mains, then this indicates an insufficient cross-section of the wires. In this case, it is necessary to measure to what values the voltage drops. If it falls to values below the minimum with which the inverter can operate (specified in the instructions), then you cannot connect the device to such a network.
Use extension cord
The network cable connected to the inverter meets all power requirements and does not cause connection problems. But if its length is not enough, then you should choose an extension cord with a cross section of wire not less than 2.5 mm2 and no longer than 20 meters. It is enough such parameters of the extender that the inverter could work with current to 150 A.
It should be remembered that when you connect the machine to the network through carrying the rest of it, you should not keep it coiled up, because when you turn on the unit, it will turn into an inductance coil.As a result, the conductors will overheat and the extension cord will fail.
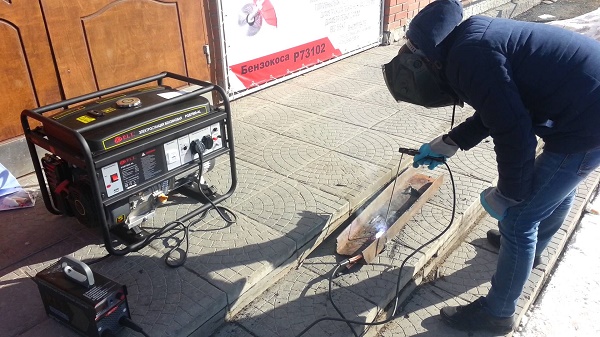
Connection to the generator
In cases when it is not possible to connect the device to the mains, it can be connected to a generator running on either gasoline or diesel fuel. The most widespread petrol power plants. But not all of them are suitable for connecting welding machines. In order for the inverter to work efficiently, the generator must have a power of at least 5 kilowatts and produce a stable output voltage. Overvoltages in voltage can damage the welder.
You should also consider with which electrode diameter you will work. For example, if the electrode has a diameter of 3 mm, then an operating current of about 120 A with an arc voltage of 40 V is required. If we calculate the power of the welding inverter (120 x 40 = 4800), we will get a value of 4.8 kW. Since this will be the power consumption, the power plant, capable of producing only 5 kW, will work at the limit of its capabilities, which will significantly reduce its service life. Therefore, the generator must be selected with some power margin, about 20-30% higher than that consumed by the inverter.
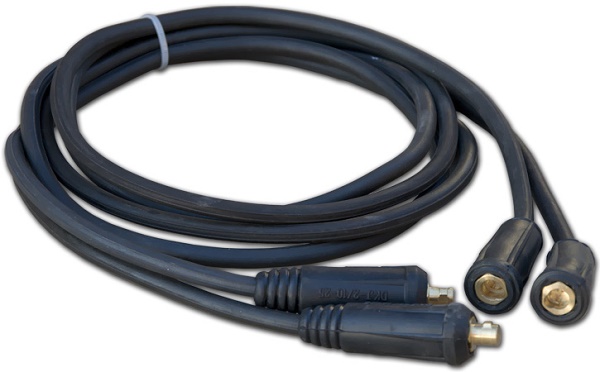
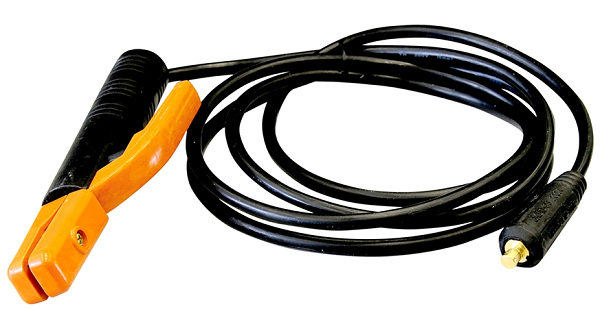
Connection of welding cables
On the front panel of the inverter there are 2 terminals, near which there is a marking in the form of “+” and “-” signs. Welding cables are connected to these terminals, one of which has a metal clip (clothespin) at the end, and the second - a holder for the electrode. Both cable can be connected to both terminals, depending on the welding method, which will be discussed further. After connecting the cables to the device, one of them, having a clothespin, is connected to the welding table or to the workpiece.
In some cases, the standard cable length may not be enough, for example, when working at height. In such situations, the question arises: is it possible to extend the welding cable? Professionals do not advise to do this, especially if it concerns an inverter unit. This fact can be explained by the fact that each cable has certain characteristics of resistance. Therefore, the “leakage” of voltage and current across its entire length is inevitable. Therefore, the longer the cable, the stronger voltage drops.
If you try to compensate for the loss of voltage and current by adding values on the panel of the unit, then this measure is likely to disable the inverter electronics.It turns out that it is easier to bring the device closer to the workplace of the welder than to spend a considerable amount to repair the unit after lengthening the cables.
Setup of the device
The quality of welding works depends on whether the welding inverter is correctly adjusted, especially with regard to the correct choice of electrodes. You should also consider:
- the depth of the weld;
- the location of the seam in space (vertical or horizontal);
- brand or type of metal being welded;
- metal thickness, etc.
You should know that for each type of metal are produced corresponding electrodes. Electrodes with a diameter of up to 5 mm can be used with inverters. But for each thickness of the equipment it is necessary to select the corresponding strength of the welding current. To properly set up the welding machine, you can use the table below.
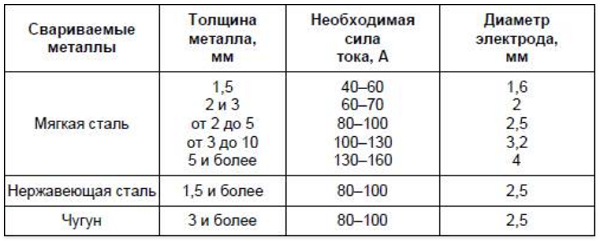
For example, if you have to use 5 mm thick mild steel with an inverter, you should pick a 3 mm electrode, and set an amperage of 100 A on the device. After test welding, you can correct the amperage, that is, reduce or increase.
Safety measures at work
The established safety rules can be said to be written by the “blood” of the victims, and therefore it is strictly prohibited to ignore them. The health and life of not only the welding equipment operator, but also the people around him depends on their observance. So, the following can be attributed to the safety rules.
- Before you start, you should check insulation integrity on all wires and cables connected to the machine. It is also necessary to check the serviceability of the equipment, namely, to ensure that the no-load voltage equals zero. In this case, the system should be operational, disconnecting the voltage on the electrode when the device is idle.
- Before connecting the equipment, check the electrical network under load (measure the subsidence range).
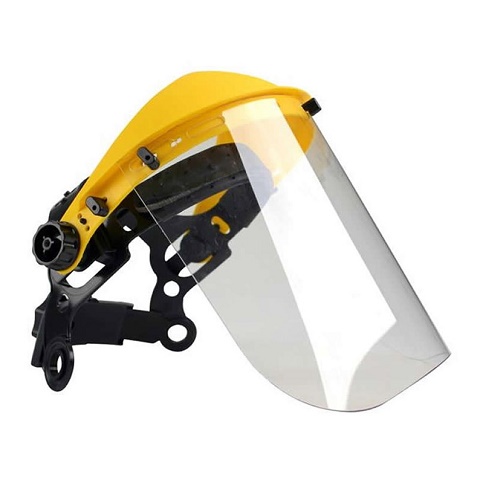
- To protect the retina of the eye from ultraviolet radiation that occurs when the welding arc is burning, it is necessary to apply protective mask (shield) or special glasses. Not so long ago, welding masks and glasses with “chameleon” glasses appeared on the market, which automatically darkened when bright radiation hit them. Glasses or a mask should be worn not only by the welder, but also by his assistant.
- If welding is carried out indoors, then to protect the respiratory organs and prevent poisoning by harmful gases respirators with replaceable cartridges or masksthrough which the purified air is forced.
- To protect hands from metal splashes use special gloves - Gaiters welder.

- To protect the body use overalls, jackets and pants made of refractory fabric.
- To protect the feet required to wear high boots, to prevent metal sparks from entering them. Boots should cover their top with pants.

- The workplace should be well lit.
- Under the feet of the welder should be rubber mat or wood flooringpreventing a person from electric shock.
- Around the workplace should not be any foreign objects through which you can stumble.
- Near the workplace should be sand and fire extinguisher for timely extinguishing the source of fire.
- Welding machine grounding is imperative.
If the safety rules have already been studied, then you can begin to become familiar with how to work properly electric welding.
Selection of polarity
It is no secret that the process of metal melting is due to the high temperature of the electric arc that occurs between the material being welded and the electrode. At the same time, a cable with a holder for an electrode and a ground cable (with a clothespin) are connected to different terminals of the device. In order to properly connect the cable, you need to understand when they are swapped.
When welding with an inverter or any other welding unit, the direct and reverse polarity of connecting the cables to the apparatus is used. Direct polarity It is accepted to call the connection when the cable with the electrode is connected to the minus, and the metal being welded is connected to the plus.
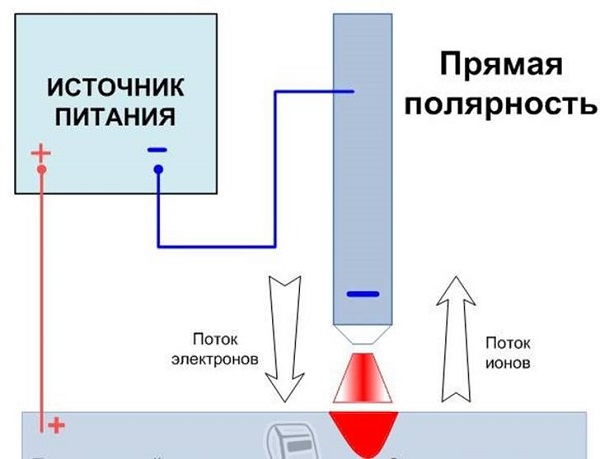
This method of connection allows the metal to warm up well, which is why the seam is deep and of high quality. The method of direct polarity is used when cooking thick metal products.
Reverse polarity involves connecting the electrode cable to the positive, and the ground cable to the minus.
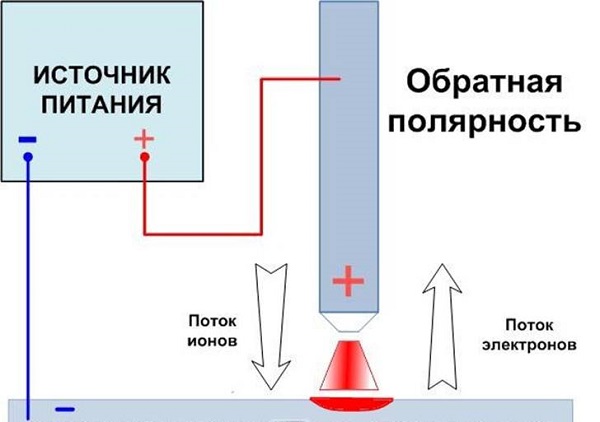
With such a connection, the metal gets less heated, and the seam teaches wider. Reverse polarity is usually used when boiling thin metal products in order to exclude burn-through parts.
Selection of welding current
The welding current is selected taking into account the thickness of the metal to be welded and the diameter of the additive. For ease of calculation, you can use the table that was given above in the section on setting up the unit. Also, when choosing the optimal current strength, you should remember the rule: the higher the current strength, the deeper the joint is obtained, and the faster the electrode can be moved. Therefore, it is necessary to achieve an ideal ratio of the speed of movement of the additive and the strength of the current so that the seam has the required bulge and depth sufficient for good welding of the edges of the parts.
Methods of working with different metals
Since the welding process is impossible without arc ignition, you should be aware that there are 2 methods to do this:
- you need to hit the metal several times with an electrode until the arc is ignited.
- you need an electrode, like a match, to strike several times on metal.
Each master selects the most convenient and suitable way to ignite the arc.But you need to strike sharply not anywhere, but along the line of the weld, so that no traces remain on the workpiece.
The place in which the metal is melted under the influence of an electric arc is called welding bath. To move it along the seam line, apply one of the methods shown in the following figure.
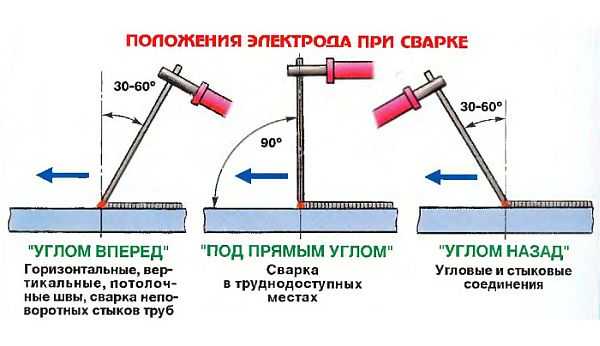
For normal bath movement, the electrode bends at an angle of 45-50 °. By tilting the additive at different angles, you can control the width of the bath. Each master selects the optimal angle of inclination to obtain a seam of acceptable quality.
The electrode can take a position back angle or forward angle. In order to obtain a wide seam, the inclination of the tooling angle is used forward, since this method produces less heat. This method boil thin metals. Thick metal can be cooked a corner back.
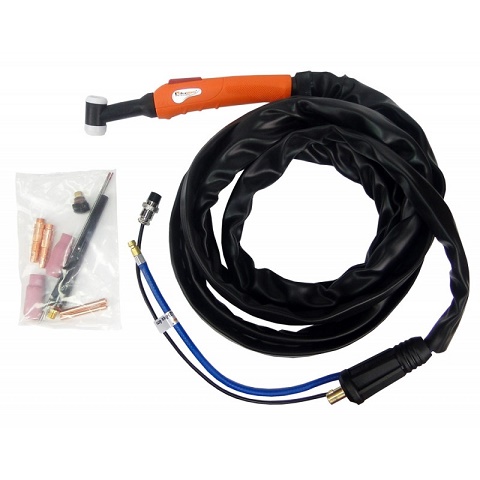
For welding non-ferrous metals will have connect argon burner to the welding inverter and use a non-consumable electrode (tungsten). Additive in this case are metal rods,which are placed on the seam line and melted by an electric arc. During the welding process the bath is blown with inert gas.
Inverter maintenance rules
Maintenance of the inverter type welding machine includes the following items.
- Visual inspection. It must be carried out each time before starting work and after it to detect possible damage to the insulation of welding cables and the power cord. Also, during external examination, it is checked that there are no damages to the housing and controls (you need to check the current regulator).
- Conducting internal cleaning of the unit. It is carried out after removing the casing from the apparatus to remove dust and accumulated dirt from all its nodes. Cleaning is performed using a directional compressed air flow to the dusty parts.
- Checking and stripping the device terminals. Periodically check the places to which the power cables are connected. If oxidation is detected at the terminals, it should be removed using fine sandpaper.
Also, avoid dropping water, water vapor and other liquids on the inverter welding machine that could penetrate the inside of the unit and cause short circuits.If any liquid has penetrated into the apparatus, then the cover should be removed from it and all moisture should be removed. Especially carefully dry the inverter's electronic board using a regular hairdryer.
/rating_off.png)


